- Tech, OC'ing, SEO and more
- Hits: 179757
Article Index
AMD Ryzen 5 1600 overclocking guide.
This guide will be an overclocking guide for AMD Ryzen 5 1600 with the setup listed below. Using a B350 chipset motherboard, I have another manual listed below for an X370 motherboard. Explaining the basics and will only list volts and numbers with basic settings setting up the VRM. I am assuming you have done this before I am writing this to supplement AMD Reddit and other AMD overclocking sources.
My Ryzen 5 1600X guide is located in the links below as well as a guide for the 8086k/8700k, Z390 and X370 motherboards and some upgrades included as well.
Ryzen 5 OC'ing the 1600X.
Intel i7 OC'íng the 8086K on Z390.
Streaming and/or recording using OBS NDI Tutorial.
My Rig.
- Case: Phanteks Enthoo Luxe.
- Motherboard: ASUS Prime B350-Plus.
- CPU: Ryzen 5 1600 Retail.
- RAM: Corsair DDR4 LPX White 16 GB 3000.
- GPU: MSI GTX 960 4GB.
- PSU: Sharkoon 600 Watt semi-modular.
- OZC Agility 3 256GB C Drive, WD Green/Blue 1TB storage drives.
- Cooling: CoolerMaster 212 EVO and AMD Wraith Spire.
- Case fans: 2 x 120mm and 1 x 140mm push fans, 1x 120mm and 3 x 140mm pull fans.
A medium-range setup, nothing fancy for a workstation but it works like a charm. This rig will run programs like Photoshop, some recording with Nvidia shadowplay, gaming, some web page editing, music, browsing etc. daily. While I could get away with not overclocking Ryzen shines when you push it and get the best results performance-wise.
Getting Started with the AMD Ryzen 5 1600.
Skipping the part of installing all the hardware in your case since that should be covered in the manuals. To ensure that you apply the RIGHT amount of thermal paste so that your CPU cooler will work as it supposes to. When booting up the first time make sure to go right into your BIOS and update the BIOS to the latest version, this will enhance stability from the get-go. Also, memory and other hardware support will be in the latest BIOS version if feeling brave use a Beta release BIOS but that might not be wise. The updating BIOS in the ASUS motherboards can be done inside the BIOS, in the worse case you need to use a flash drive. Boot up your system one time to see if you installed the components correctly and make a baseline performance test with Passmark or Cinebench. Restart and boot back into your BIOS, ensure that you have the latest drivers and updates for stability and support purposes!
You also want to download the following programs for stress testing your overclock. These are a vital tool for stress testing and monitoring if you already have tools you can use those but these programs I highly recommend and were used while writing this overclocking guide.
- HWiNFO64: https://www.hwinfo.com/download/
- Prime 95: https://www.mersenne.org/download/
BIOS Settings.
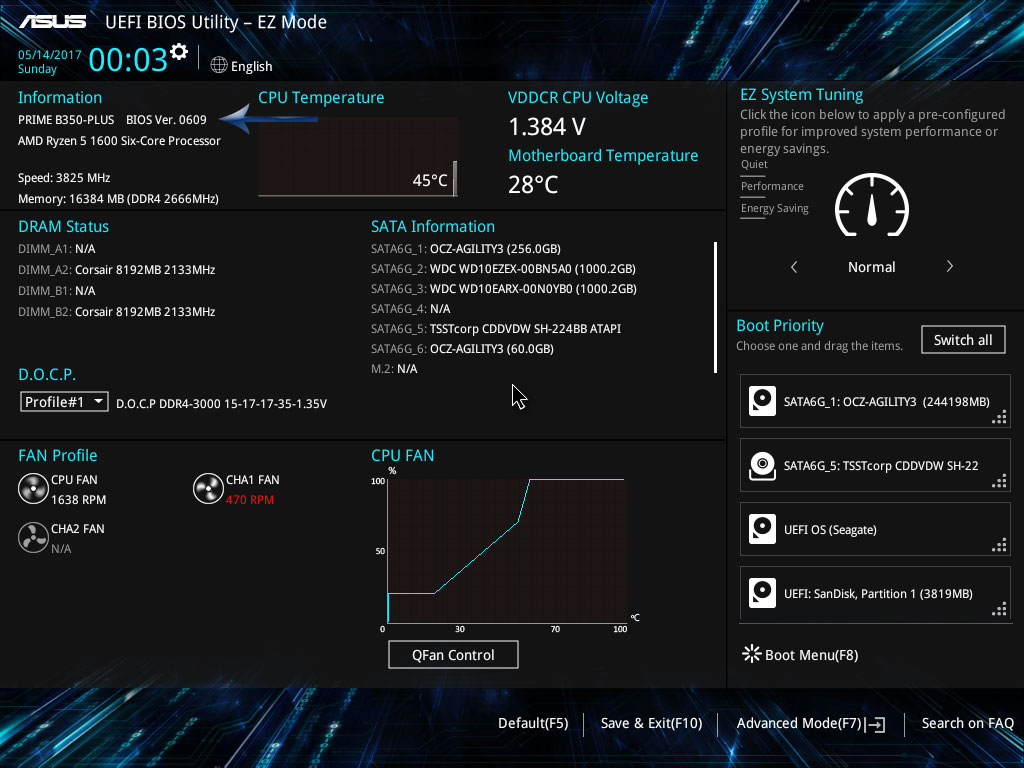
Make sure your RAM profile is set to 2133mhz, not DOCP/XMP/A-XMP max 3000/3200mhz and up, just the basic 2133mhz all DDR4 runs on. Set the optimal RAM clocks speed after achieving a stable CPU overclock since Ryzen still has some compatibility issues. What RAM MHz you can pick also has to do with the die quality of the components, Samsung allows for the best results anything else will be lower. You can check your die quality with THAIPHOON BURNER and see for yourself, manufacturers have a list, but this tool is far easier and quicker. 1st Gen Ryzen is notorious for being very picky with RAM selection ensure yours is at least QVL from the motherboard vendor. Samsung B-die is known for always working with 1st Gen Ryzen CPU's. Finding Samsung B-die kits follow the rule of thumb 3200mhz with C14 timings, or 3600mhz should always be Samsung B-die kit.
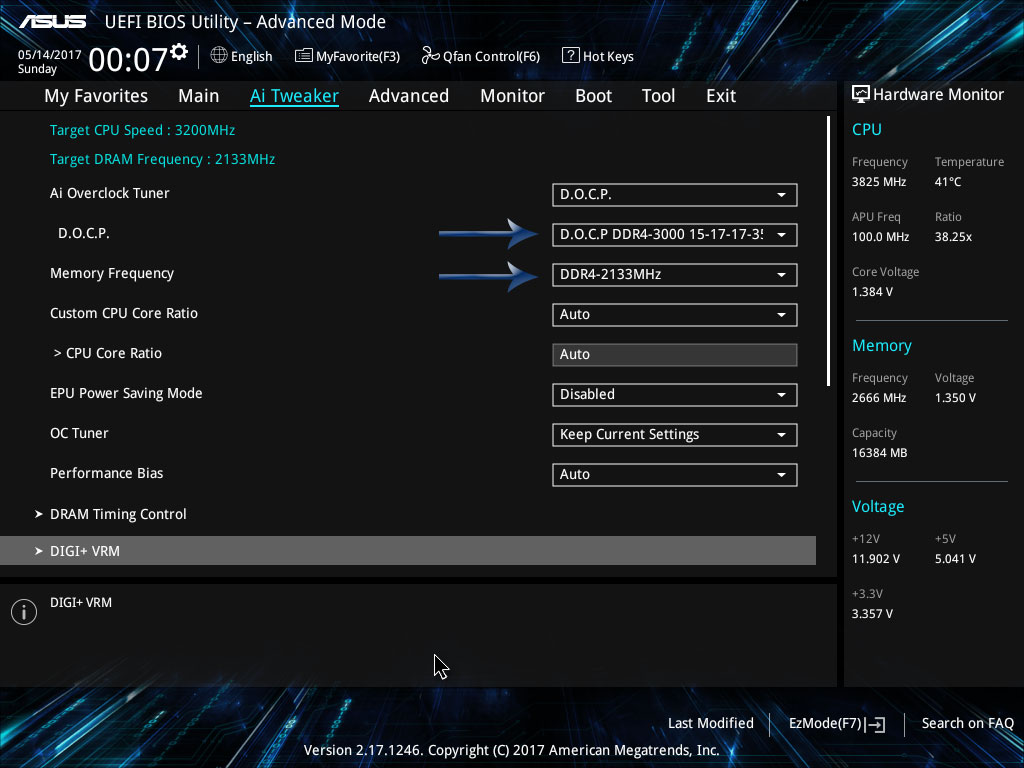
Now it is time to set the Ryzen 5 clock, in ASUS it is called CPU Core Ratio, MSI calls it CPU Frequency. Each chip Intel or AMD Ryzen will behave differently, the OC community phrase would be "silicone lottery", and it is winning or losing.
That said any Ryzen should be able to reach 3800mhz or I would recommend a refund and replacement with a better chip. They can go as high as 4000mhz or even higher, but that is winning the silicon lottery or being blessed with an engineering sample.
DIGI+ VRM Settings Ryzen 1600.
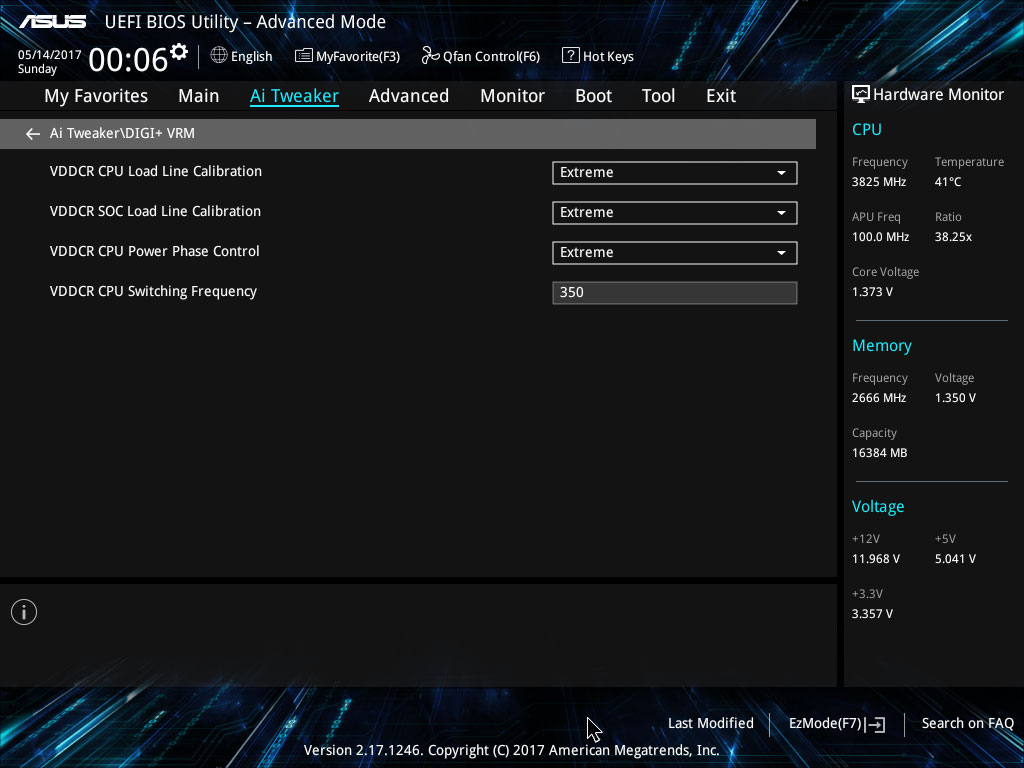
These settings help with achieving greater overclocks and stability of the overclocks, setting this in the BIOS over AI Suite is better since it might reset. Putting them to Extreme will only affect power consumption do make sure to select the VDDCR CPU Switching Frequency to 350 MHz and not higher. You can tinker with these settings once you have achieved a stable overclock, see if you can reduce power consumption, this is a starting point, not the end.
- VDDCR CPU Load Line Calibration: Set to Extreme or LLC 3 or equivalent.
- VDDCR SOC Load Line Calibration: Set to Extreme or LLC 3 or equivalent
- VDDCR CPU Power Phase Control: Extreme.
- VDDCR CPU Switching Frequency: Set to 350.
Some other BIOS options might be available to you as I have with my other guide using an X370 motherboard. VDDCR Current Capability should be set the highest possible option in your BIOS both for CPU and SOC.
AMD CBS.
Here you can find some critical settings, for now, leave everything on Auto but Disable Core Performance Boost and Global C-state Control, this will hamper stable overclocking if left on. Core Performance Boost to put it is the boost function of your CPU within set guidelines from AMD to increase core clocks and VDDCR CPU voltage. Global C-state Control does the opposite and will lower core clocks and VDDCR CPU voltage when the CPU idles. This could be left on, but with higher a overclock, I found this resulted in instabilities.
- Core Performance Boost: Disable.
- Global C-state Control: Disable.
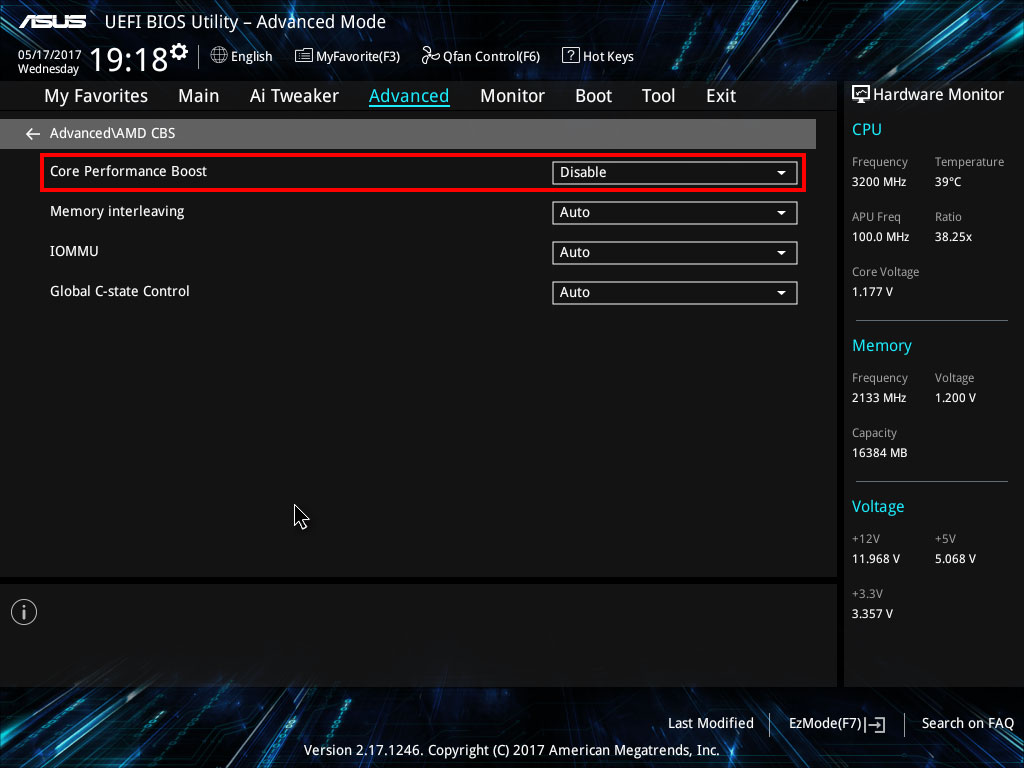
AMD Ryzen 1600 CPU Core Volts.
There are several volt ranges you need to consider, for those who are new to overclocking Voltage and CPU core ratio/frequency will attribute to your overclock. The ratio of your clock should be seen as x multiplied by 100, mostly 99.9 and 99.8 what then translates into overclock speed; higher ratios need more volts. The Voltage will result in more or less heat being produced there for you need cooling, the Voltage can be different per chip due to the silicone lottery. Lower volts is always better but is not always possible, and will set a limit on how far you can overclock combined with the CPU core ratio/frequency.
- AMD Recommended Voltage: 1.350 and 1.375 volts.
- Community Recommended Voltage: 1.400 and 1,450 volts.
- Absolute max and not recommended: 1.500 and 1550 volts.
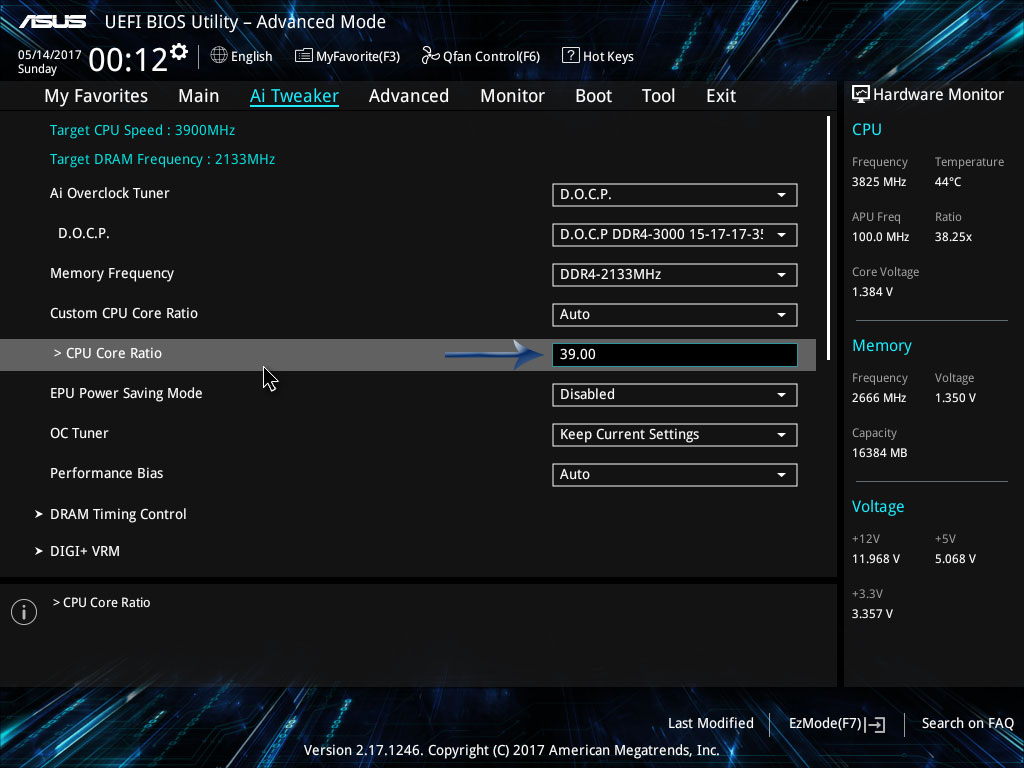
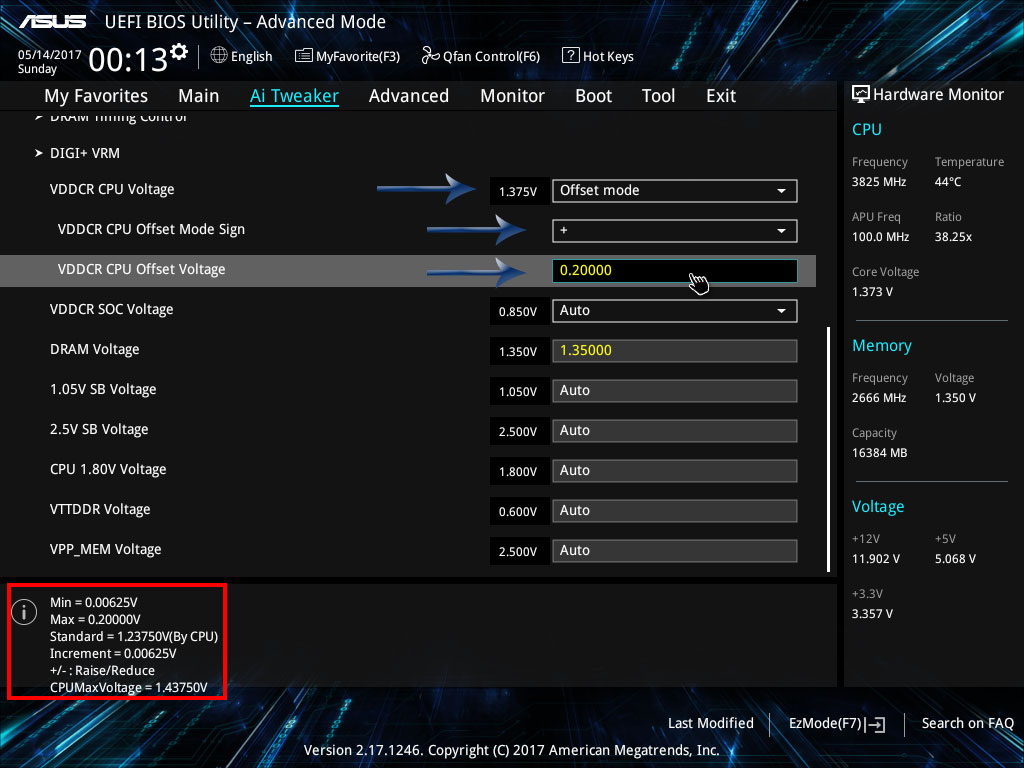
Here we start with an overclock speed of 3800 MHz, set CPU Core Ratio to 38.00, disable EPU Power Saving mode and OC Tuner. Now it is time to adjust the CPU voltage, VDDCR CPU Voltage in this BIOS also to note this offers an offset and not a manual mode. Set the CPU Voltage to Offset Mode, Offset Mode Sign to + and Offset Voltage to 0.13750. Exit the BIOS and save these settings, you can also opt to save as a profile under the Tool section of this BIOS and reboot. If you want to use Manual mode, you can directly dial in the VDDCR CPU Voltage. Ensure the Voltage does NOT exceed 1.400 VDDCR CPU Voltage. Going higher than 1.400 CPU voltage will require a better cooling solution like a Noctua Dual 120mm or 140mm tower cooler or a 240 or 360 AIO. Now save these settings and exit the BIOS and run a quick stress test with Prime95 with small FFT's. If this remains stable boot back into the BIOS and dial in 38.50 or 39.00 and keep the VDDCR CPU Voltage and repeat the process. If this fails to pass the stress test, then increase the CPU voltage. For Offset Mode 0.2000 and Manual Mode dial in 1.400 save these settings and run another stress test in Prime95 with Small FFT's. Pass or fail you can move the CPU clock speed 500mhz up or down and adjust the Voltage where needed. Most 1600 none X or 1600X will cap out around 3.9Ghz with the best CPU's able to reach 4.0Ghz. This with a voltage of 1.400 or higher but keep an eye on temperatures and stability.
- 3.9Ghz with 1.375 CPU Voltage.
- 4.0Ghz with 1.400 or more CPU Voltage.
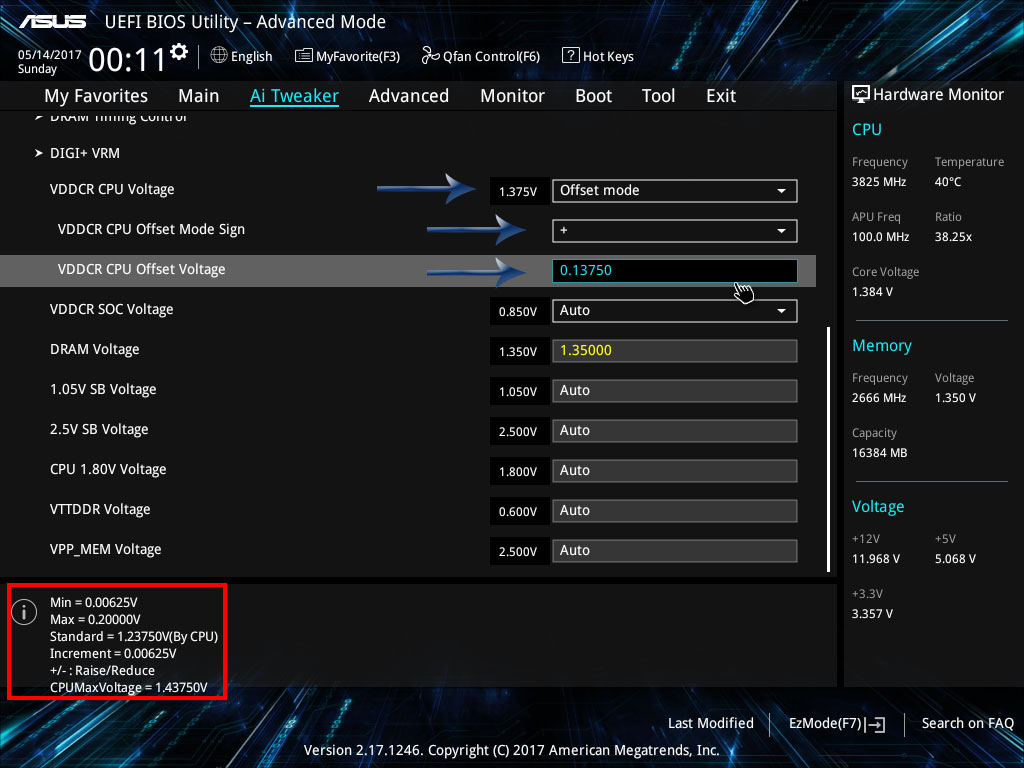
Stability and Tweaks.
Unless the silicone lottery hates you, it should reboot, and now you use Cinebench and Prime to run a quick stability test. If your settings are stable and they should be you can try to lower the CPU Offset Voltage to lower your temperatures.
As shown in the picture, the increments are 0.00625 volts use that to lower the CPU Voltage while remaining stable in Prime95/Cinebench. Make sure to keep an eye on those temperatures for that I would recommend HWMonitor, no individual core temperature programs are updated yet. You can also set your XMP/A-XMP/DOCP profile above the basic 2133 MHz; I was not blessed with a Samsung B-die so mine, for now, is set at 2666 MHz.
Here is my CPU-Z validation link for my 38.25: https://valid.x86.fr/z9ia69
My Absolute Max, 3900 MHz.
I spend days reading up on Ryzen and the overclocking potential I have not touched my DDR4 RAM yet, waiting for some BIOS update. Temperatures even with the stock cooler are acceptable, but the core voltage is above the AMD recommended value. Therefore I opted to go back to my 38.25 clocks what yielded me to best results, with BIOS updates I hope this will become more viable.
The new AMD Ryzen CPU chip is impressive especially considering the price, with a good overclock you can take on CPU's double in price. Happy I took the plunge and invested in a Ryzen 5 chip with my upgrade, Intel better steps up its game because this is stiff competition. With that, I conclude my small guide; I hope this has helped the readers and saved them some time.
- Paul Ripmeester


