- Tech, OC'ing, SEO and more
- Hits: 59278
Article Index
OBS and NDI streaming and recording tutorial.
This will be a quick run down to record and stream without the need for a capture card. Streaming directly from your gaming rig without a capture card will result in performance loss in a game. While initially, I was looking to buy a capture card the end result was disappointing. My main monitor is a 1440p 165hz refresh rate and the capture card locks the refresh rate to 60hz and the Duplicate Desktop option also generates problems on its own. And you still have to run software from your main pc besides this requires resources it also means capturing in-game means you can not alt-tab as it will cut the feed and displays your captured desktop. However, I went back to the web trying to find some way I can capture footage and have more freedom doing so. Here is where I stumbled upon NDI for OBS it removes all restrictions I have with a capture card and allows for much better fine-tuning of your whatever you want to capture.
Pros:
- No capture card needed.
- No performance impact on your main/gaming rig.
- Recording and streaming in high quality at the same time.
- Capture any resolution size and increase or decrease the resolution size.
- No refresh rate cap on the main/gaming rig.
Cons:
- Requires a 2nd PC.
- Takes up LAN bandwidth.
Getting Started with OBS and NDI.
You will need a 2nd PC, this can be any PC or laptop the better, of course, will result in better footage as well as being able to stream and record at the same time if you are a content creator as well. You can start out with a very cheap 2nd hand pc with cheap mice and keyboard as well as a screen. you can use 1 screen but this would mean you will have to change feeds what is suboptimal and you would have to set everything up before starting a stream and or recording. however, you would only need an iGPU or basic GPU since you will not use that hardware to capture any feed from your gaming rig. In terms of RAM, you will need 8GB however you will be needing a strong CPU since all encoding is done with the CPU. In short, the more cores and the higher the frequency the better, starting with a Ryzen CPU or older gen Intel CPU would yield the best results.
For future reference, I will list my NAS/Capture rig specs, nothing special about it I am using parts from my older gaming rig I recently upgraded.
- CPU: Ryzen 5 1600X overclocked to 3.9Ghz.
- RAM: DDR4 Corsair 16GB 3200Mhz.
- GPU: ASUS RX 570 4GB(no iGPU on Ryzen).
- Mobo: ASUS X370 Gaming-F.
- Storage: M.2 C Drive, SSD Gaming drive, Striped RAID Array.
The Raid array is for storing the footage, you do not need any M.2 or SSD for a Capture rig I just had these drives on hand. Another important note for those who overlock either of their rigs ensures your fan curve is set to create a minimal amount of noise. Having a beefy CPU cooler with a higher TDP will help greatly reducing noise while maintaining cooler CPU load temperatures. I am a fan of the Gelid Phantom Black overkill for a NAS/Capture rig but it barely makes any noise so a perfect solution for a modest price(35 Euro). While running a Corsair 150i Pro 360 radiator with push/pull on my 8086k @ 5.2Ghz, delidded and liquid metal applied and resealed.
Besides the obvious OBS installation on both PC's or Laptops, you will need the NDI plugin the installation file can be found here: OBS NDI You will need to install this on both systems and reboot. Your gaming rig will transfer the captured feed over your LAN or Wifi so ensure those can handle the increased traffic. I am recommending you are at least on a 1GB LAN using Cat5e cables, a 10GB network is better but a lot more expensive. Wifi is not stable enough in most cases I would recommend against using that but it can work at the cost of performance of the captured feed by saturation of the wifi signal. Using a 100MB/s network is possible I have seen my traffic go up to 25mb/s with just the capture feed, it will restrict your internet performance. Important to remember here is that you will send from your gaming rig to your capture rig a feed over LAN of x amount of MB/s and that both rigs will also communicate with the internet taking up x amount of MB/s for streaming and gaming.
But in most cases routers have 1GB switches so unless your network is really old I would not be worried but it is certainly wise to check your router specs and double-check the network cables you use an upgrade if needed.
OBS: https://obsproject.com/
Streamlabs: https://streamlabs.com/
OBS NDI: https://obsproject.com/forum/resources/obs-ndi-newtek-ndi%E2%84%A2-integration-into-obs-studio.528/
Setting up your NDI Feed.
You will capture from your gaming rig, voice chat will happen from the Gaming Rig so you will need to setup OBS or Streamlabs to your taste. All OBS or Streamlabs will do it generate a feed and send it to through your LAN to your Capture Rig. Besides your own preferred setup, you will need to set up the NDI plugin. Any extra you might have like overlays, widgets, and alerts can be done from either rig, but I would suggest using the Capture rig so you never have to alt-tab and use the mice/keyboard or even streaming deck(s) from your capture rig. It allows you to work on your stream without the viewer ever knowing as well as any smooth recording session as a result.
In OBS go to Tools then select NDI Output Settings, tick both boxes on Main Output and Preview Output and give them a name.
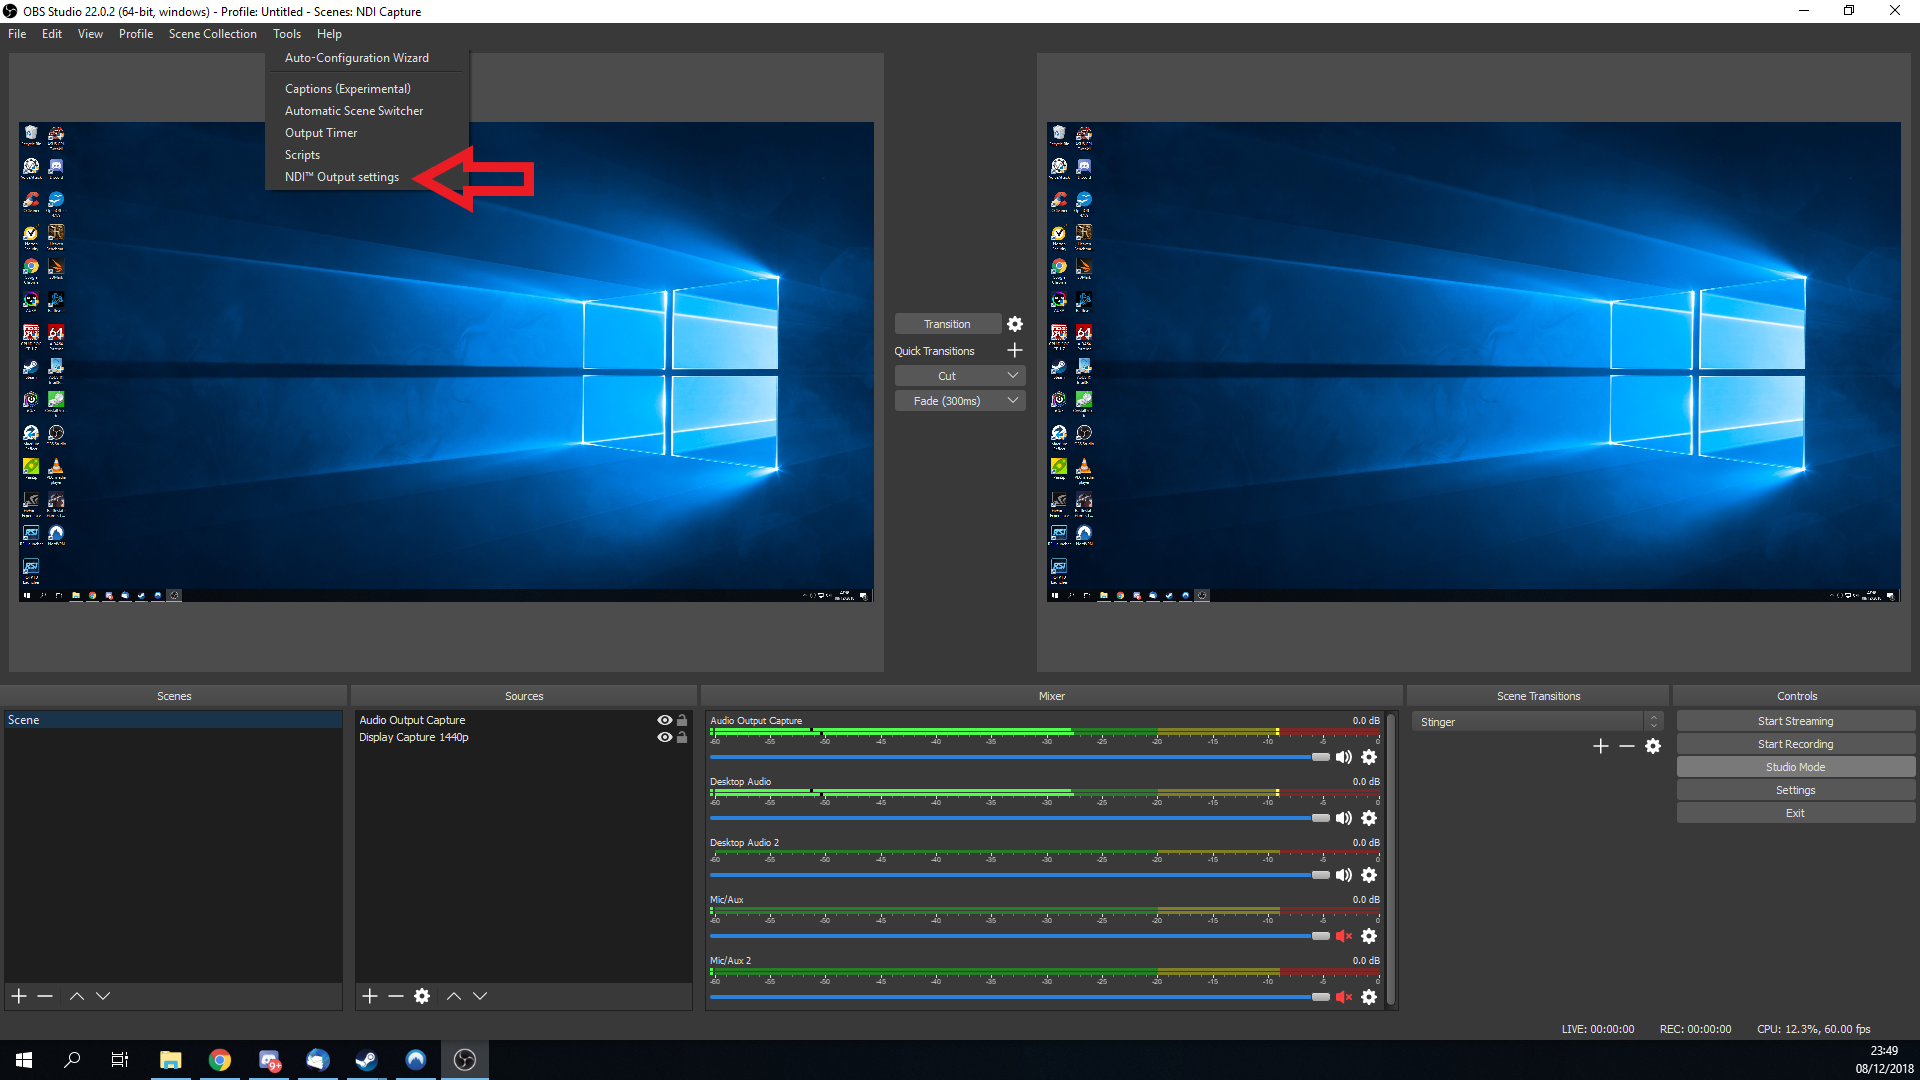
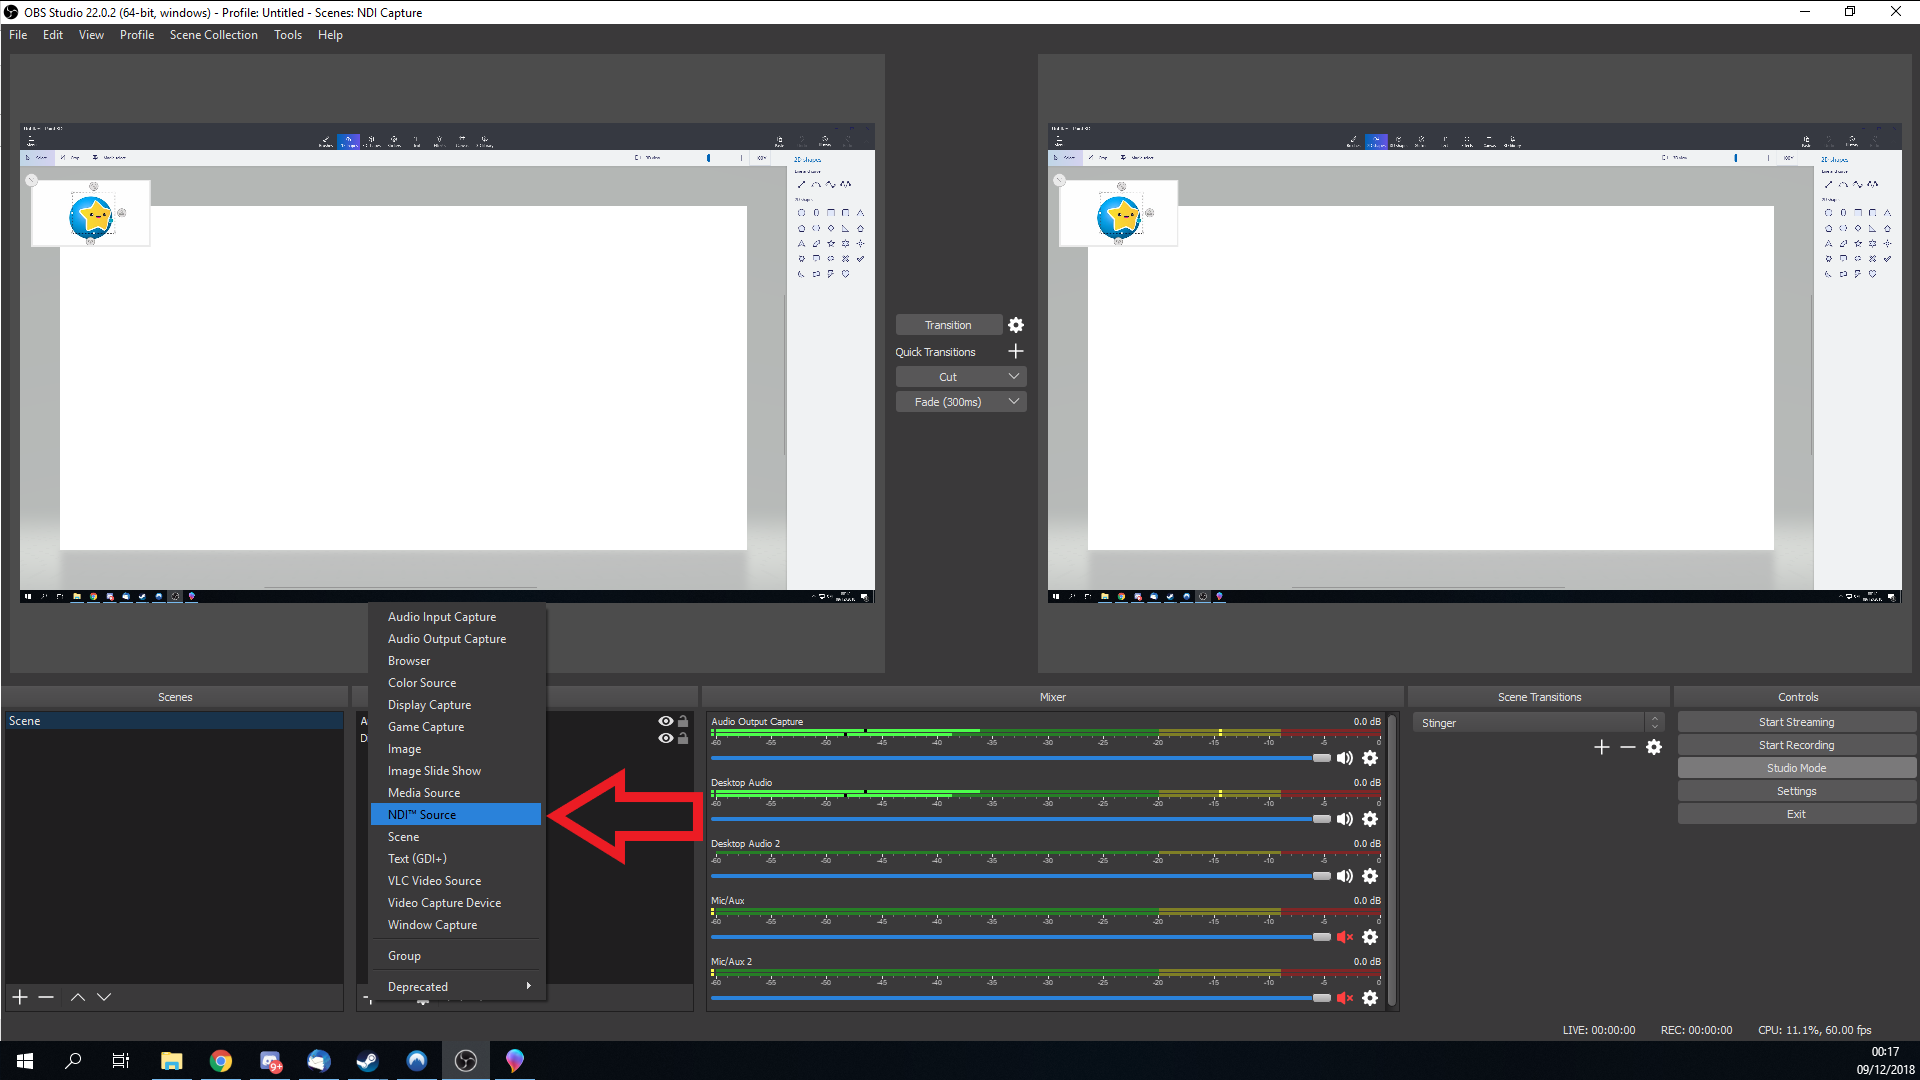
You will notice that while the NDI plugin is active you can not modify the output settings so ensure you have those set or go back to the NDI plugin and untick the boxed to modify your output settings. I will have some more tips for the quality of your capture feed below but first, let's finish the basics. The next step will be capturing the feed using NDI plugin on your Capture Rig, In your preferred scene to stream or capture add a source and select NDI Source, Select Create new and name this source to your liking and click OK.
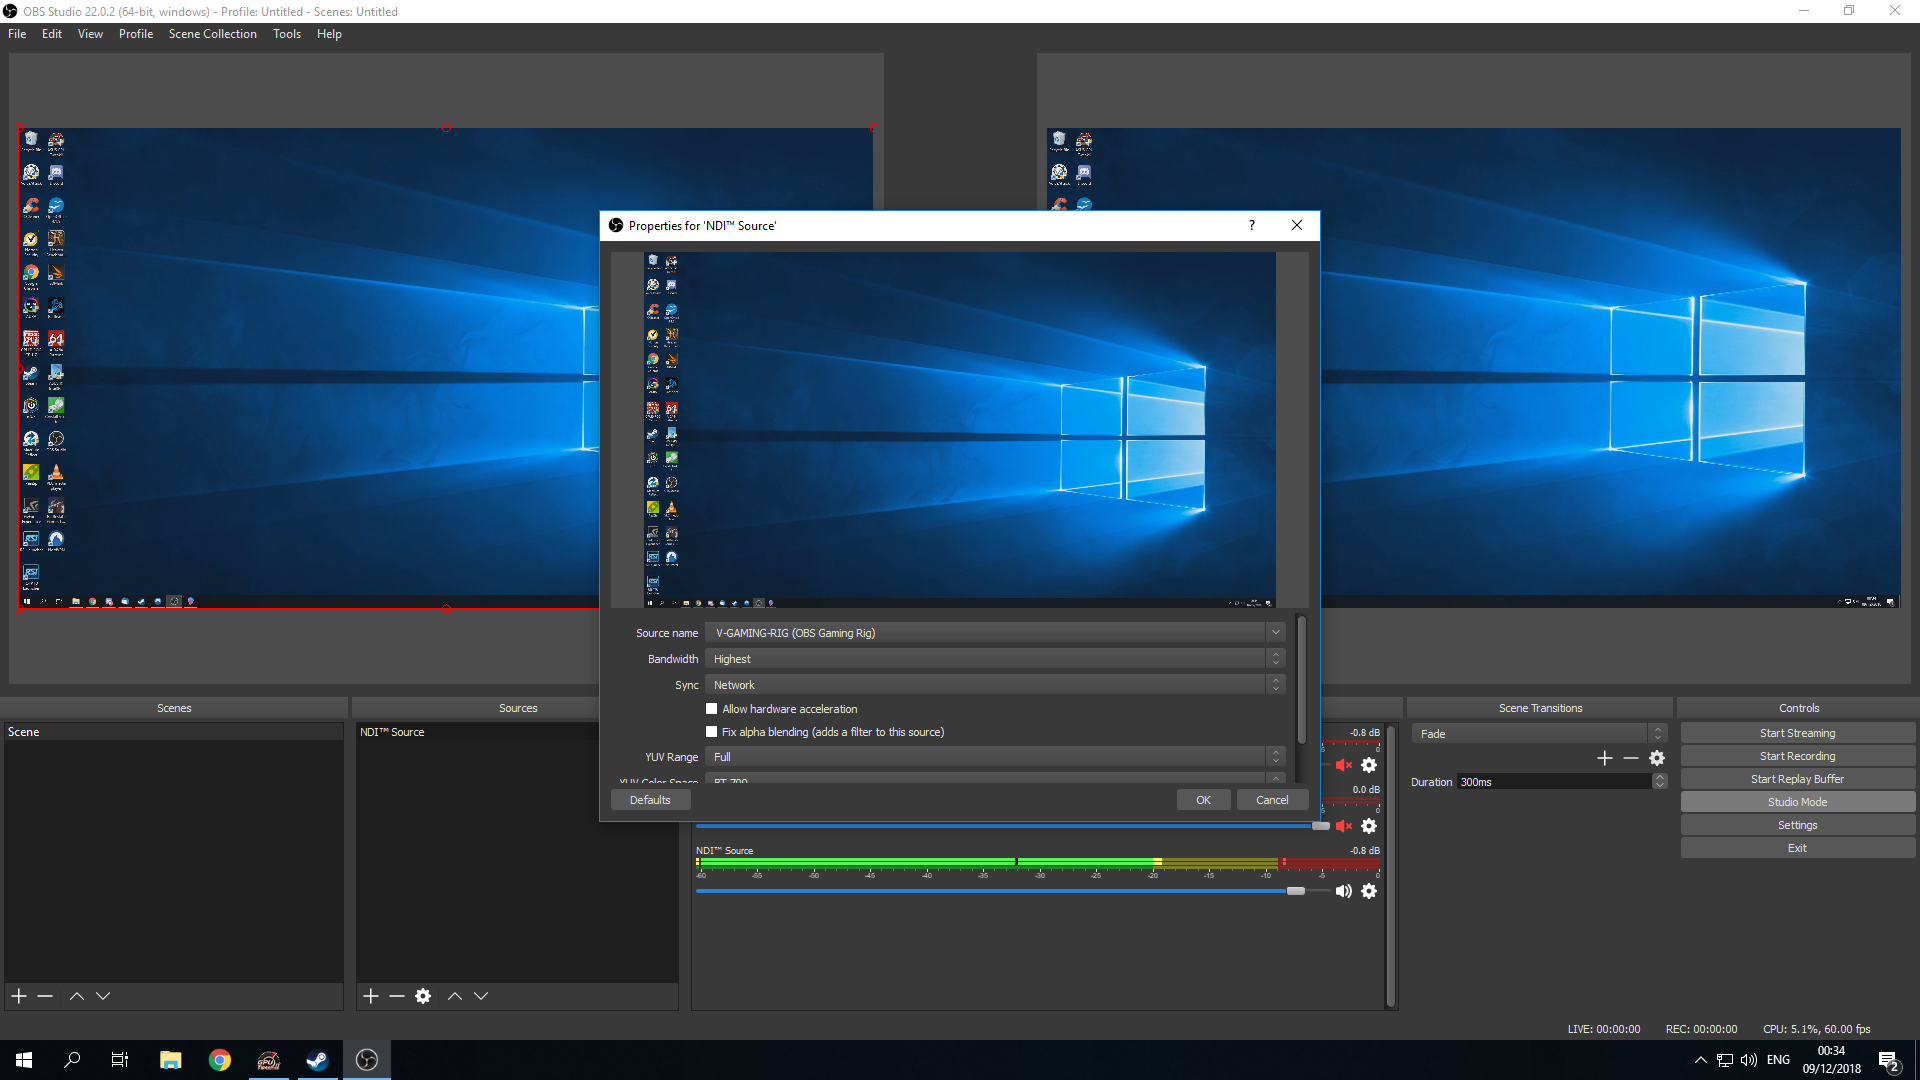
You will be presented with an options screen, Under Source name select the feed that you named in OBS/Streamlabs NDI plugin setup. Ensure you use the highest possible bandwidth for the best results unless you intend to use lower settings. Also, make sure the YUV Range is set to Full and the YUV Color Space is set to BT.709. And then click OK. You will notice as soon as you select a feed it will start displaying your desktop this means it is now receiving and you are ready to start Streaming and or Recording.
Now you will have to select your stream service and enter your stream key and select a Recording Path if you wish to record as well. Furthermore, you will have the option to record as you stream or just make a recording for you to make content. Always use the X264 encoder over hardware, the CPU encoding is more powerful and yields better quality results. Important here as well as to ensure you select the right bitrate with the right resolution for your recording or stream. In my case using my hardware I Record and Stream 1080p @ 60 FPS with a streaming bitrate of 6000 and a recording bitrate of 12000.
These settings will vary with hardware as well as any limits a streaming service might impose on your feed, but recording wise you can do whatever you want just make sure there is no lag and you have a stable stream that does not drop frames giving the best viewing experience.
Recording Only.
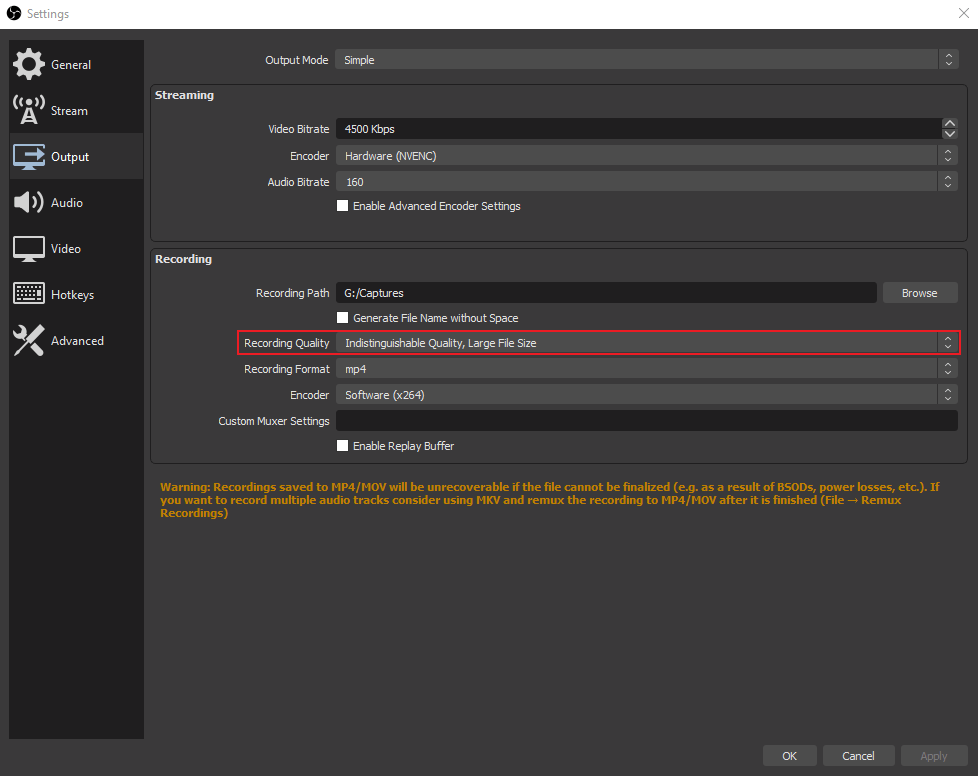
If you just wish to capture video material for let's say YouTube content without much hassle simply go to Output under Settings on the Capture rig. Then select the Output Mode and set this to Simple. Ensure your recording path is correct and select Indisnguisable Quality, Large File Size. Recording format set to flv if you lose power you can still use the captured material over mp4 etc, you can convert the flv to mp4 if your editing software needs it later on. Also, make sure the Encode is set to Software (x264). But remember this will be large files so you will need plenty of disk space and if you want to make backups you will need a beefy NAS solution locally or in a cloud storage solution. To start recording simply click Start Recording on your Capture rig to ensure you do not have any overlays active to capture clean material.
CPU presets vs Bitrate.
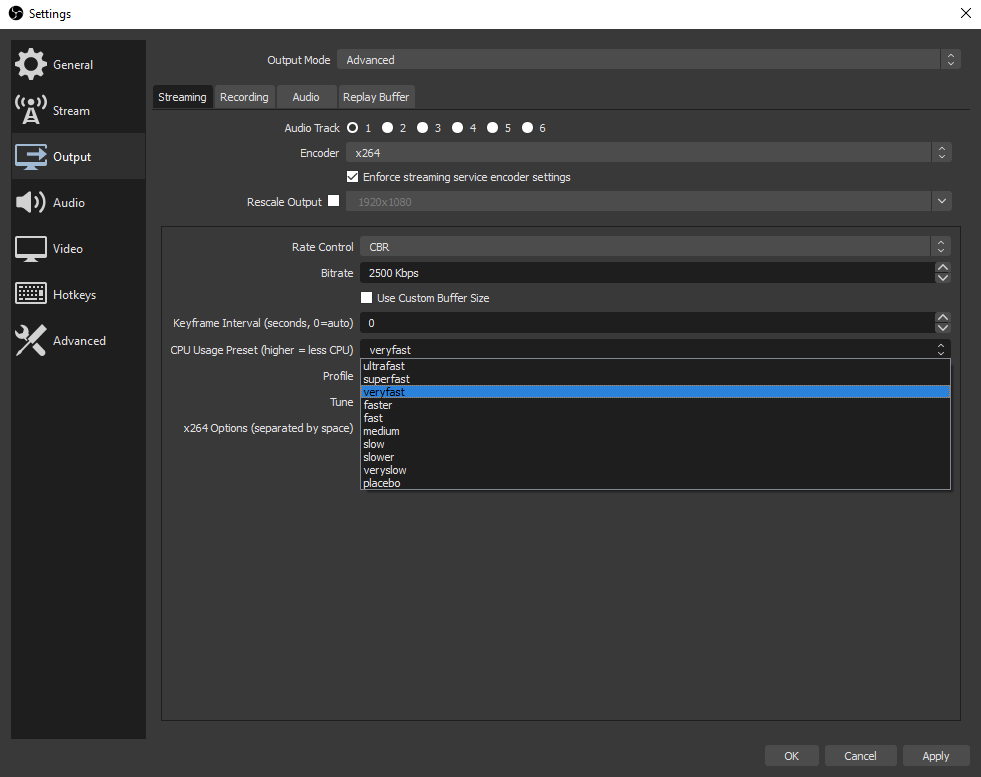
They achieve in essence the same, however, they both increase quality at the expense of increased requirements. Increased CPU presets will require a better CPU going from very fast and up. While bitrate will increases the bandwidth you need in your LAN and internet provider upload speed. Since there are so many different configurations it is hard to pinpoint each PC build but for reference, a Ryzen 5 1600X will stream and record over 1GB LAN, 15MBPS upload, 4500 Bitrate with a Fast CPU preset 1080p @ 60 fps.
- CPU Preset: Requires a better CPU the higher the preset.
- Bitrate: Requires more network upload speed the higher the bitrate.
Tips & Tricks.
As you may notice the OBS/Streamlabs resolution for streaming and recording is set to the screen size, you can temporarily set your screen resolution to 1440p or 4k and adjust the settings in OBS/Streamlabs. Then you can save these settings without OBS/Streamlabs reverting those back when you set your resolution back to the original resolution of the screen. Remember to adjust your bitrate accordingly and test your stream and recording for a CPU bottleneck. Another way to increase your stream and recording quality is by increasing the CPU Usage Preset from Very Fast to Faster or higher. You can on your main rig select under Tune the Film setting to increase quality at the expense of LAN bandwidth.
Bitrate options for streaming.
- 1080p @ 60 fps: 4500 to 6000.
- 1080p @ 30 fps: 3500 to 5000.
- 720p @ 60 fps: 3500 to 5000.
- 720p @ 30 fps: 2500 to 4000.
This covers the basics of setting up your OBS/Streamlabs streaming and or recording Capture Rig there are many more options but this should get you started on a high-quality stream and or recording spree.
Please share or link the article if you find it useful.
- "Note to self: shoot anyone near the console on outpost Kareah"


