- Tech, OC'ing, SEO and more
- Hits: 133346
Article Index
Overclock Settings: CPU Core Ratio, voltages, Ringbus, and misc voltages.
Now to start with some actual overclocking, you might want to make a reference score in your favourite benchmark before starting for comparisons. Make sure that all your settings are set to default like not having a memory overclock unless you are 100% sure this is stable.
AVX Offset.
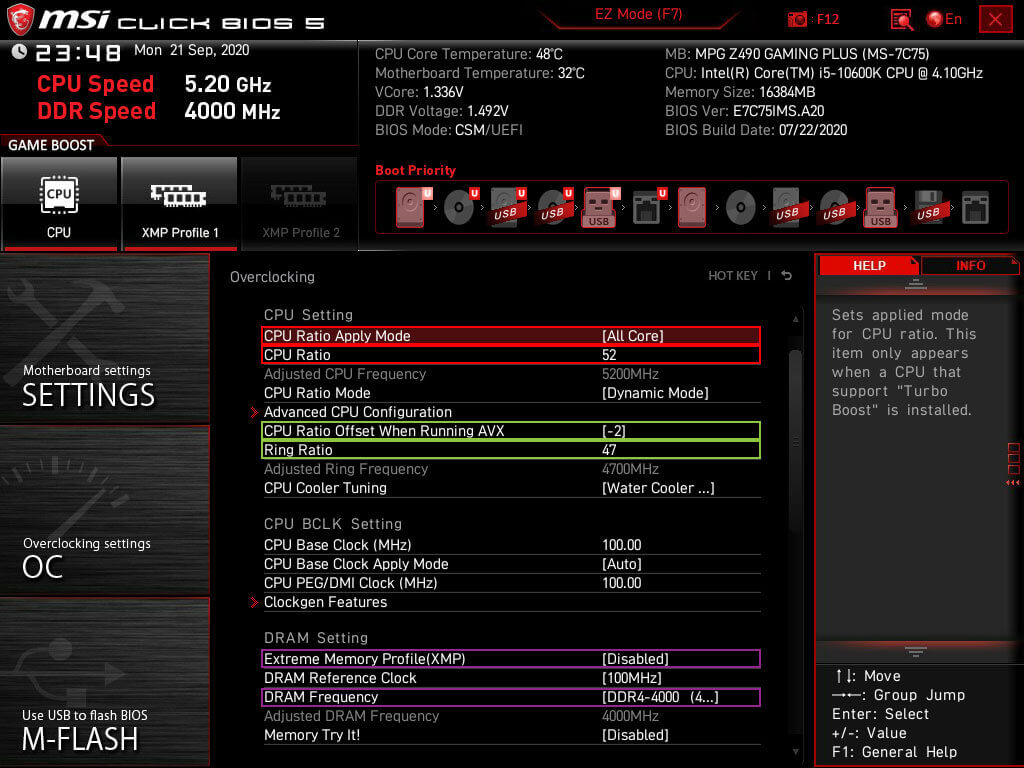
Offset is useful for getting a higher clock speed normal loads like gaming vs rendering/encoding with AVX. But it is really brutal on the CPU and requires more voltage to remain stable. Good CPU's can usually do with -1 AVX, consider -2 on bad CPU or using really small form factor builds.
- AVX offset for normal to bad chips should be 2 or 3.
- AVX offset for golden chips can be 1 or 0.
Starting with the CPU frequency marked in red in the image below make sure CPU Ratio Apply Mode is set to All Core and that the CPU ration is set to 49. Then Scroll down and select the CPU AVX offset to -1 or -2. Ring Ratio can be left on Auto and can be changed once the CPU overclock a 100% stable. Then marked in Purple is the DRAM settings unless you have a stable DDR4 overclock you want to turn XMP off and set the DRAM Frequency to the base speed of 2133 or 2400.
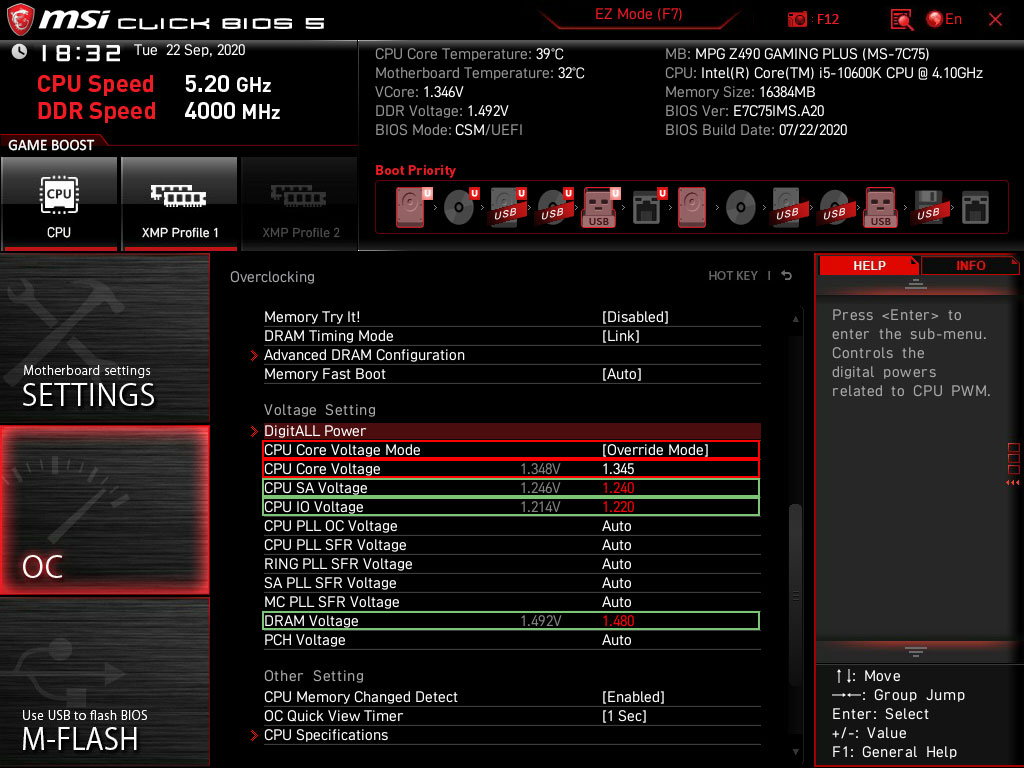
Scroll down, and now it is time to adjust the voltages. Since the 10600K is still on the 14nm node like the previous generation, the same voltage restrictions apply. Marked in red is the voltage settings for the CPU first unlock the voltage control but setting CPU Core Voltage Mode to Override Mode. This then allows the set that CPU Core Voltage. Take into account the table below as well as the binning information when setting your initial voltage. As an example below in red is the voltage for a golden chip reaching 5.2Ghz with 1.345Vcore. Marked in green are the voltages for DRAM overclocking you can leave these on Auto unless you have a 100% stable memory overclock.
- Save Voltages for light overclocking, 1.2 ~ 1.3 Vcore is the range where 5.0Ghz/4.9Ghz on golden chips.
- Save Voltages for medium overclocking, 1.3 ~ 1.4 Vcore is the range for 5.0Ghz.
- Above 1.4Vcore your a reaching the limit of 14nm as well as thermal issue's.
Change the voltage to 1.25Vcore and daily in 49 in the CPU Core Ration marked in red in the above image. Press F10 to save and reboot the PC. Now you can run a quick CinebenchR20 to gauge if it stable at all if so follow up with five runs in Linpack Xtreme using 8GB of memory or more. If it crashes on either booting into windows or running a stress test, you will most likely end up in the 5.0Ghz to 5.1Ghz range. Important to note here that is also ties into the LLC level you selected for this overclock. Something you can also change and then try to run a short stress test.
When 1.25Vcore crashed at 4.9Ghz, then you can increase the voltage or lower the multiplier. The preference here is just increasing the voltage since you are far from the max allowed voltage for the 10600K. Enter a voltage of 1.275Vcore and reboot the PC and run a CinebenchR20 if that is stable run Linpack Xtreme stress test on 8GB of memory with five runs. To find the right multiplier with 1.275Vcore keep chancing the multiplier until it is stable. 1.275Vcore also does not generate a lot of heat, so should work with most CPU coolers and will provide you with a good indication of how high your 10600K can overclock.
The 10600K used for this guide ran 5.0Ghz on 1.245Vcore with a 46 multiplier on the Ringbus. Important to note here that when you change the Ringbus only do so after getting a stable overclock on the CPU. As well as this 10600K was unstable with a Ringbus multiplier of 47 but was stable with a Ringbus multiplier of 46. To illustrate how important it is to only change the Ringbus after your done overclocking the CPU. Validation with CPU-Z: CPU-Z 10600K @ 5.0Ghz and a CinebenchR20 score of 3861 so you have an idea how a stable 5.0Ghz overclock looks like.
To do an initial confirmation of a stable overclock run Linpack Xtreme with the same settings as before but this time around do it ten times and use HWiNFO64 to keep an eye on the temperatures and CVID(Vcore). Then you can go for a higher CPU overclock and try 5.0Ghz and 5.1Ghz but make sure to not thermal throttle the CPU, so you are limited by your cooling solution. As well as exceeding 1.4Vcore what would degrade your CPU and most of the time thermal throttle your CPU. Make sure you keep your AVX offset to -1 and -2 for chips that overclock really bad most of the times you won't need AVX instructions unless your rendering content for instance.
Some other tips are that IF you are not stable with 1.275Vcore and do not want to drop the CPU frequency you can increase the CPU voltage and reach a higher CPU overclock. The only limiting factors are your cooling capacity to prevent thermal throttling and staying below 1.40Vcore. Try 1.30Vcore for instance with your preferred frequency. To point out that 1.275Vcore is a starting point, not the end.
- Increase the voltage 0.025 per attempt, so from 1.250Vcore to 1.275Vcore to 1.300Vcore until stable with the preferred CPU frequency.
- When thermal throttling lower the voltage and keep thermals in the 85C ~ 90C.
- Add 0.020Vcore ~ 0.025Vcore per 100mhz increase on the CPU.
Ringbus.
Once you have established the CPU overclock is stable, you can set a higher Ringbus. Most overclocks will end up with a Ringbus multiplier of 47 or 46. Ideally, you want the Ringbus to run 500mhz or less from the CPU Mhz. Taking this 10600K as an example, a Ringbus of 4700Mhz was stable with 5.1Ghz and 5.2Ghz but was unstable with 5.0Ghz. But you will have to stress test any changes in the Ringbus separately and including any CPU or RAM overclocks. Ringbus impact DRAM overclocking the most as well as reducing latency it can be left on Auto if neither is a concern.


