• This email address is being protected from spambots. You need JavaScript enabled to view it.

Tech, OC'ing, SEO and more

Here I post a very wide range of articles regarding tech that I use and then optimize, overclock and improve. Anything from overclocking the new Ryzen CPU's, Intel CPU's to SEO for Joomla and some Photoshop tutorials. While the above mentioned is to be seen as a sample I will add more tutorials/manuals as I progress. Furthermore, I will be adding some links to people and organizations that I find useful content wise and might help you further on subject matter for each category.

SEMRush SEO audit for your content: How To Boost Instantly! Your Site/Blog Performance with SEMrush Site Audit Tool
- Article for SEMRush an SEO tool I also use for my website on an SEO audit on your website and improve your content so it may rank higher.


TWRP

User Rating: 5 / 5

Star ActiveStar ActiveStar ActiveStar ActiveStar Active

Guide to custom recovery and root on the Samsung Galaxy series.

This guide is a general step by step process on how to install a custom recovery(TWRP) and gain root(Magisk) access. This guide will contain reference pictures, links to resources and the step by step process on installing TWRP and Magisk. It is important to note that tempering, replacing or modifying a stock Samsung ROM will void the warranty. Although rarely this may cause damage to your phone so proceed on your own risk.

Glossary of some of the terms used in this guide can be found here: Samsung Galaxy devices root, recovery, and custom ROM FAQ.

Preparations.

The first step is to download all the utilities and files linked below. And move all these files into a folder on your PC and then copy the folder to an SD card on your Samsung device. 

  1. Download Odin: https://odindownload.com/
  2. Download TWRP, make sure to select the correct Samsung device: https://twrp.me/Devices/Samsung/
  3. Download Magisk, https://magiskmanager.com/#How_to_Install_Magisk_Latest_Version_201_on_Android_Non-Rooted_Phones
  4. Download RMM-State-Bypass, https://drive.google.com/file/d/1UvqcYUbVTFomAmKCVkMyfTWeuz1sEz8n/view
  5. Download Disable_Dm_Verity_ForceEncrypt, https://zackptg5.com/android.php#disverfe
  6. Download a custom ROM(H-ROM & Lineage work with TWRP)) but make sure it is for your specific Samsung Galaxy device, https://forum.xda-developers.com/

Preparing your phone.

Now the first step of preparing your phone is to head over to Settings and scroll down and tap on About Phone.

About Phone

Scroll down to Software Information and tap that.

Software Information

Scroll down and look for build number and tap that 7-10 times to unlock Developer options.

Build Number

Head back to Settings and scroll down and tap Developer Options.

Developer Optios

Scroll down to USB Debugging and swipe to enable. Some phones like the Galaxy J6(2018) have an OEM Lock options disable that after USB Debugging.

USB Debugging

Installing TWRP. 

Power down your Samsung device and enter download mode. Depending on your device either by holding Volume Down + Power button + Home button or when there is no Home button hold Volume Down + Power button or Volume Up + Volume Down + Insert USB. Release the buttons as soon as the Samsung logo appears. And now open Odin and make sure your Samsung device is detected.

odin phone added.

Click on the Options tab and make sure to untick Auto Reboot and tick F. Reset Time.

Odin Options

Now add the correct TWRP file for your Samsung device under AP.

Click start and wait for Odin to flash TWRP to your device.


Using TWRP.

Now to go from Download Mode to Recovery/TWRP Mode follow the steps below in sequence.

  1. Hold Volume Down  + Power button + Home button or Volume Down + Power button when there is no Home button until the Samsung Device powers down.
  2. Then directly hold the Volume Up + Power button + Home button or Volume Up + Power button when there is no Home button and release the button as soon as the Samsung logo appears.

TWRP custom recovery menu

Go to Install and select the storage you saved all the files on.

 All files needed installing custom ROM and root.

Tap on the RMM-State_Bypass and Swipe to confirm Flash.

 TWRP RMM-State_Bypass

Go to Wipe and select Advanced Wipe and select Data and Swipe to Wipe.

Data wipe 


Head back to Install and tap on Magisk*version number* and Swipe to confirm Flash.

TWRP Magisk install 

Now you have installed all the required files to safely Root your Samsung device you can now use TWRP to flash the custom ROM. Important to note is when selecting a custom ROM from XDA-Devs that you can flash it through TWRP. It is just easier and you try out different custom ROMs before committing to one without too much hassle.

Head to Wipe, select Advanced Wipe and select Dalvik / ART Cache, Cache, Data, System, and Swipe to Wipe.

TWRP wipe

Simply head back to Install and select your preferred Custom ROM and Swipe to confirm Flash if you have any extras with your Custom ROM like apps etc you can install them now by heading back tp Install and select the files and Swipe to confirm Flash.

TWRP custom ROM install.

Head back to Install and select the Disable_Dm-Verity_ForceEncrypt and Swipe to confirm Flash.

Installing Disable_DM-Verity

If not you can now select Reboot from the main menu and select System. This should boot straight into your new OS some Custom ROMs might require up to 20 minutes to boot the first time and perhaps several reboots after selecting your language. Using this guide should be the easiest way for gaining root access and installing a custom ROM to your Samsung device(s) with that said you can now install all your apps and I would highly recommend installing the Magisk and TWRP app as well you can find them both in the Google App Store.

Soft & Hard Brick.

This occurs when your device has received for instance the wrong data file for a custom ROM, flashed the wrong TWRP version for your device, etc. In this case, your Samsung device can either soft brick or hard brick.

Fixing a Soft Brick.

If bricking occurs soft brick is the most common kind of bricking. This happens when there your phone keeps boot looping so it powers up and then at some point switches off and powers up etc and keeps doing that in a loop as well as crashing on boot giving errors etc. This can be simply fixed by booting into the TWRP Recovery Mode and either flashing a correct custom ROM or the stock ROM or use a backup.

Fixing it is following the steps named above on how to flash a custom ROM, do the Wipe and then do the next step selecting a custom ROM and Swipe to confirm Flash.

Fixing a Hard Brick?

Hard bricking is rare but it means your device won't even boot and keeps flashing the Samsung logo and won't power down, or won't show more than a black/grey or a battery screen when connecting a USB cable. Recovery from this is harder and your only chance of recovery slim since it can also mean there might be hardware damage however hardware damage is extremely rare.

The only fix for this is to let the battery drain this may take hours to days depending on the charge in the battery and then charging the Samsung device around 5% and then putting the Samsung device in Download Mode and flashing the correct TWRP version using Odin and powering up in TWRP Recovery mode. The steps are the same as above Installing TWRP

In the case of hardware damage, you will need to buy a new Samsung device. Or visit a local repair shop and ask for a rough estimate on repairs.

You can find some of my Samsung specific devices guides here: Samsung A3/A5/A7 2017 Root & Android Oreo 8.0 OS upgrade Tutorial and Samsung Galaxy J6(2018) guide to Root and Custom ROM.

- Paul "HisEvilness" Ripmeester

 
Samsung Galaxy J6

User Rating: 5 / 5

Star ActiveStar ActiveStar ActiveStar ActiveStar Active

Samsung Galaxy J6(2018) guide to Root and Custom ROM.

This will be a guide on how to root and install a custom ROM on a Samsung Galaxy J6 2018. Before you start with this guide remember to back up your files such as photo's etc. Also included in this guide will be to revert the phone to stock using the factory ROM from Samsung. Also, make sure you have about 50% battery left to ensure the J6 will not shut down during this guide. And finally, it is VERY important to note rooting and installing a custom ROM will void any warranty so proceed at your own risk.

A glossary can be found here: Samsung Galaxy devices root, recovery and custom ROM FAQ.

Preparations.

Firs your Samsung J6 need to be unlocked using the following steps to enable USB debugging and OEM Unlock by following these steps.

  1. Go to Settings.
  2. Go to About.
  3. Tap on build number 7-10 times.
  4. Go back to Settings and select "Developer Options".
  5. Select USB Debugging first and then select OEM Unlock.
  6. The device will reset now but verify the above-named options are on.

Now to download the correct files.

Installing TWRP.

Copy files to your phone or SD card, Oreo ROM, forced encryption disabler, RMM State Bypass and, no verity opt encrypt. Power down your Samsung J6. Now boot into Download Mode by holding Volume Up and Volume Down and plug in the USB cable at the same time WITHOUT hitting the power button. This will Boot your Samsung J6 into Download mode and do the following steps.

Open Odin flashing tool after extracting it into a folder of your chosen location. Your phone should be in download mode make sure you select Continue to activate the download mode so Odin can detect it. Under options in Odin make sure F.Reset Time is selected, and make sure Auto-Reboot is turned off. Now click on AP and select the TWRP *.tar file and let it load. Now click Start, it will say pass in green in the top left of Odin. Now the important step you will need to power down your device and directly boot into TWRP so read the following steps before attempting.

  • Press and hold Power + Volume Down.
  • Directly press Power + Volume Up as soon as the screen blanks.

TWRP install steps in Odin

Using TWRP.

Now it is time to prep the Samsung J6 with installing the previously mentioned files to safely install a custom ROM.

  1. Select Install
  2. Select RMM-State_Bypass_Mesa_v2
  3. Swipe to install.
  4. Wait for the install to complete.
  5. Select Install.
  6. Select no-verity-op-encrypt.
  7. Swipe to install.
  8. Wait for the install to complete.

Installing a custom ROM.

Just stay in TWRP and it is time for the final steps fist you need to clean the Samsung J6 in order for the custom ROM to work. First, some folders need to be wiped so head select Wipe in the TWRP home screen.

  1. Select Wipe.
  2. Select Advanced Wipe.
  3. Tick system.
  4. Tick data.
  5. Tick dalvik & cache.
  6. Tick cache.
  7. Swipe to wipe.

Now head back into the TWRP home screen and select install and select the custom ROM and swipe to install. Now reboot your phone by selecting Reboot in TWRP and select System. Depending on your custom ROM there will be some options most important here is that you use Magisk with the correct kernel. Also important to note booting the first time may take up to 20 minutes, select your language and reboot TWICE. The main reason to use Magisk it will still allow banking apps etc to work over SuperSU so you will retain the full functionality of your phone.

S8 Port, use the Phoenix or Stock kernel with Magisk.

A8 Port, Use the Phoenix or Stock kernel with Magisk.

Soft Brick & Hard Brick.

This may happen but in the case of a soft brick, you will be able to power down the phone and repeat the above steps Using TWRP. When your device is hard bricked it will stay in a boot loop and the Samsung logo will keep flashing other than the up to 20 minutes first boot time. In this case, you will have to drain the battery when the device powers down then charge the battery to 1% to 2% and hold Volume Up + Volume Down and insert the USB cable to enter download mode and flash TWRP again. Steps are the same as mentioned above.

Check out my other guide for Rooting the Samsung Galaxy A3, A5, and A7 here: Samsung A3/A5/A7 2017 Root & Android Oreo 8.0 OS upgrade Tutorial. And my guide for installing TWRP through Odin and root access with Magisk here: Guide to custom recovery and root on the Samsung Galaxy series.

- Paul "HisEvilness" Ripmeester 


AMD 2200G APU

User Rating: 5 / 5

Star ActiveStar ActiveStar ActiveStar ActiveStar Active

Overclocking guide for the AMD Ryzen 3 2200G and 2400G APUs.

This overclocking guide is for the Ryzen 3 2200G and Ryzen 5 2400G APU taking the Ryzen 3 2200G as an example to go over the BIOS settings using an X370 from ASUS. In this guide, there will be a range of screenshots showing all the settings you need to tweak for quick reference. The only difference between the 2200G and 2400G is the core count thus the heat output will be greater for more core count as well as the silicone lottery in general. My build is total overkill for the APU but it was intended for the Ryzen 5 1600X with an upgrade path to the Ryzen 5 3600X any B350 or B450 Motherboard will be just fine for a Ryzen APU but you can consider an upgrade path even with B350 and B450 motherboards if you wish to do so. 

My Rig.

  • Case: Phanteks Enthoo Luxe.
  • Motherboard: ASUS STRIX X370-F.
  • CPU: AMD Ryzen 2200G APU.
  • RAM: Corsair DDR4 LPX 16 GB @ 3200.
  • GPU: Radeon RX Vega 8 APU.
  • PSU: EVGA SuperNOVA G3 750W Gold.
  • C Drive: Crucial MX300 M.2 525GB
  • CPU Cooling: Gelid Phantom Black.

Getting Started.

The usual hardware checks and make sure your BIOS is updated. With the new Ryzen series, older motherboards might need a BIOS update before being able to run the 2000 series. You may apply for a bootkit and assistance if you happen to have an older motherboard: AMD 2000 series Support. Also, ensure to install the latest driver for your chipset(B350/X370/B450/X470) and enable to AMD Ryzen power plan. Also, make sure when buying RAM it is on the QVL list however by now most DDR4 kits should work with Ryzen since the BIOS Mirco code has matured greatly.

You also want to download the following programs for stress testing your overclock. These are a vital tool for stress testing and monitoring if you already have tools you can use those but these programs I highly recommend and were used while writing this overclocking guide.

 ASUS Strix X370 check for BIOS version


BIOS Settings.

Start with setting your RAM to 2133mhz or 2400mhz this is the base speed for DDR4 kits. Changing the RAM speed to the advertised speeds should be done later on after establishing a stable overclock on the CPU and internal GPU. Also noteworthy here is to point out that faster RAM will increase performance since the infinity fabric clock speed is tied to the RAM clock speed however after 3200mhz you will see diminishing returns. And lastly, both the CPU and Vega GPU overclocking will be covered in this overclocking guide. Make sure if you are using a separate GPU not to use the Vega GPU overclock settings as is while it being overclocked will do no harm but it will generate additional heat. For this guide, both the CPU and Vega GPU were overclocked to the max this will give you a pretty good idea where you may end up with your overclock using the settings within this guide.

ASUS Strix X370 DDR4 frequency


DIGI+ VRM Settings 2200G/2400G.

Depending on your motherboard quality there will be some settings here you can adjust to take into account lower end VRM's I used conservative settings. Some settings as described might not be there on lower-end motherboards but try to set them as high as possible and revisited this portion once you have achieved a stable overclock. Settings here will affect you're overclocking and how high you can go in the overclock so your mileage may vary.

Load Line Calibration will overshoot slightly at LLC 6 or higher and slightly undershoot at LLC 5 and lower this will affect the stability of your overclock changing LLC and VDDCR volts could lower your temperatures while remaining stable. A B350 motherboard I tested only had options to adjust LLC to Extreme leaving very little control resulting in having to dial in slightly higher VDDCR voltage to compensate for Vdroop. Also when using the 2400G over the 2200G you will have to adjust LLC and VDDCR to retain a stable overclock to account for the increased core count.

ASUS Strix X370 DIGI+ VRM settings


AMD CBS.

Under the Advanced tab, there is a section called AMD CBS head over there and change the following settings. Core Performance Boost should be left off since you want to manually enter the Core Ratio and not boost at all. And Global C-state Control will cause instability if it is left one since it will attempt to lower voltages when the CPU is idle.

  • Core Performance Boost: Set to Disable.
  • Global C-State Control: Set to Disable. 

ASUS Strix X370 AMD CBS settings


VDDCR CPU Voltages & GFX Core Voltages.

This final step will be to adjust the CPU Core Ratio, GFX clock frequency, VDDCR CPU Voltage, and GFX core voltage. You want to start however with the CPU overclocking and stress test if the overclock is stable and then adjust the GFX settings and test them with the CPU overclock combined this will make it easier to find out if there is any instability in your overclock.

VDDCR CPU Voltages.

  • AMD Recommended Voltage: 1.350 to 1.375 volts.
  • Community Recommended Voltage: 1.400 to1,450 volts.
  • Absolute max and not recommended: 1.500 to 1550 volts.

GFX core voltages.

  • AMD Recommended Voltage: 1.1 to 1.2 volts.
  • Community Recommended Voltage: 1.3 to 1.4 volts.
  • Absolute max and not recommended: +1.4 volts and above.

Start with entering a Core Ratio of 39.00 and adjust the VDDCR CPU Voltage to 1.4 most Ryzen APU's will boot and pass a stress test do a quick Cinebench run and see if it is stable at all if that passes run a Cinebench and a 10 minute Prime 95 Small FFT's stress test. If this fails you want to go back into the BIOS and set a Core Ratio of 38.50 and repeat the above-named process. If it passes you can keep the Core Ratio as it is but lower the VDDCR CPU Voltage to 1.3750 and do Cinebench run and validate that with a Prime 95 Small FFT's stress test 10 minutes. When that passes keep lowering the voltage and repeat the Cinebench and Prime 95 Small FFT's stress tests until it fails. Now save these settings in a BIOS profile and try to run a Core Ration of 40.00 with a VDDCR CPU voltage of 1.4 and do another Cinebench and Prime 95 Small FFT's stress test. When it passes lower the VDDCR CPU voltage by 0.25 and repeat the Cinebench and Prime 95 Small FFT's stress tests until it crashes. When you are satisfied with your Core Ratio and VDDCR CPU Voltage save those settings as well and do at least a 30 minute Prime 95 Small FFT's stress test.

When your CPU overclock is stable than its time to overclock the internal Vega GPU start by adjusting the GFX core frequency to 1600, VDDCR SoC Voltage to 1.25, and GFX core voltage to 1.3 save those settings and boot into windows. Now do a quick Heaven Benchmark of 10 minutes and check your monitor for stuttering or artifacting. When it passes you can go back into the BIOS and adjust the GFX core frequency to 1650 and stress test with Heaven benchmark, Or lower the GFX core frequency when it fails. Rinse and repeat adjusting GFX core frequency, GFX core voltage, and VDDCR SoC Voltage. Once you are satisfied with your Vega GPU overclock do a stress test with Heaven benchmark for about 30 minutes.

The final step would be setting your DDR4 kit to the advertised speed and making sure that is also stable with doing one final burn-in test, just select the D.O.C.P./XMP profile and it should set all the settings for you.

ASUS Strix X370 Frequency settings

ASUS Strix X370 Voltage settings


VDDCR CPU Voltages Curve.

This is my voltage curve for this specific AMD 2200G APU yours may be different due to the silicone lottery however this can be used as an indication and what voltages you want to use for what clock frequency. If you can use lower voltages with a higher clock frequency you have a better chip thus you might be able to clock it even higher.

2200G @ 3.7Ghz.

  • 37 Core Ratio.
  • VDDCR @ 1.18125
  • CPU LLC 6
  • SOC LLC 6
  • Validation with P95 Small FFT's and Custom 8K FFT's.

2200G @ 3.8Ghz.

  • 38 Core Ratio.
  • VDDCR @ 1.25
  • CPU LLC 6
  • SOC LLC 6
  • Validation with P95 Small FFT's and Custom 8K FFT's.

2200G @ 3.9Ghz.

  • 39 Core Ratio.
  • VDDCR @ 1.3
  • CPU LLC 6
  • SOC LLC 6
  • Validation with P95 Small FFT's and Custom 8K FFT's.

2200G @ 4.0Ghz.

  • 40 Core Ratio.
  • VDDCR @ 1.4125
  • CPU LLC 7
  • SOC LLC 6
  • Validation with P95 Small FFT's and Custom 8K FFT's.

 Now you should have a stable overclock on your AMD 2200G or AMD 2400G APU, you could even opt in to consider a longer stress test of both overclocks by testing for a couple of hours and monitoring temperatures as well. With my 2200G I reached 4.0Ghz with a noise level of 20 - 25 DB @ 4.0Ghz with a Gelid Phantom Black tower cooler But you want to consider the noise level as well if you have a cheaper cooler.

- Paul "HisEvilness" Ripmeester

 
AMD Overclocking Terminology FAQ

User Rating: 5 / 5

Star ActiveStar ActiveStar ActiveStar ActiveStar Active

AMD Overclocking Terminology FAQ

This Terminology FAQ will cover some of the basics when overclocking AMD based CPU's from the Ryzen series. This covers the Zen, Zen+  and Zen 2 architectures and all products stemming from those architectures. Going over some of the basics of BIOS settings and what a function is or why it should be turned on or off and under what condition(s). These settings will vary from motherboard and CPU as well as the degree to which they can be set in the BIOS.

The Basics.

What is a VRM?

VRM stands for Voltage Regulator Module and is located close to the CPU socket to provide a reliable and clean power supply. The VRM regulates the power from the PSU. In overclocking you modify BIOS settings to instruct the VRM for increased performance at the expense of increased heat output. Motherboards for overclocking come with a high-quality VRM that uses better components. But a VRM always consists of MOSFET's, Chokes, Capacitors, and a PWM Controller. The IC(Integrated Circuit)is there to control and regulate those components.

What is the difference between Ryzen and Zen?

Ryzen and Zen are the same, whereas Zen is the architecture and Ryzen is the product name of the AMD consumer-based CPU's. So Ryzen CPU's are based on the Zen architecture, Zen 1 architecture is used for the Ryzen 1000 series CPU's(Ryzen 1600X et), Zen+ is used for the Ryzen 2000 series CPU's(2600X etc.). Zen 2 architecture is used for the Ryzen 3000 series(3600X etc.) Zen 3 architecture is used for the Ryzen 5000 series(5600X etc).

What is AMD CBS?

Custom settings for your Ryzen CPU's that are provided by AMD, CBS stands for Custom BIOS Settings. Settings like ECC RAM that are not technically supported but work with Ryzen CPU's as well as other SoC domain settings.

What is PBO?

Precision Boost Overdrive(PBO) is the AMD automatic overclocking solution for the Ryzen CPÚs. Initially released on the Threadripper HDT CPU's and should not be confused with Precision Boost what dictates the Frequency Range boosting table. It comes default on motherboards that have a design spec of 88w and/or 60A or higher using CPU's that have a 65W TDP or higher.

What are save voltages for Ryzen APU internal GPU?

The internal Vega GPU is the same on all Ryzen APU variants. The RX Vega 11 and RX Vega 8 internal GPU frequency can be overclocked. 

    AMD   Community
RX Vega    1.100v ~ 1.200v    1.200v ~ 1.400v 

What are save voltages for Ryzen SoC?

SoC voltage is the same for all architectures with the Ryzen CPUs. And are used when overclocking the FCLK(Infinity Fabric) and MCLK(Memory Frequency). And in some cases can help to stabilize CPU overclocking.

  AMD Community
Ryzen SoC  1.000v ~ 1.150v  1.150 ~ 1.250 

What are save voltages for Ryzen CPU's?

Each Zen architecture has it's own AMD recommend, and Community recommended voltages. Save voltages are to ensure your CPU will have a long life span. Dangerous voltages may damage or degrade a CPU. The table below has the save voltages for each of the Zen architecture released by AMD. 

    AMD   Community
Zen1 (Ryzen 1000 series)    1.350v ~ 1.375v    1.375v ~ 1.450v 
Zen+ (Ryzen 2000 series)    1.300v ~ 1.350v    1.350v ~ 1.400v 
Zen2 (Ryzen 3000 series)    1.250v ~ 1.300v    1.300v ~ 1.350v 
Zen3 (Ryzen 5000 series)   Stock   1.000v ~ 1.100v

BIOS Settings.

What is VDDCR CPU Load Line Calibration?

CPU LLC adds extra voltage to compensate for Vdroop when a CPU or GPU is put under heavy load. LLC gives overclocking stability by preventing low or high voltage fluctuations and tries to maintain a stable voltage supply to the CPU or GPU. Higher LLC tends to overshoot more in voltage supply, and a lower LLC tends to undershoot in the voltage supply to the CPU.

LLC infographic

What is VDDCR CPU Current Capability?

It is a threshold for the VRM to shut down and monitors the current supply to the CPU, setting Current Capability higher will allow for more current supply to the CPU but will increase heat output. This works best if you have an overclock that shuts down the motherboard/PC because the threshold is triggered.

What is VDDCR CPU Switching Frequency?

Switching frequency is the transient response of your VRM MOSFETs settings this higher in Mhz will allow for a better transient response at the expense of increased heat output and using a lower setting in Mhz will lower the heat output but lower the transient response. Better transient response in overclocking translates into a more stable voltage supply from your PSU to the CPU.

What is VDDCR CPU Power Duty Control?

This will allow for setting the current supply to the internal CPU voltage regulator at the expense of increased heat when set to extreme and lower heat when using optimized or standard. This will help with stability in overclocking and give the best result when using optimized or extreme.

What is VDDCR CPU Power Phase Control?

This affects your VRM Power Phases to the CPU and will be depending on the setting, achieve greater stability in overclocking. Setting Power Phase Control to extreme keeps the number of active CPU power phases at the maximum. If you set Power Phase Control to optimized, there will be a power-saving, but less stability, phases to the CPU will power down.

What is SOC?

SOC(AMD) stands for System On Chip and is also known as uncore(Intel) and encompasses all the components, not in the core of the actual CPU but on the same substrate like internal GPU, Cache, I/O Ports, Memory Controller etc. Overclocking SOC settings can help in varying degrees with keeping CPU core components stable.

Zen 1 and Zen 2 Core vs SoC infographic

What is VDDCR SOC Load Line Calibration?

SOC LLC adds extra voltage to compensate for Vdroop when uncore is put under heavy load LLC gives overclocking stability by preventing low or high voltage fluctuations and tries to maintain a stable voltage supply to the uncore. Higher LLC tends to overshoot more in voltage supply, and a lower LLC tends to undershoot in the voltage supply to the SoC.

LLC infographic

What is VDDCR SOC Current Capability?

It is a threshold for the VRM to shut down and monitors the current supply to the SoC, setting Current Capability higher will allow for more current supply to the SoC but will increase heat output. This works best if you have an overclock that shuts down the motherboard/PC because the current threshold is triggered.

What is VDDCR SOC Switching Frequency?

Switching frequency is the transient response of your VRM MOSFETs settings this higher in Mhz will allow for a better transient response at the expense of increased heat output and using a lower setting in Mhz will lower the heat output but lower the transient response. Better transient response in overclocking translates into a more stable voltage supply to the SoC.

What is VDDCR SOC Power Phase Control?

This affects your VRM Power Phases to the uncore and will be depending on the setting, achieve greater stability in overclocking. Setting Power Phase Control to extreme keeps the number of active SoC power phases at the maximum If you set Power Phase Control to optimized there will be a power-saving, but less stability, phases to the CPU will power down.

What is VDDCR SOC Voltage?

This setting affects the voltage supply to the SoC components. It should be increased when overclocking the CPU core frequency/ratio to aid with better stability of the SoC components as well as the core components. Increasing the VDDCR SOC Voltage will increase the heat output of the CPU package as a whole.

What is CPU Core Ratio?

Sets the clock rate of your CPU by a factor of 10X. So a Core Ratio of 40.00 will multiply the external clock with a base value of 100 to 4,0Ghz.

What is VDDCR CPU Voltage?

Sets the voltage for your CPU on a 1:1 ratio, depending on your motherboard you can either enter a manual value of an offset value. So a value of 1.4000 will set the CPU voltage to 1.4 volts using the manual setting.

What is FCLK?

Stands for Infinity Fabric Clock Speed(FCLK) and can be adjusted with the new Ryzen 3000 series(Zen2). In previous Zen and Zen+ architecture, the Infinity Fabric Clock speed would be set by the DRAM frequency(MCLK). Ideally, you want FCLK to run synchronously(1:1 ratio) with the MCLK for best performance. In short, a DDR4(Double Data Rate) kit is rated for 3600Mhz MCLK and therefore will run synchronously with 1800Mhz FCLK, a 1:1 ratio.

What is the GFX clock frequency?

Sets the clock rate of the internal Vega GPU on Ryzen APUs by a factor of 1:1, so a 1600 value translates into a 1600mhz GPU clock speed.

What is the GFX core voltage?

Sets the voltage for the internal Vega GPU on Ryzen APUs on a 1:1 ratio, so a manual value of 1.25000 is 1.25 volts.

What is AMD SAM?

Stands for Smart Access Memory and work with the AMD 5000 series CPUs and AMD 6000 GPU's. In short, it is a new way for your PC to access the whole memory capacity(VRAM) of an AMD 6000 series GPU. Previously this was done with 256MB paging of the VRAM called BAR(Base Adress Register). Depending on your motherboard brand it can be found in the PCIe section of the advanced menu or advanced settings and turn on Above 4G Encoding and Re-Size BAR Support.

What is DRAM Voltage?

Is the voltage supply to your RAM aka Memory sticks, increasing the DRAM voltage will allow your RAM to run at a higher frequency at times without changing the DRAM Timings but will increase heat output.

What is Global C-State Control?

This sets the idle states of a CPU when it is not executing commands there a various C-States and serve as a power-saving function. For overclocking, this should be turned off since you want maximum performance at the expense of increased power consumption and helps with keeping a stable overclock.

Closing thoughts.

The main reason to write this FAQ is to supplement guides for AMD Ryzen based CPU's found on this website, and I could not find a one-stop-shop solution for ensuring I nail the explanation for each BIOS settings correctly. You can find my guides for the AMD Ryzen CPU's in the bullet list below.

- Enjoy overclocking, Paul "HisEvilness" Ripmeester

 
How to set up a Virpil VPC WarBRD Base and Constellation Delta Grip in Lite Mode

User Rating: 5 / 5

Star ActiveStar ActiveStar ActiveStar ActiveStar Active

This guide will cover how to set up a Virpil VPC WarBRD with a Virpil VPC Constellation Delta Grip the old guide is no longer relevant since Virpil has some major software improvements. The newer software is, in general, easier to use and far more stable but can still be a bit overwhelming when using it for the first time. This guide is for the VPC Configuration Tool in Lite Mode since the Pro Mode can lead to bricking the base therefor is only advised for prosumers.

Update.

A new and better VPC Configuration Tool has been released and therefor the guide was updated to reflect that. The updated software release version is VPC-JOY-200325.

Assembly.

When your package arrives you will notice bubble wrap and other packing materials. You will have some spare parts like cams and springs, I use mine stock without changing anything. What you will need is a CR-V #10 bit remember to have one on hands.

Next up is attaching the base to the Constellation Delta grip, there is a connection male plug in the grip. Gently pull it out a bit so you have enough slack to attach it to the connector in the WarBRD base. Then align the grip with the base so it is centred and use the knob on the base to screw it in place. Remember when taking off the grip to gently remove the connection cable.

Connector plug for the grip

The next part is attaching the base plate to the WarBRD base, there are 4 screws in one of the bags. Take the CR-V # 10 bit and align the screw holes and put each screw in, do not screw them in 1 by 1. Screw them in halfway down and then start on 1 corner, any corner you like and screw it down. Then do the same with the opposite screw so the plate aligns correctly and the screw will fit in the flush. Now tighten them all down to the base plate is firmly attached but do not exert too much force. You will also find some M3 rubber pads in the box place them on the bottom of the base plate. This concludes the assembly part, do a quick visual check if the Constellation Delta grip is correctly aligned.

Base plate CR-V # 10


Getting Started.

Plug-in the USB male to a USB 2.0 Female on your PC make sure you use your 3.0 ports for external HDs and USB sticks. Download the latest version of the VPC Configuration Tool from Virpil here: https://virpil-controls.eu/downloads/software.html and install the software on a desired HD or SSD. When connecting your joystick for the first time windows will install some default drivers and it should show up in Devices and Printers. Also, check if your RGB light turns on when connecting the joystick if it does not turn on make sure you have connected the plug inside the grip to the base correctly.

Firmware Update.

Next step is to update the firmware of your Joystick with the latest version, an image is added to show the steps and the location of each step inside the VPC Config Tool.

  1. Click on Firmware in the VPC Configuration Tool,
  2. Select the correct device, if using multiple devices unplug all but 1 to prevent confusion.
  3. Select the correct *.hexc, if multiple files exist check your devices with the latest file date.
  4. Click on the big blue "Start auto firmware update"
  5. This window tells you when the update is done and to go to the next step in the process.

Firmware update steps.

The update should last a minute maybe more if you're on an older PC but the software will tell you when it is done in the dark grey window with the steps taken for the update process.

Profile.

This section is more clear since the instructions are included within the VPC Configuration Tool but the step is included in this guide to prevent confusion.

  1. Select the Profile tab.
  2. Select your Base.
  3. Select your Grip.
  4. Select the side your device is located and used.
  5. Select Create Profile.
  6. Save to VPC Device.

Profile settings.

You can export the profile however the final step will be calibration and you also want to save those settings. Another final step mentioned is the "Save VPC DEVICES" this is required in the final step hence also selecting the "Save current calibration".

Calibration.

Now it is time to calibrate all the axis on your Virpil WarBRD base and Constellation grip. Very important here is NOT to use the windows calibration and that you must use the calibration from the VPC Configuration Tool and you will have to remove any windows calibration by Windows Settings and by typing the search bar "Set up USB game controllers" and then selecting "properties" select the "Settings" tab and click "Reset to default". This should clear windows calibration now head back into the VPC Configuration Tool.

  1. Click on the Axis tab.
  2. Click the "CALIBRATE AXIS"

Axis configuration

Now your in the calibration screen this screen also has instruction included you will see various visual sliders with a red background this represents your axis and they are out of alignment, in this case, there are mechanical parts inside the base measured with sensitive sensors. For this Constellation grip, you have the X and Y-Axis you gently move the stick up, down, left and right. The Z-Axis can be calibrated by twisting the Constellation grip. And now to calibrate the rY and rX that is the small joystick above the scroll wheel and gently move that up, down, left and right. Now you can see the sliders aligned to their mechanical centre and their background changed to blue.

Axis calibration screen

Saving to Device.

Now the final step is to head back to the Profile tab and select "Export Profile to File". Give the profile an easy to remember to name and select save. Each step is now saved to the joystick after each step but keeping a profile will be useful.

Joystick LED.

The LED is still functional but the function is hidden in the VPC Configuration Tool. Follow these steps to enable modify the colors of your LED(s)

  1. Select Pro.
  2. Select LED.

Enabling LED functionality

Your WarBRD and Constellation DELTA is now ready to be used in-game now you will have to configure the buttons to your choice and make sure to save those settings as well since it can be time-consuming. Below you can find a screen of all the buttons they remain the same from the previous guide.


ROG Ryujin 360

User Rating: 5 / 5

Star ActiveStar ActiveStar ActiveStar ActiveStar Active

This is a FAQ for common questions and troubleshooting for the new ASUS ROG series of AIO's. Therefore am writing this article because I could not find much in terms of troubleshooting the new ASUS ROG AIO, this covers the ROG Ryujin 360 and ROG Ryujin 240 AIO's as well as the ROG Ryuo 240 and ROG Ryuo 120 AIO's. Therefore I decided to write a short FAQ and walk through some of the solutions I figured out. Included are also some files to create gif files with or without a transparent background.

OLED picture is stuck, does not refresh or load a new picture.

There is a small chance when testing out various pictures with the ROG AIO OLED screen it seems to jam and does not allow you to refresh the picture. But you can still add text but that keeps building upon the small OLED screen.

  • Turn off your PC.
  • Locate the USB header that connects to the AIO.
  • Unplug this USB 2.0 header and reconnect it.
  • Reboot your PC.
  • Startup LiveDash and change the picture.

Fans or VRM pump head fan spin upon booting.

When booting your PC the fans on your PC are controlled by the BIOS and not the Fan software. Hence they will spin up based on those BIOS settings. To fix this boot into the BIOS and go to Monitor --> Q-Fan Configuration. And select the header(s) you are using. Ensure you are using the PWM Mode and set the CPU Fan Speed Lower Limit to the lowest value possible. Below is an example where the CPU Fans header is used.

Fan Configuration

How to install ASUS plugin for Corsair iCue.

Corsair and ASUS teamed up for a plugin and will be expanding into more ASUS products. For now, only ASUS motherboards with RGB zones are supported and will show up in Corsair iCue. Support for other ASUS components is coming in the future. Follows these steps below to install the plugin.

  • Aura Sync compatible motherboard.
  • iCue v3.23 or higher.
  • Aura v 1.07.79 or higher.
  • iCue ASUS Plugin.

Installation Steps.

  1. Install or update Corsair iCue if not yet installed, Exit iCue.
  2. Install or update ASUS Aura, Exit AURA.
  3. Extract the folder in Corsair\CORSAIR iCUE Software\plugins
  4. Start iCue and do not use AURA.
  5. ASUS Motherboards and in the future other ASUS products will show up in iCue.

Connected devices from Corsair and ASUS in iCue

LiveDash does not uninstall properly, therefore, it stops functioning.

This problem occurs when installing LiveDash and shows no popup that shows the installation progress however a LiveDash icon does appear on the desktop. Can occur when simply trying to uninstall LiveDash as well. LiveDash will shows as installed under "Apps and Features" and trying to install LiveDash will just give a popup that asks if you want to remove LiveDash and simply will not uninstall. This is due to the fact the registry is not cleared of LiveDash thus Windows will think it is still installed.

LiveDash uninstall part 1

  • Double click on LiveDash and wait for the restore point to be created.
  • Confirm the uninstall by clicking OK.
  • Click Finish.
  • Select Advanced and click Scan.
  • This will show the leftover windows Registry items select the items as shown below.

LiveDash uninstall part 2

  • Click next(yellow button) and click yes again on the confirmation pop-up.
  • Select the 2 leftover programs links in the next window.
  • Click finish(yellow button) and click yes on the pop-up window.
  • Now you can install LiveDash again and this should fix this problem, do make sure you have the latest version of LiveDash for more features!

LiveDash blocked by (another) Administrator.

Certificate issue where LiveDash is blocked from running on your PC by Administrator or by an Administrator(the inbuild Admin account). Requires a reinstall of the drivers by doing the following.

  • Open Windows Settings, Win key + x + n.
  • Type in Find a setting: User Account Control Settings.
  • Select the: Change User Account Control Settings.

User Account Control Settings

  • Set to the slider to the bottom, Never Notify.
  • Click Ok and click Yes on the pop-up window.

User Account Control Settings

  • Now install LiveDash or uninstall and reinstall LiveDash.
  • Set to UAC(User Account Control Settings) back to the default setting.
  • Click Ok on the pop-up.

Creating .gif(animated images) or .jpg(static images) for the OLED screen.

First and foremost ensure you stick to the max dimensions of 160 pixels by 128 pixels to ensure you have a nice centered image. And ensure that this is not bigger than 1MB. Any program will work but to make animations you need to use something like GIMP or Adobe Photoshop. A simple jpg can be created with Paint that comes with windows. Even if your image does not exceed the pictures restrictions ensure you use the 160 pixels x 128 pixels or your picture will be off-center.

  • Creating a transparent background.
  • Remove the background layer.
  • Or use the paint bucket tool or convert the background and use color code: #FF0000
  • If there is no solid background then you need to select the portion you want with a Lasso Tool or Magic wand.
  • If you can remove the background due to the selection process hit Ctrl + Shift + I in PS or select Inverse.

For those who want even less hassle don't worry I made a small .zip file that contains a transparent gif file, black background gif file and a PSD work file with the layers you need so you can use them in an editing program like Adobe Photoshop and GIMP. Those files are called ROG_AIO_gif_files can be found here: AIO OLED Templates

Update fails in ASUS Armoury Crate.

When using the ASUS Armoury Crate application update does not parse the update for the ROG Ryujin and Ryuo even after a reboot of the PC. Seems to be a problem with the Armoury Crate app and can easily be fixed by heading over to the corresponding support page and download the installer for the newest version of the Armoury Crate app.

- Paul "HisEvilness" Ripmeester


SEO Tools 2019

User Rating: 5 / 5

Star ActiveStar ActiveStar ActiveStar ActiveStar Active

Simple and free SEO tools, 2019 Edition.

Below you will find a list of online free SEO tools you can use for various websites to improve your SEO, may it be a custom webpage from a WordPress or Joomla installation. Many free SEO tools lists are filled with paid or semi-paid solutions my list will cover those you can use for free may it be you have to register for a free account. This free SEO tools list covers the whole range of SEO needs, so anything from someone starting out with SEO to more advanced SEO users. SEO tools you may find in this list are for keywords, backlinking, site and image optimization, and Google PageSpeed such as load times and total requests. This is my free SEO tools list for 2019 you may use all or some to increase your site traffic.


Webmaster Tools.

There are 3 search engines that allow to submit sitemaps and analyze your site performance based on their own ruleset. These are powerful SEO tools in itself because the data comes straight from the source. Important to note here that with Bing that they provide the data for Yahoo as well. Data mine search results that apply to your website and the number of clicks you get from search results. As well as showing the number of pages from your website that have been indexed or ignored or have errors. And do not forget to submit your site map so the crawl bots will visit your site sooner than later.

  • Google Search Console: Google Search Console
    T
    he biggest search engine and a must if you want to start with SEO if you want to improve your traffic with big data straight from the source.
  • Bing Webmaster: Bing Webmaster
    M
    uch smaller than Google and they still use meta tags however it can still give you a good amount of traffic.
  • Yandex Webmaster: Yandex Webmaster
    T
    he Russian search engine they offer their services in English as well and a great way to reach out to a Russian audience.

Webpage optimization and performance.

Several websites offer several services and result to analyze the various aspects of your websites such as loading time, minifying various coding aspect such as .css and .html as well as the number of requests. An important ranking factor in SEO is the loading speed and content optimization. As well as some aspect to indicate the end-user experience something that has become a more important ranking factor over time, this includes meta and title description and the structure of your website. The most important ranking factor to consider is that for Google since that yields the most traffic for your website but it is wise not to neglect the other search engines and take them into consideration. 

  • GTMetrix Weekly: GTMetrix
    By far the most popular optimization and performance test on the web it will give you a good idea and what you need to improve on as well as providing a waterfall tab that shows in sequence how your site loads how much time it takes. What makes it even better is that you can test for PC and mobile devices from various location to test how your website will perform to a global audience.
  • Gift of Speed: Website Speed Test & Performance Optimization Tools
    A
    nother optimization and performance test that also allows you to test from different locations but only for PC. They do offer a small selection of tools to use with their test so you can optimize on the fly.
  • Google PageSpeed Insights: PageSpeed Insights
    S
    traight from the source this test is from Google and will give you an indication of how you will do in ranking based on your website speed. Wise to use to compare to other tests if the results are roughly the same.
  • Webpage Test: WebPageTest - Website Performance and Optimization Test
    T
    his test is much more granular than any of the other tests and allows for a wide selection of test locations as well as devices with a waterfall. Great for deep optimization of your website for SEO.

Backlinks and Analyzers.

Everything for backlinks and SEO related data linked to links, the amount of external and internal links, new links and lost links with that sprinkled in some content analysis with your links. Important to know who links to your website and if they do link to what page. Collecting links is vital for your growth as well as being a ranking factor in SEO. Here are some great free tools that allow you to give a better break down of links to your website and links within your website.

  • SEO Web Page Analyzer: Web Page Analyzer Free Tool for SEO
    Offering a short summary of your website regarding links, keywords, and social media offers some features from the previous section. Simple and easy to use tool with all the data contained in one page.
  • Open Link Profiler: Free link analysis tool - Link research
    By far the best free link analyzer out there offers a wide range of statistical analysis of your backlinks. You can see the age, anchor text, domains and pages of backlinks to your website.
  • MOZ: Moz Pro
    The free version offers some analytics for backlinks as well as page and domain authority. Great way to verify some of the backlink data you get from other tools.
  • Browseo: Your New SEO Browser: Browseo
    Look at your website from a search engine perspective without any style sheet and what is important for SEO.

Keyword and Search Trends.

See how your content stacks up in the world and see what the trends are. Very important for SEO even more so if you want to take a deeper dive into SEO. These are the tools to find the trends related to the content of your website and search queries from users.

  • Answer The Public: AnswerThePublic: that free visual keyword research & content ideas tool
    An absolutely great tool to visualize a massive amount of data regarding specific queries for keywords you are using or want to use. Breaks down your search and visualizes them in an easy way great for SEO.
  • Google Trends: Google Trends
    Coming straight from the source see the latest search trends by country so you can adjust your website content accordingly. See current and past search trends coming straight from Google.
  • Google Correlate: Google Correlate
    T
    he little brother of Google trends this gives you are a more granular opposite method of searching for keywords. It will look for patterns regarding your input and tries to find correlating data sets.

Images and Optimization.

Images make up the larger portion of your website site there for it will impact your SEO score if you do not optimize them. These tools will ensure you will keep your quality images but reduce their size so your website will load faster. What is also important is a favicon for your website in various sizes and a search engine to see who is using your images on the web. Great free tools to help you optimize your end-user experience.


Misc.

Some other tools that I consider to be vital for use in SEO they fill in a niche you won't find on any other the other categories. Ranging from Content Delivery network to a sitemap XML generator and a little tool that pings various crawl bots that you have updated your website content all in all these tools should give you an extra edge when it comes to SEO.

  • Cloudflare: CloudFlare
    My favourite CDN it will greatly help SEO and speed of your website loading times and improve your overall SEO score. Easy to use and free with a lot of options with most of them being a couple of clicks.
  • Small SEO Tools: 100% Free SEO Tools - SmallSEOTools.com
    An SEO swiss army knife this site provides some great free tools that basically covers every category in this article an absolute overdose of tools however you might some not as great a specific tools previously mentioned.
  • SERP Simulator: SERP Simulator - SEO Title & Meta Description Tool 2018 | SERPsim
    See how your the microdata markup of your website translates into a visual representation.
  • Ping-o-Matic: Ping-o-Matic!
    Notify a wide range of search engines and websites that you have updated the content of your website.
  • XML Sitemap Generator: Create your Google Sitemap Online - XML Sitemaps Generator
    Everything you need to generate an XML sitemap that you can then submit to the various search engines.

This concludes my list of great free and useful SEO tools for 2019. Hope this helps everyone out there who just started with SEO or just looking to improve their website a bit and venture into the phenomenon of SEO. By no means, is this list a bible but a selection of tools from my experience trying to optimize my websites. Also, consider that you do not need every tool every day or week you can use most of the SEO tools on a monthly basis or every time you launch a new website.  Be sure to share and of course, a link would help me out a ton.

- Paul "HisEvilness" Ripmeester

 
SEO in 2019, updated tips & tricks.

User Rating: 5 / 5

Star ActiveStar ActiveStar ActiveStar ActiveStar Active

SEO in 2019, updated tips & tricks.

Google has updated it's SEO rules and scoring mechanics and sites will also be subjected to manual review by actual people. This means that the "old" SEO game of tricking the system will be harder or even useless. That said if you practised good SEO before not much will change for you since you never tried to trick the system, to begin with. A 200-page manual was released/leaked with instructions from Google to the reviewers on how to proceed/rate websites from now on. With the vast amount of websites out there, it will take some time before you will be reviewed but manual reviews are here to stay and will most certainly weed out the bad SEO practices of the past. This will be a short and sweet article going over the basics and some end-user examples from me the author.


What is SEO?

SEO stands for Search Engine Optimization it basically is about how a human will try to make a site in terms of the actual coding so that a machine/algorithms/AI can understand so it may be ranked and listed in a search engine. Various factors will set your ranking XYZ, trying to cheat the system will be penalized as well as being harmful to web users, helpful content, as well as content from reputable people, will be ranked higher.


Content is King.

Google and any other search engine for that matter provide one service and one service only that is to provide a list of results from a web user query. so it is in a search engine's best interest to answer any query the best possible way. To do so search engines as Google will use programs/algorithms to visit a site and see how it may be listed on their site. For the 2019 update, Google now tries to determine the user's reputation as a writer on the content he/she provides. You do not per se have to hold for instance a Ph.D. in a field but it would help if you do and Google can find that on the web. What also counts is experience Google tries to determine that by finding out more articles of a subject matter you have written about or that you collaborated on with others. It is not just written content it can also be images and videos or even podcasts. Another factor will be back-links to your site or a specific article as well as the authority of those links, the big change this time around is the authority of the link(s) so it is wise to ensure if you want to work on backlinks that those come from good sites in an organic way, so no paid linking as well as advertisement. In short, go for quality over quantity when you try to generate/create backlinks. The next change is the user experience, how easy is to access the information and how do you provide useful content to the web. A fast responsive website that is not cluttered with advertisement and has a proper markup in terms of coding as well as the markup of the text so the end-user can read without distractions and does not leave your site and goes elsewhere. A higher bounce rate is a good indication that a user found what he/she is looking for. And finally in somewhat ties into backlinks what do other random web users think of your site and the content it provides. Reviews or links as a source are a great way to determine that factor.


Content Delivery Network.

A CDN or content delivery network is a great way to gain access to more people all over the world by having your website caches in a cloud-like network. This means that the main server you work on and hosts your site is located near you, your content will be served to web users by a local server decreasing load times and increasing responsiveness. Google as others also considers load times and optimization a factor when ranking your site so even though you have basic hosting a CDN will help with those factors by speeding up that process since they always use high-end servers and internet connections.

SSL and HTTPS.

Another important change is the enforcement of the https protocol for all websites, not just websites that have online transactions. So your entire website has to be using the https://your content, to increase its ranking. This will prevent the spreading of malware and make the web a safer place. This also ties into the end-user experience. You can either get an SSL certificate to start using the https:// protocol from your hosting provider or from your CDN network.


What does it mean in practice?

Let's take my website hisevilness.com and this article as an example, it is a personal webpage of a person who writes about technology as a hobby and the YMYL would be my work in the Defense industry. And the website content is a whole spectrum of subject matter and not a single subject. I do not buy links nor do an advertise on the web all my work is organic and spreads by word to mouth.

Reputation.

My reason to write this article is simply that I also do overclocking of pc hardware which can also be found on the website and SEO is like overclocking your website and I like to share this on my website. In order to establish this, an algorithm or reviewer will look at my social media platforms, steam profile and other content regarding the subject matter on this website. So if you want to establish a reputation link to your social media profiles, profiles like steam, etc. This will reflect who you are as a person, in the case of a business you will have separate profiles so you should link and backlink from those to your website. Try to find older examples of any of your activities or business activities mention and link to those. Share your links on social media like tweet out if you finish an article so people can find it that way. Put your work on Pinterest but ensure you do not have a small sample size of backlinks but a wide variety of relevant backlinks to your site. By relevant is that I get backlinks from overclocking sites to my articles and not from a car sale shop. A secondary source is my online gaming adventures there a logos, screenshots of scores, etc showing that I also spend a considerable amount of time working with hardware and using that hardware. The YMYL would be my work while most of this would not even be on the internet and is even classified it does have mentions in video's like a Peshmarga T-55 tank bouncing of an ATGM(Anti-Tank-Guided-Missile)of the front armor by angling its armor just before impact resulting in a non-lethal impact and the survival of the T-55 tank crew. Google algorithms and reviewers can find these all on YouTube another Google platform. So ensure if you have YMYL content Google can find this by having an online profile that reflects that. While most people will have a much easier time getting their YMYL by getting reviews I, unfortunately, can not due to the nature of my work.

Content Markup.

The end-user experience is important and is made easier by providing content that has a good markup in terms of the coding and in terms of the markup of the actual text. The way your code is presented to Google is important do not clutter your website with crap. Here is a snapshot of my website by GTmetrix.com: https://gtmetrix.com/reports/www.hisevilness.com/NwgNb4Cs My PageSpeed score(Google) is 96% and 83% for Yslow(Yahoo). Run the GTmetrix tool on your own website and see where you can make improvements these will cover both the coding and the content. Just to highlight one major scoring aspect is the image size in size as well as dimension make sure you serve images that fit your page and that they are not resource-intensive in terms of size(kb/mb). An easy way to optimize your images is by using https://tinypng.com/ and re-upload images that were too big in size to a smaller size also speeding up the user experience in the process.  Text markup it is important to remember not to spam caps or use H1 headers, use H1 header once to lead in the article then use H2 headers to lead in paragraphs and subparagraphs with H3 headers.

Content Delivery Network.

Make sure you can deliver your content around the globe from local servers without too much hassle and a CDN can be free or paid. I am used www.Cloudflare.com as my go-to CDN. A CDN will also make it faster for Google to load and search your content. As mentioned above the scoring of GTmetrix thus Google shows minifying CSS/JavaScript/HTML a CDN service provider can do that for you with the click of a button. My SSL certificate is also from my CDN so my entire website is using the https:// protocol. As well as using basic GoDaddy hosting that is a shared solution the CDN has greatly increased loading speeds on PC and mobile devices.


Final thoughts. 

These are just some of the changes but by far the biggest and will have the most impact on how the web user will be able to find your content for the most part on Google. It is still wise to submit your website to Bing and Yandex so it may be found by a wider audience. For a more in-depth analysis in the form of a webinar, I would refer to this YT video below as well as Google PDF distributed to the reviewers linked below. And for an in-depth SEO article, I previously have written surrounding the Joomla CMS found here: https://www.hisevilness.com/articles/technology/seo-tips-tricks-for-joomla-cms.html 

Google Manual User Review Guide PDF: https://www.hisevilness.com/images/PDF_Files/searchqualityevaluatorguidelines.pdf

- Paul "HisEvilness" Ripmeester.

 
Intel i7 overclocking the 8086K.

User Rating: 1 / 5

Star ActiveStar InactiveStar InactiveStar InactiveStar Inactive

Intel i7 overclocking the 8086K on Z390 a Motherboard.

This helpful guide is for overclocking the i7 8700K as well as the i7 8086K the only difference is that the i7 8086K skew is binned at the expense of the i7 8700K skew, that said the i7 8700K should reach 5.0Ghz in most cases whereas the i7 8086K should be able to get between 5.1Ghz and 5.2Ghz or even 5.3Ghz if you have a golden chip. The settings here are an example to guide you to achieve your own overclock and will be different on a case by case basis. Each component is different per build as well as the silicone lottery playing its part. Furthermore, this will be for the Z390 platform, but it should also work for the Z370 platform with the main difference is wifi support for Z390 on the chipset as well as some minor BIOS tweaks. I have also added my Vcore curve for my 8086k overclocking experience as well as the LLC, AVX offset, Ringbus, and validation methods.


My Rig:

  • CPU: i7 8086K limited edition.
  • Cooling: Corsair H150i Pro AIO.
  • Motherboard: ASUS Maximus Hero XI Z390.
  • G.Skill TridentZ RGB 32GB 3200Mhz, 4 x 8GB.
  • GPU: ASUS ROG Strix 1080ti.
  • PSU: Corsair RM850x with Cablemod Pro cables.
  • 6 x Corsair LL120 RGB fans, 3 x Corsair ML120 fans.
  • Storage: m.2 960 EVO, 1 x 500GB 860 EVO, 1 x 1TB 860 EVO, 2 X 2GB Seagate Barracuda.
  • Case: Lian Li PC-O11-Dynamic Tempered Glass.

This is first and foremost a gaming PC with high overclock in mind, optimized for gaming and showcase PC. AMD Ryzen is still a great value option and in my opinion and makes a better workstation, NAS Rig and Capture Rig. With more cores for less AMD Ryzen is a great entry into a work station and productivity and does not require a higher clock speed and overall benefits more from more cores. However, this does not go for all applications that for instance benefit the Intel integrated graphics however if you stack core per core AMD offers much greater value. For that instance, I made my main gaming build with Intel and AMD is the productivity build.

You can find my other guides related to the above here:


Getting started with the 8086k overclocking.

The usual checks, BIOS update, Windows update, driver updates, and remove bird shit from the silicone(delid). For delidding and relidding, I used the Aqua-Computer Dr Delid tool. The Der8auer Delid Die Mate 2 should also work. If you do not want to delid, you will run into higher temperatures and CPU throttling at lower voltages. The Z390 motherboards offer a more robust VRM over the Z370 motherboards, but they also should work fine for the Intel i7 8086K and 8700K. In this case, I am using the Maximus Hero XI that has an excellent Prediction display section on the left side it will give you a rough range of voltages and clock speeds for you to work with as well as a rating for your cooling solution. However, this is still guesswork on the ASUS motherboard side and is not featured on other brands like MSI and EVGA etc. Do take this with a grain of salt my initial overclock range was lower and I managed to get to 5.2Ghz stable and even boot into 5.3Ghz on my i7 8086K. Something else to consider is your clock with AVX loads. It will give a ballpark idea on what your voltage is for the overclock with AVX and without AVX loads.

You also want to download the following programs for stress testing your overclock. These are a vital tool for stress testing and monitoring if you already have tools you can use those but these programs I highly recommend and were used while writing this overclocking guide.

ASUS Maximus Hero XI UEFI BIOS Prediction


BIOS Settings.

Time for some preparations and do some of the basic settings these are the Digi+ Power Control and Internal CPU Power Management settings. As usual, the settings naming convention might be different for other motherboard vendors like MSI, but here an ASUS Maximus Hero XI was used. The most critical part here will be the CPU Load-line Calibration you want to predict your Vdroop and ensuring you do not over or undershoot. In my case, I picked LLC 6, so I have a slight undershoot vs picking LLC 7 that would overshoot and generate a lot more heat. Again this will come down to the silicone lottery in each case and how much voltage you need for your overclock vs the Vdroop you have and the LLC you need to compensate for it.
For a more detailed rundown on LLC, VDroop and voltages for overclocking reference this article: https://en.wikichip.org/wiki/load-line_calibration.

Extreme Tweaker --> External Digi+ Power Control Settings.

  • CPU Load-line Calibration: to level 6 or 7, once achieving a stable overclock you could try to set Load Line Calibration 5 even.
  • CPU Current Capability: to 170% or the highest possible % on other motherboards.
  • CPU VRM Switching Frequency: set to Manual and set it to 500.
  • CPU Power Duty Control: set to Extreme.
  • CPU Power Phase Control: set to Extreme.
  • DRAM Current Capability and DRAM Switching Frequency settings are only needed when you want to overclock your RAM, for now, you leave that as is.

Boot Voltages is only needed when you want to extreme overclocking on LN2 etc. These settings do not apply for overclocking on Air or a Closed or Open Liquid Loop.

ASUS Maximus Hero XI External Digi+ Power Control

 Extreme Tweaker --> Internal CPU Power Management.

ASUS Maximus Hero XI Internal CPU Power Management

Advanced --> CPU Configurations --> CPU - Power Management Control.

  • Boot performance mode: I've set this to Turbo Performance however this can be left as the default setting.
  • Intel(R) SpeedStep(TM): Should be Disabled due to previous settings changes but double-check.
  • CPU C-States: Set to Disabled.

ASUS Maximus Hero XI CPU Power Management Control


Overclock Settings: CPU Core Ratio, voltages, Ringbus, and misc voltages.

First, an important to note about the core voltages, also known as Vcore, there are different save voltages for other cooling solutions and whether you delidded your CPU. As mentioned above, having a delidded CPU with liquid metal and a closed or open loop will have more significant overclocking potential. While the actual voltages will not kill the CPU the current could kill your CPU thermal protection, and other safeguards are in place, but it is better to play it save so adhere to the Vcore guidelines listed below. Ignoring these could lead to faster chip degradation and instabilities as well as thermal throttling.

  • Save Voltages for light overclocking, 1.2 Vcore @ 4.8Ghz for the 8700K, 1.2 Vcore @ 4.9Ghz for the 8086K.
    This is a good and safe starting point even if you have a good chip lower voltages will help to keep temperatures lower, start here if you are air cooling.
  • Save Voltages for medium overclocking, 1.3 Vcore @ 4.9Ghz, 1.3Vcore @ 5.1Ghz for the 8086K.
    Most data for the 8700K and 8086K stipulates that these are suitable starting voltages when using open or closed-loop cooling.
  • Above 1.4Vcore @ any frequency you will run into thermal throttling, any overclock on the 8700K or 8086K should be below 1.4Vcore to prevent thermal throttling and maintain save operating thermals.

Again it will vary what your CPU will run on voltages wise however the general rule is that lower voltages are better and you will overclock higher if your chip reaches higher frequency on lower voltages. Now let's dive into applying those overclock settings, some settings vary between motherboard types and vendors you should be able to double-check on the internet for your motherboard. However, the ASUS series should have the same naming conventions, and lower-end motherboards might have fewer settings you can change.

Extreme Tweaker.

Starting from the top, set your memory XMP under Ai Overclock Tuner to XMP you can tinker with your RAM settings once you have confirmed your CPU overclock stable. BCLK Frequency will affect your entire overclock, so any changes here will change the CPU core frequency, Ringbus frequency, and RAM frequency leave this alone for now. ASUS MultiCore Enhancement is for stock settings; it does not affect manual overclocks so it should be Disabled. SVID Behaviour I went at a Typical Scenario; however, it does not affect your 8086k overclock or 8700k overclock since you will manually override these settings. CPU SVID Support should be disabled unless you are using Adaptive or Offset voltages.

ASUS Maximus Hero XI Extreme Tweaker Part I 

ASUS Maximus Hero XI Extreme Tweaker Part II

The above settings are vital, so you're actual overclock will not be affected in any way shape or form now it is time to dial in the final settings and test the overclock. First, the important setting is the AVX Instruction Core Ration Negative Offset, AVX is in simple terms an instruction set for your CPU that gives it a heavy workload that requires more voltage thus generates more heat and is usually found in productivity and not in gaming or day to day tasks. Therefore motherboard vendors added the option to offset your CPU frequency for AVX loads so that you may achieve greater overclocks for none AVX loads like gaming. Some synthetic benchmarks like Prime95 will use AVX loads so be aware of that. Below are some suggestions for you to test out but I start with AVX frequency for the 8086k of 5.0Ghz and 4.8Ghz for the 8700K.

  • AVX offset for normal to bad chips should be 2 or 3.
  • AVX offset for golden chips can be 1 or 0.

ASUS Maximus Hero XI Extreme Tweaker AVX

Next up is setting the CPU Core Ratio this setting will determine your CPU frequency in GHz, so a setting of 50 will result in a 5.0Ghz frequency. For the Maximus Hero X and XI, you have the option to either set the frequency per core or Sync All Cores. To achieve the best performance it is best to use Sync All Cores so select that and fill in desired starting frequency under 1-Core Ratio Limit, for the 8086K we will start at 50 to get a 5.0Ghz frequency overclock. The 8700K it is best to start at 49 to achieve a 4.9Ghz frequency overclock. The BIOS will set the same frequency for all the other cores later on you can revisit this and see if you, for instance, can apply a higher overclock on cores 1 through 3 and lower the overclock on cores 4 to 6.

ASUS Maximus Hero XI Extreme Tweaker CPU Core Ratio

Next up is the Ringbus of your CPU, basically is the internal CPU communication speed for cache, IGP, memory controller etc. Performance gains here are very small none the less any gain of performance is wanted. But it is wise to start with the stock Ring Bus speed of 43 as in 4.3Ghz and revisit this setting once you confirmed a stable core overclock. A 1:1 overclock is considered the best, but I run mine at 4.8Ghz unofficial the best overlock is within 0.5Ghz(500Mhz) or less over the CPU frequency. Another important setting here is CPU Core/Cache Current Limit Max set this to the maximum, for the Maximus Hero XI that is a 255.75 setting. And leave the Ring Down Bin setting to Auto. Also, ensure the Min. CPU Cache Ratio and Max. CPU Cache Ratio remains the same.

ASUS Maximus Hero XI Extreme Tweaker RingBus

The final step is setting the Vcore or CPU Core/Cache Voltage, this setting will apply to the CPU and the Ringbus to maintain a stable overclock. And you will revisit this section multiple times when your overclock passes or fails. For now, you can set the CPU Core/Cache Voltage to Manual Mode other modes are more finicky and manual mode while being less power efficient does offer greater overclock stability. Under - CPU Core Voltage Override fill in 1.3 this will apply a 1.3 voltage to your CPU for the 8086K this should be more than enough to reach 5.0Ghz, and the 8700K should be able to reach 4.9Ghz. The CPU VCCIO Voltage and CPU System Agent Voltage should be initially left to Auto but should be changed later on to lower voltages and decrease thermal output but only once you established a stable overclock. You can opt to save your settings under Tool or proceed with hitting F10 to save your settings and reboot your PC. The first boot might power up and down this is your PC testing out your overclock settings but should boot into windows. If your PC fails to boot the overlock failed, and you should either lower the voltage of the CPU Vore/Cache Voltage or lower the CPU frequency CPU Core Ratio.

ASUS Maximus Hero XI Extreme Tweaker Vcore


Stability Testing.

Now that you have booted into windows you should do some stability testing to ensure your overclock is stable I usually start with Cinebench and do three runs to give me a good indication as well as ensuring the overlock does not generate more than 90C of heat preferable lower than that. If your initial Cinebench runs pass you can head back into the BIOS by holding Shift, then click restart from the windows menu, then select Advanced Troubleshooting Tools, Advanced Options and select UEFI Firmware Settings or simply restart and keep pressing Del or F2 when booting up. Depending on a pass or fail you either lower or increase the CPU Core Ratio and boot back into windows and run Cinebench again to see if you fail or pass. Failing again, you will need to lower the CPU Core Ratio until you are stable at the same CPU Core/Cache Voltage.

If you pass, you should increase the CPU Core Ratio until the Cinebench runs fail and then increase the Vcore but not above 1.4 volts. Once you have established the max possible overlock, you should do a final stability test using Prime95 using the Small FFT's setting and run that for at least 30 minutes without crashing or the program reporting errors. Very important as well is ensure with the final test to check your temperatures with a program like HWiNFO64 and make sure you do not go beyond 90C or thermal throttle altogether. When doing so, make sure you either have a fan curve that will run at 100% with temperatures above 75C or set your fans manually to run at max RPM.

Once you completed those test you can consider your overclock stable you can now opt to adjust the Ringbus speed and lower the CPU VCCIO Voltage and the CPU System Agent Voltage and repeat the stability testing with starting with Cinebench runs then confirming stability with Prime95 while keeping an eye on temperatures in HWiNFO64. And remember to give the Load Line Calibration a shot at setting 5.


8086k Vcore Curve.

To help out some other overclockers, I went back into the Bios and did some testing with various clock speeds to show the Vcore curve for my 8086k. Here are my results yours may vary due to the silicone lottery.

8086k @ 5.0Ghz.

  • 50 Core Ratio.
  • Vcore @ 1.230
  • AVX -1
  • LLC 6
  • Ringbus @ 47
  • Validation with P95 Small FFT's and Custom 8K FFT's.

8086K @ 5.1Ghz.

  • 51 Core Ratio.
  • Vcore @ 1.295
  • AVX -1
  • LLC 6
  • Ringbus @ 47
  • Validation with P95 Small FFT's and Custom 8K FFT's.

8086K @ 5.2Ghz.

  • 52 Core Ratio.
  • Vcore @ 1.380
  • AVX -1
  • LLC 6
  • Ringbus @ 47
  • Validation with P95 Small FFT's and Custom 8K FFT's.

8086K @ 5.3Ghz.

  • 53 Core Ratio.
  • Vcore @ 1.425
  • AVX -2
  • LLC 7
  • Ringbus @ 47
  • Validation with P95 Custom 8K FFT's Only.

Voltage Curve from 4.9Ghz to 5.3Ghz

Now you should have a firm grasp on how to overclock an 8086k or 8700K on a Z390 motherboard. The numbers used in the pictures are for my end-use case and might vary with you. Cinebench runs scores should be around the 1700 mark. Slight instabilities can also be spotted when Cinebench hangs for a second or more. Increasing the CPU Core/Cache Ration by 0.005 can even fix that. Remember to share my guide if you find it useful.

- Paul "HisEvilness" Ripmeester.

 
Samsung Galaxy A Series

User Rating: 5 / 5

Star ActiveStar ActiveStar ActiveStar ActiveStar Active

Samsung A3/A5/A7 2017 Root & Oreo OS upgrade Tutorial.

I found a great way of turning my Samsung A5 2017 into an A8 2018 in terms of the OS through a ported OS, as well as having root access. I found current guides somewhat confusing so I decided to write my own guide to root and install the OS. But before we start this can brick your device so make sure you make back up of all your files, contact list and data on a micro SD card and then back up those to your PC for redundancy. Again do this at your own peril however in a worst-case scenario you have to install a stock ROM and start over, something I will cover in the last part of this guide. Also, an important note bank apps tend to NOT like rooted phones, for this reason, I would advise against rooting and installing a custom OS or simply get a 2nd phone just for banking apps I am using a Samsung A3 2017 for banking apps that I left untouched and unrooted. This tutorial also works for the Samsung A3 2017 and the Samsung A7 2017 version but in this case, I am using a Samsung A5 2017 to write this tutorial.

A glossary can be found here: Samsung Galaxy devices root, recovery, and custom ROM FAQ.


Preparations:

The hardware side and enabling developer mode.

  • A Samsung A3/A5/A7 2017 Phone.
  • Micro SD Card of a capacity of 3GB or more.
  • Developer Mode Enabled(How to below).
  • Samsung USB Cable & any PC or Laptop.

The enable developer mode procedure:

  • Go to Settings.
  • Scroll down to "About Phone".
  • Software Information.
  • Look for the infobox "Build number".
  • Tap this 7 times, after 3 times you will get a notification "you are x tabs away etc"
  • Head back to "Settings".
  • Scroll Down.
  • Select "Developer options".
  • Enable: "OEM unlock".
  • Enable: "USB debugging".

And you are done preparing to root and install a new OS to your Samsung A3/A5/A7 2017 phone. The next steps will be downloading the right software versions and utilities to root and install the Android Orea 8.0 OS. Below I will list and link all the files you need including a link to a zip file stored on my site to download all the files but for those security nuts out there I will provide a link per download so you can verify the content of each individual zip file.

Download the following files:


Now extract the Odin3 zip file on your desktop or desired folder and place the TWRP zip file in there as well, place the RMM-State Bypass Mesa v2, Magisk v18.x and HadesRom Oreo Stock v6.0 on your micro-SD card.

  • Power off your phone.
  • Hold the following buttons: Home button + Power button + Volume DOWN button, this will load you into a green screen with "downloading".
  • Start Odin3.
  • untick the Auto-Reboot.
  • Under AP select the TWRP zip file you placed in your Odin3 folder.
  • Click Start.
  • Wait for the Odin3 program to say Pass, a big green box that says Pass right below the Odin3 program header.
  • Hold the following buttons: for all the 3 Galaxy A series Power button + Volume DOWN button to power down your device.
  • Hold the following buttons: For the A3 Volume Up + Home Button + Power Button, A5 Power button + Volume UP + Home button, for the A7 Volume Up + Volume Down + Power Button, and release on the Samsung, screen to enter TWRP.
  • Swipe to unlock or simply select Wipe.
  • Tap: "Advanced Wipe" and select: Dalvik Cache, Cache, Data, System.
  • Select wipe again and tap the: Format Data(this step is only needed when coming from the stock ROM"
  • Tap the "Select Storage" button and select your micro-SD card.
  • Select the RMM-State_Bypass_Mesa_v2.zip.
  • Now swipe the "Swipe to Confirm Flash"
  • Select and tap Reboot and select "Recovery".

The next step in TWRP is to root your device using Magisk v18.x or newer. And allows for root access on your phone.

  • Since you rebooted into TWRP in the last portion of this guide select Install.
  • Select the Magisk zip file.
  • Swipe the "Swipe to confirm Flash"
  • Select Reboot and select Recover.

So now your device is rooted it is time to install the custom Hades ROM you can also opt to just keep your device as is and not continue with the next step of installing a custom ROM.

  • Last step you booted back into TWRP.
  • Select Install.
  • Tap "Select Storage" and select your micro-SD card.
  • Select the "hadesRom_Oreo_Stock_v6.0"
  • And now swipe the"Swipe to Confirm Flash"
  • This will install the custom ROM.
  • Now select Reboot and tap "System"

This should now boot into your new Oreo 8.0 OS and will prompt you to do the setup as usual. If you followed this guide to the letter anyway below I will go over the steps when you hard or soft brick your device. When you do or corrupt any files by unplugging or stopping any flashing in the above-mentioned steps you will need to install the stock ROM and start all over. The main reason why everyone says make backups, while I never had any problems this is just a cover all the basics guide.

First of all, you will need to find a stock ROM of your phone, may it be the Samsung A3/A5/A7 2017 from the correct country and provider. Sites might require you to register and the download speeds might be somewhat slow of premium membership.

After obtaining the correct or generic stock ROM you will need to unzip the files in a folder on your hard drive that can van easily find them. The next step is to open Odin3 and connect your phone via the USB cable. If your phone does not even shut down or does not respond simply let the battery drain.

  • Power off your phone.
  • Hold the following buttons: For the A3 Volume Down + Home Button + Power Button, A5 Power button + Volume UP + Home button, for the A7 Volume Up + Volume Down + Power Button, this will load you into a green screen with "downloading".
  • Select the BL file, files you unzipped starting with BL_ in Odin3.
  • Select the AP file, files you unzipped starting with AP_ in Odin3.
  • Select the C P file, files you unzipped starting with CP_ Odin3.
  • Select the CDC file, files you unzipped starting with CSC_ Odin3.
  • Ensure that only F.Reset Time and Auto Reboot are ticked.
  • Select Start.
  • Wait for the big green box with Pass it will then reboot into your stock OS.

This will recover any damage, unroot/unbrick and unfck your Samsung Phone. And you can opt to redo the steps above or call it a day. In any case, I hope you enjoy this tutorial and the endless possibilities an unrooted phone gives you. You can find my guide for the Samsung J6 2018 here: Samsung Galaxy J6(2018) guide to Root and Custom ROM and a general guide on using TWRP, Magisk and Odin for all Samsung Galaxy devices here: Guide to custom recovery and root on the Samsung Galaxy series.

 - Paul "HisEvilness" Ripmeester

 
Streaming and/or recording using OBS NDI Tutorial.

User Rating: 5 / 5

Star ActiveStar ActiveStar ActiveStar ActiveStar Active

OBS and NDI streaming and recording tutorial.

This will be a quick run down to record and stream without the need for a capture card. Streaming directly from your gaming rig without a capture card will result in performance loss in a game. While initially, I was looking to buy a capture card the end result was disappointing. My main monitor is a 1440p 165hz refresh rate and the capture card locks the refresh rate to 60hz and the Duplicate Desktop option also generates problems on its own. And you still have to run software from your main pc besides this requires resources it also means capturing in-game means you can not alt-tab as it will cut the feed and displays your captured desktop. However, I went back to the web trying to find some way I can capture footage and have more freedom doing so. Here is where I stumbled upon NDI for OBS it removes all restrictions I have with a capture card and allows for much better fine-tuning of your whatever you want to capture.

Pros:

  • No capture card needed.
  • No performance impact on your main/gaming rig.
  • Recording and streaming in high quality at the same time.
  • Capture any resolution size and increase or decrease the resolution size.
  • No refresh rate cap on the main/gaming rig.

Cons:

  • Requires a 2nd PC.
  • Takes up LAN bandwidth.

Getting Started with OBS and NDI.

You will need a 2nd PC, this can be any PC or laptop the better, of course, will result in better footage as well as being able to stream and record at the same time if you are a content creator as well. You can start out with a very cheap 2nd hand pc with cheap mice and keyboard as well as a screen. you can use 1 screen but this would mean you will have to change feeds what is suboptimal and you would have to set everything up before starting a stream and or recording. however, you would only need an iGPU or basic GPU since you will not use that hardware to capture any feed from your gaming rig. In terms of RAM, you will need 8GB however you will be needing a strong CPU since all encoding is done with the CPU. In short, the more cores and the higher the frequency the better, starting with a Ryzen CPU or older gen Intel CPU would yield the best results. 

For future reference, I will list my NAS/Capture rig specs, nothing special about it I am using parts from my older gaming rig I recently upgraded.

  • CPU: Ryzen 5 1600X overclocked to 3.9Ghz.
  • RAM: DDR4 Corsair 16GB 3200Mhz.
  • GPU: ASUS RX 570 4GB(no iGPU on Ryzen).
  • Mobo: ASUS X370 Gaming-F.
  • Storage: M.2 C Drive, SSD Gaming drive, Striped RAID Array.

The Raid array is for storing the footage, you do not need any M.2 or SSD for a Capture rig I just had these drives on hand. Another important note for those who overlock either of their rigs ensures your fan curve is set to create a minimal amount of noise. Having a beefy CPU cooler with a higher TDP will help greatly reducing noise while maintaining cooler CPU load temperatures. I am a fan of the Gelid Phantom Black overkill for a NAS/Capture rig but it barely makes any noise so a perfect solution for a modest price(35 Euro). While running a Corsair 150i Pro 360 radiator with push/pull on my 8086k @ 5.2Ghz, delidded and liquid metal applied and resealed. 

Besides the obvious OBS installation on both PC's or Laptops, you will need the NDI plugin the installation file can be found here: OBS NDI You will need to install this on both systems and reboot. Your gaming rig will transfer the captured feed over your LAN or Wifi so ensure those can handle the increased traffic. I am recommending you are at least on a 1GB LAN using Cat5e cables, a 10GB network is better but a lot more expensive. Wifi is not stable enough in most cases I would recommend against using that but it can work at the cost of performance of the captured feed by saturation of the wifi signal. Using a 100MB/s network is possible I have seen my traffic go up to 25mb/s with just the capture feed, it will restrict your internet performance. Important to remember here is that you will send from your gaming rig to your capture rig a feed over LAN of x amount of MB/s and that both rigs will also communicate with the internet taking up x amount of MB/s for streaming and gaming.
But in most cases routers have 1GB switches so unless your network is really old I would not be worried but it is certainly wise to check your router specs and double-check the network cables you use an upgrade if needed.

OBS: https://obsproject.com/
Streamlabs: https://streamlabs.com/
OBS NDI: https://obsproject.com/forum/resources/obs-ndi-newtek-ndi%E2%84%A2-integration-into-obs-studio.528/


Setting up your NDI Feed.

You will capture from your gaming rig, voice chat will happen from the Gaming Rig so you will need to setup OBS or Streamlabs to your taste. All OBS or Streamlabs will do it generate a feed and send it to through your LAN to your Capture Rig. Besides your own preferred setup, you will need to set up the NDI plugin. Any extra you might have like overlays, widgets, and alerts can be done from either rig, but I would suggest using the Capture rig so you never have to alt-tab and use the mice/keyboard or even streaming deck(s) from your capture rig. It allows you to work on your stream without the viewer ever knowing as well as any smooth recording session as a result.
In OBS go to Tools then select NDI Output Settings, tick both boxes on Main Output and Preview Output and give them a name.


OBS NDI Plugin Location


You will notice that while the NDI plugin is active you can not modify the output settings so ensure you have those set or go back to the NDI plugin and untick the boxed to modify your output settings. I will have some more tips for the quality of your capture feed below but first, let's finish the basics. The next step will be capturing the feed using NDI plugin on your Capture Rig, In your preferred scene to stream or capture add a source and select NDI Source, Select Create new and name this source to your liking and click OK.


OBS NDI Plugin Scene Source


You will be presented with an options screen, Under Source name select the feed that you named in OBS/Streamlabs NDI plugin setup. Ensure you use the highest possible bandwidth for the best results unless you intend to use lower settings. Also, make sure the YUV Range is set to Full and the YUV Color Space is set to BT.709. And then click OK. You will notice as soon as you select a feed it will start displaying your desktop this means it is now receiving and you are ready to start Streaming and or Recording.


OBS NDI Plugin NDI Source


Now you will have to select your stream service and enter your stream key and select a Recording Path if you wish to record as well. Furthermore, you will have the option to record as you stream or just make a recording for you to make content. Always use the X264 encoder over hardware, the CPU encoding is more powerful and yields better quality results. Important here as well as to ensure you select the right bitrate with the right resolution for your recording or stream. In my case using my hardware I Record and Stream 1080p @ 60 FPS with a streaming bitrate of 6000 and a recording bitrate of 12000.
These settings will vary with hardware as well as any limits a streaming service might impose on your feed, but recording wise you can do whatever you want just make sure there is no lag and you have a stable stream that does not drop frames giving the best viewing experience.


Recording Only.

If you just wish to capture video material for let's say YouTube content without much hassle simply go to Output under Settings on the Capture rig. Then select the Output Mode and set this to Simple. Ensure your recording path is correct and select Indisnguisable Quality, Large File Size. Recording format set to flv if you lose power you can still use the captured material over mp4 etc, you can convert the flv to mp4 if your editing software needs it later on. Also, make sure the Encode is set to Software (x264). But remember this will be large files so you will need plenty of disk space and if you want to make backups you will need a beefy NAS solution locally or in a cloud storage solution. To start recording simply click Start Recording on your Capture rig to ensure you do not have any overlays active to capture clean material.

Recording settings for lossless.

CPU presets vs Bitrate.

They achieve in essence the same, however, they both increase quality at the expense of increased requirements. Increased CPU presets will require a better CPU going from very fast and up. While bitrate will increases the bandwidth you need in your LAN and internet provider upload speed. Since there are so many different configurations it is hard to pinpoint each PC build but for reference, a Ryzen 5 1600X will stream and record over 1GB LAN, 15MBPS upload, 4500 Bitrate with a Fast CPU preset 1080p @ 60 fps.

  • CPU Preset: Requires a better CPU the higher the preset.
  • Bitrate: Requires more network upload speed the higher the bitrate.

Encoding presets for the CPU

Tips & Tricks.

As you may notice the OBS/Streamlabs resolution for streaming and recording is set to the screen size, you can temporarily set your screen resolution to 1440p or 4k and adjust the settings in OBS/Streamlabs. Then you can save these settings without OBS/Streamlabs reverting those back when you set your resolution back to the original resolution of the screen. Remember to adjust your bitrate accordingly and test your stream and recording for a CPU bottleneck. Another way to increase your stream and recording quality is by increasing the CPU Usage Preset from Very Fast to Faster or higher. You can on your main rig select under Tune the Film setting to increase quality at the expense of LAN bandwidth.

Bitrate options for streaming.

  • 1080p @ 60 fps: 4500 to 6000.
  • 1080p @ 30 fps: 3500 to 5000.
  • 720p @ 60 fps: 3500 to 5000.
  • 720p @ 30 fps: 2500 to 4000.

This covers the basics of setting up your OBS/Streamlabs streaming and or recording Capture Rig there are many more options but this should get you started on a high-quality stream and or recording spree.
Please share or link the article if you find it useful.

- "Note to self: shoot anyone near the console on outpost Kareah"

 
Star InactiveStar InactiveStar InactiveStar InactiveStar Inactive

Opinions, opinions and then some more opinions when it comes to desktop builds with AMD and Intel CPU's. Stepping away from the fray I would like to throw my 2 cents into the conversation as an end-user who pays for his hardware. Writing this article is based on end-user experience from a person who was listed as the world's most dangerous hacker using a Pentium II. To an advent gamer who racks up legendary scores in PvP games in over 2 decades of gaming, photoshop editing, and web design. At the end of the day, it is to you the reader and therefore end-user how to spend and what to spend your money on.  This article is for the purpose of offering perspective backed up by experience from different angle stepping away from the fray.

Value.

Value is made up in 2 parts, the first is what a corporation would like to charge you for their product. This is effected by the bottom line, how much it costs to produce their product(s), their R&D expenses, PR and staffing costs. Part 2 is you the end-user, you decide how much value you want to attach to a product, the corporate PR tries to influence you. It is called Public Relations for a reason they are being paid to represent their product as best they can and might even lie. Always wise to cross-reference with multiple sources, people who are for and against but try to filter out the "fanboy" information. But at the end of the day you the end-user decides where to spend and how much you are willing to spend on a given product.

CPU Bottleneck, performance, and basics.

A bottleneck in your hardware is either the CPU or the GPU when it comes to gaming. In order to find what is your bottleneck run some benchmarks ingame and see what is maxing out first. Some games are more CPU intensive and some more GPU intensive, run different games to get an accurate picture. Then there is your screen, 1080p, 1440p and 4K those will also bottleneck different components. 1080p will always bottleneck the CPU and 4K will always bottleneck the GPU. Then there is a refresh rate, a 165hz screen is capable of displaying 165 FPS with the standard being 60hz on most screen. This ties into your screen resolution so when your CPU or GPU is getting bottlenecked at different resolutions. Other components such as the amount of RAM and what speeds and timings your RAM runs. Your storage solution also influences this, games on an SSD will have better loading times, lower latency over a regular hard drive.

Intel.

Known for higher prices but the best clock speeds on their CPU's, the Intel premium as it is lovingly referred to. Intel has an overall dominance over the desktop, laptop and server market over AMD and you will see more Intel systems.
Their performance for high-end gaming/overclocking is somewhat hampered by using really bad paste between the chip and IHS. And not all Intel CPU's can be overclocked you will need a K variant such as an 8086K and a motherboard that has an overclocking chipset.

AMD.

Mostly known for the value and not charging a premium for their product AMD is not known by many in the general public. They have a far smaller market share then Intel but are making a come back with their Ryzen and Thread Ripper CPU's.
All AMD chips are soldered so their thermal performance is much better may it be at lower clock speeds. The only motherboards from AMD that do not support overclocking are their low-end motherboard chipsets.

Building AMD.

Most commonly referred to as the budget option AMD systems tend to cost less may it be at a small performance hit in gaming. With workstations and servers, they are however making waves with the Thread Ripper being on par with Intel in terms of performance. I am using a Ryzen 1600X that I used for gaming and now I am turning it into a NAS/Capture rig with NAS storage drives. It has lower operating voltage thus consumes less power and the motherboard chipset offers more PCIe lanes over Intel. This means you can run an m.2 C drive and 6 SATA drives with a GPU and a capture card without add-in cards. As mentioned above the CPU is bottlenecked at 1080p there for it is wise to use a 1440p screen with free-sync and an AMD GPU. The bottlenecked is now your GPU with free-sync on an AMD GPU smoothing out the frames per second. AMD GPU's are in general less expensive then NVIDIA and the Free-Sync monitors also charge no premium. Most people on a budget go for 1080p but that would as mentioned above bottleneck the CPU resulting in a lower FPS. In short, if you want high fps with high refresh rate Free Sync monitor but you are on a budget go AMD.

Intel build to the right and AMD build to the left behidn the screen

Building Intel.

If you want the highest possible FPS at the highest possible refresh rate you will end up with an Intel CPU and Nvidia GPU. But this will come at the premium even more so in recent days of writing this article currently prices are inflated so you pay even more. As well as building a workstation, you also will pay this premium more performance at an exponential cost. Intel has the i5/i7/i9 as a mainstream CPU's and the Xeon and X series CPU's for workstations and servers. The main difference between mainstream vs professional in the number of PCIe lanes and RAM channel you have. Gaming on a highly competitive level is still best with Intel you will get the best FPS at the highest possible refresh rate. That said your GPU will be the bottleneck on 4k but most high-end gamers or streamers do not play on 4k due to the lack of FPS. 4k Gaming is becoming somewhat viable with the new 2080ti and the release of 4k high refresh rate monitors. But it will be at least 1 more generation of GPU architecture before 4k gaming on the highest level will be viable. And due to the fact the mainstream CPU's offer fewer PCIe lanes, you will not be able to connect as many devices to your motherboard. That said most gaming PC's use external storage, for the most part, may it be somewhat forced upon by Intel. Also to consider here is when using NVIDIA you cannot use Free-Sync you will be relegated to G-Sync that also comes with a premium. You can opt-in to use an AMD GPU and go for Free-Sync but at the current time, there aren't any real high-end AMD GPU's. For my end-user experience, I wanted the highest possible performance on my 1440p, 165hz Acer Predator monitor. Running on an overclocked 8086k/Z390 Motherboard, ASUS ROG 1080ti, 32GB of G.Skill DDR4 with Samsung 860 EVO SSD's.

Intel based gaming PC

Conclusion.

Intel and AMD are pretty much tied in the server and workstation market with AMD offering much sharper pricing for their products. For gaming, Intel is still king if you want the absolute max in frames per second paired with an Nvidia GPU.
AMD is a great budget option, from low end to mid-range builds that will game just fine at considerably less cost. it comes down to you the end-user where you want to spend your money and how much you wish to spend. But the market does need competition or prices will be inflated and performance gains will be far less. Therefore I step away from the fray and I buy AMD/Intel and Nvidia products when they are priced right for the right amount of performance.

-Booommmm! Headshot!
Paul "HisEvilness" Ripmeester.

 
Ryzen 5 overclocking the 1600X.

User Rating: 5 / 5

Star ActiveStar ActiveStar ActiveStar ActiveStar Active

AMD Ryzen 5 1600X overclocking guide.

Here is my overclocking guide for the R5 1600X based on my experience using an ASUS X370 Gaming for a better V.R.M. over a B350 chipset. After some months I decided to upgrade my 1600 to a 1600X to see if there is a difference in performance, on paper at least the X series should offer higher clock speeds. Upgraded to an X CPU but I did not get a Ryzen 7 over a Ryzen 5 since clock speeds remain the same, the Ryzen 5 1600X and Ryzen 7 1800X offer the best clock speeds. So for anyone looking for a CPU for gaming higher clock speeds take president over core count for the best experience.

My Rig, PC Partpicker.

Link: https://pcpartpicker.com/list/GvtDkd

  • Case: Phanteks Enthoo Luxe.
  • Motherboard: ASUS STRIX X370-F.
  • CPU: Ryzen 5 1600X Retail.
  • RAM: G.Skill - Trident Z RGB 32GB 3200
  • GPU: ASUS STRIX GTX 1080ti.
  • P.S.U.: E.V.G.A. SuperNOVA G3 750W Gold.
  • Samsung 960 EVO, O.Z.C. Agility 3 256GB, W.D. Green/Blue 1TB storage drives.
  • Cooling: CoolerMaster LiquidMaster 240 AIO.
  • Case fans: 4 x 140mm intake fans, 3 x 140mm + 1 x 120mm exhaust fans.

If you read my previous article regarding the Ryzen 5 1600, you will see I have made substantial upgrades to my P.C. As it stands, the only matter is that the 1080ti seems slightly bottlenecked by the lower per-core speed over an Intel CPU.
However, as newer games enter the market supporting better multicore performance, this will negate this current gap for AMD relative to Intel. Pure performance-wise an i7 would be better but for a more significant premium and it would only be for gaming.

You can find the related guides here:
Ryzen 5 OC'ing the 1600.
Intel i7 OC'íng the 8086K on Z390.
Streaming and/or recording using OBS NDI Tutorial.


Getting Started with overclocking the AMD Ryzen 5 1600X.

As always insert your desired hardware and ensure it boots and windows version of your taste is installed. For this guide, I used an A.S.U.S. motherboard and a 240 AIO for cooling. Air cooling might make it harder to achieve a higher overclock.
The principle remains the same as well as using a different vendor. However, they might use different wording then A.S.U.S. Also, make sure to run a baseline benchmark to check stability at stock settings and scores so you can measure any gains. Check your BIOS version especially with Ryzen updates do tend to offer more excellent stability especially RAM wise.

You also want to download the following programs for stress testing your overclock. These are a vital tool for stress testing and monitoring if you already have tools you can use those but these programs I highly recommend and were used while writing this overclocking guide.


ASUS-ROG-Strix-X370-F BIOS version


BIOS Settings.

Ensure you run stock DDR4 RAM speeds that is 2133mhz with stock timings. As you might be aware of Ryzen is a bit funky when it comes to RAM, but higher MHz will yield a faster system. The RAM clock speeds tie into the infinity fabric that "glue's" chiplets together in the die. For the best results ensure you have Samsung B-Die or Hynix A-Die IC's, you can check the Q.V.L. or RAM manufacturer as well as use Typhoon Burner. Note the screenshot below has my D.O.C.P. profile the highest settings, keep the stock timings for now and change this after finishing your CPU overclock.


ASUS-ROG-Strix-X370-F-RAM
Now to get down to getting the best out of your chip without burning the house down. As always you are bound by the "silicon lottery", and on this draw, I have the short straw because I am not getting better clock speeds. Good chips can run 4.1Ghz with proper voltages mine are a bit on the high side, and I tuned down my overclock just to be saved.


DIGI+ VRM Settings Ryzen 1600X.

The X370 offers much more in the BIOS for overclocking, a greater range of settings then a B350 board as well as a better V.R.M. A better V.R.M. translates into a more stable power supply, fewer fluctuations resulting in great stability. 

These settings are the best for my chip, especially the Line Calibration settings vary from chip to chip if you are close to stable make changes here.


ASUS-ROG-Strix-X370 BIOS, DIGI+ VRM


AMD CBS.

Settings of importance here are Core Performance Boost. This will set your clock speed to the number entered in the BIOS without a boost. If you leave this one, it will result in instability due to the chip trying to boost higher frequency, when running at the highest frequency this will result in crashes. And a Global C-State Control should also be disabled since this function is for power savings and would try to downclock your CPU and down volt VDDCR CPU voltage.


ASUS-ROG-Strix-X370-F AMD CBS


Ryzen 1600X V.D.D.C.R. Core Volts.

As with the Ryzen 5, 1600 the none X the same volt limits apply, going beyond those will result in your CPU degrading to the point it will not maintain the overclock. Also to note is that the X version has a higher set temperature not to be alarmed by higher numbers, this is why better cooling is essential. When stress testing the overlock, you want to use a tool like HWiNFO64 to monitor temperatures, clock speeds, and voltages.

  • AMD Recommended Voltage: 1.350 to 1.375 volts.
  • Community Recommended Voltage: 1.400 to 1,450 volts.
  • Absolute max and not recommended: 1.500 to 1550 volts.

The two settings you will have to adjust here are CPU Core Ratio and VDDCR CPU Voltage. The first is a straight-up number the latter is an offset number. On the X370 you either use Offset Mode or Manual Mode, Offset Mode offers better granular tweaking over manual Mode so we will be using Offset Mod. Now it comes down setting the CPU Core Ratio, start at 38.00 and then set the Offset mod to 0.0375. This should work on any system. If this does not post, you have a terrible CPU that will be a nightmare to overclock, and getting higher frequencies will need exponential more volts. Run a quick Cinebench to see if your stable if so reboot and head back into the BIOS, now set the CPU Core Ratio to 38.50 and keep the Offset mode as is. Repeat the process add 0.20 until your Cinebench test fails. Now you can add more volts in the Offset mode, an Offset of 0.07500 will give 1.425 V. But do not go straight to an Offset of 0.07500, up the voltage 0.00625 then see if your system will post and then increase the CPU Core Ratio again until it fails. With a bit of luck, you should be stable at 40.00, a 4.0Ghz on all cores the less voltage it takes to get to 4.0Ghz the better your CPU is. Fewer volts is less heat and a higher overall overclock see if you can make it to a CPU Core Ratio of 41.00 with 0.07500 Offset or lower.


ASUS-ROG-Strix-X370-F Voltage Offset


V.D.D.C.R. Curve.

Here is my V.D.D.C.R. volt curve for my 1600X I must add that this was added well over a year later with a much more mature BIOS version for my STRIX X370-F. But all settings were tested using a Gelid Phantom Black CPU Cooler(dual fans). Depending on your motherboard and CPU due to the silicone lottery, your mileage may vary but this should give you a good indication where your CPU is compared to this 1600X sample.

1600X @ 3.7Ghz.

  • 37 Core Ratio.
  • VDDCR @ 1.325
  • CPU LLC 3
  • SOC LLC 3
  • Validation with P95 Small FFT's and Custom 8K FFT's.

1600X @ 3.8Ghz.

  • 38 Core Ratio.
  • VDDCR @ 1.350
  • CPU LLC 4
  • SOC LLC 4
  • Validation with P95 Small FFT's and Custom 8K FFT's.

1600X @ 3.9Ghz.

  • 39 Core Ratio.
  • VDDCR @ 1.39375
  • CPU LLC 5
  • SOC LLC 5
  • Validation with P95 Small FFT's and Custom 8K FFT's.

1600X @ 4.0Ghz.

  • 40 Core Ratio.
  • VDDCR @ 1.450
  • CPU LLC 5
  • SOC LLC 5
  • Custom 8K FFT's(not deemed fully stable).

Voltage curve from 3.7Ghz to 4.0Ghz

Now when you have achieved a stable overclock, it is time for a proper burn-in test to validate your overclock and ensure it is completely stable. Use Prime95 and run that for at least 30 minutes to an hour, if your overclock holds it will be completely stable under stress as well as average load. If your crash on Prime95 that means you're overclock is unstable, and you have to lower the CPU Core Ratio or increase the Offset voltage. Make sure you keep an eye on your temperatures, HWiNFO64 is a useful software-based monitoring tool although actual sensors will be more accurate. This concludes the overclocking guide for the Ryzen 5 1600X on an ASUS X370 motherboard, remember mileage may vary and may Gaben be with you.

- Paul "HisEvilness" Ripmeester

 
PC Case Airflow Air Cooling

User Rating: 5 / 5

Star ActiveStar ActiveStar ActiveStar ActiveStar Active

Case Airflow: Case Study with a

Phanteks Enthoo Luxe.

In part I found here: the fundamentals of setting up a good air cooling loop. The 3 basic set up positive pressure, negative pressure and neutral pressure for case airflow and the abbreviations common for air cooling.
For part II diving in deeper with a specific case the, Phanteks Enthoo Luxe using a wide range of fans and pressure setups. While I prefer a negative pressure setup I prefer to go over the numbers on a case by case basis running the numbers per setup.


The Case; Phanteks Enthoo Luxe.

Recently upgraded to a Ryzen 5 1600 and decided to upgrade the case as well, my old Antec Dark Fleet 30 was not optimal for cable management. This case is an Enthoo Luxe is a full tower model derived from the Enthoo Primo offering most of the features at a slightly smaller size. For cable management, there is plenty of room, Steel chassis with Aluminum faceplates and room for 8 case fans and 2 drive cage fans. If you are in the market for a new case look at the Phanteks line they have many features, also interesting to check out are Cooler Master cases. But for this article, the fans are important since this is not a review but a specific study with the Enthoo Luxe.

Front: 1 x 200mm or 2 x 120mm or 2 x 140mm fans or 1 x 120mm 1 x 140mm setup.
Bottom: 2 x 120mm or 2 x 140mm fans or 1 x 120mm 1 x 140mm setup.
Top: 1 x 200mm + 120mm or 140mm, 3 x 140mm, 3 x 120mm or a mix of 120mm and 140mm fans.
Back: 1 x 140mm or 120mm fans.
Sides: None.
HDD Cage: 1 x 120mm fan per removable cage.
Case Diagram Negative Pressure.


The Fans.

While I normally like a uniform design, while doing some research I found some interesting fans I wanted to test. Once I've settled on my fan setup I will buy more of the Phanteks fans and probably keep the high static Corsair fans in the front.

Phanteks: 140mm and 200mm high CFM fans for exhaust.

  Static Pressure. CFM. DB.

PH-F140SP

1.33 82.1 19

PH-F200SP

1.04 110.1 25

PH-F120XP

1.72 61.6 27

Corsairs SP120: 120mm high static pressure fans for intake.

  Static Pressure. CFM. DB.

SP120

1.60 57.4 26.4

Arctic F12 and F14: 120mm and 140mm fans for exhaust and intake.

  Static Pressure. CFM. DB.

F12

- 53 22.5

F14

 - 74 22.5


The Corsair SP120 offer better static pressure than current 120mm Phanteks fans, 120mm always offer better static pressure over 140mm fans. Pressure is building up is higher due to air being pushed through a smaller diameter. The Phanteks fans offered a high CFM making them perfect for exhaust fans, The Arctic fans I wanted to test due to the low price per fan. 140mm fans always offer a higher CFM over 120mm fans as they offer a wider tunnel and bigger fan blades to push more volume.
Large diameter allows for more air throughput at the loss of pressure due to fans limited capability of compacting the volume in a larger diameter. There is the exception to the norm of course but this is a general logic you would, of course, check with your preferred brand for actual CFM and Static Pressure.

As time progressed and I went from a range of test with overclocks I ran into a problem with the F12 fans not working properly. For some reason the F-12 did not spin up located on the back of the case in a standing position, this would mess with my RPM profile and create extra noise. Due to this fact, this article has been delayed and I also decided to add an extra CPU fan since this has become more common.


PWM Signal, PWM Hub, and Heat Management:

You might want to consider making RPM profiles or setting RPM ranges in the BIOS this would require either 4 pin PWM connectors or a PWM hub. A PWN hub will allow for 3 pin as well as 4 pin connectors to be used but will read the PWM signal and set voltage accordingly to all connecting fans. If you have a wider assortment of 4pin PWM connectors splitter cables could work just as good but it would require you to tune each PWM/RPM profile. The PWM hub in the Phanteks Enthoo Luxe is included there are aftermarket PWM hubs you can buy, be sure to check your motherboard specs when adding fans. In my case, the ASUS Prime B350 Plus has 3 x 4pin PWM headers, all giving a PWM signal some cases the 4 pins might not offer a true PWM signal. Check again if these are 4pin PWM connectors or normal 3pin connectors and that all if not some offer a true PWM signal from the motherboard.

There are 3 more options for setting your fan RPM, a program called Fan Speed what works great if your motherboard is supported. However, not all motherboards are included and I could not get it to work with the AMD Ryzen platform it will simply not read the BUS info correctly. The 2nd option would be setting your fan speeds through your bios a common workaround if no software offers a good solution. Simply reboot and head into your BIOS settings and look for Q-Fan settings to set your fans accordingly. The 3rd option is installed a Fan Controller in one or more of the front panels slots and offers full control that way, a good option for Q-fan or Fan Speed. I go into greater details regarding the above-mentioned options in my first article if you are unsure what your best option would be.

My current setup is my back 120mm fan is a PWM fan with 4 pin connector straight to the motherboard. My fan hub is connected to the CPU PWM connector and has the pull fan on the first hub connection followed by the push fan on the second connection. Then I have 4 connections left for 6 more fans with the front 2 x 120mm fans as well as 2 x 140mm top on splitter cables. Leaving me with 1 PWM connector from the motherboard I am considering using with testing a CPU water cooling setup for my next article. A caution here though since connecting to many fans to a hub might lower the RPM since that is regulated with voltage, each hub as a total voltage output. Going over the total output will not fry your hub merely limit the RPM due to the total voltage ceiling your hub has to ensure your fans stay under the total limit. Either use a 2nd PWM HUB or use more of the PWM connector you might give on your motherboard to prevent limited cooling performance.

Also, an important note is that the motherboard PWM signal relays the temperature from the chip socket, not the chip diode! The socket diode will always show a lower temperature measurement then the CPU diode since the CPU diode is closer to the heat source. For a proper temperature measurement use the program called HWiNFO64, or use more advanced measurement tools if you have those at your disposal. CPU (Tctl/Tdie) is the diode located inside the chip, CPU is the diode in the socket, below a screenshot to illustrate with red outlining. Furthermore, the diodes are not optimal calibrated so temperatures could be off slightly from chip to chip, nothing can be done about this. It will not harm or damage your CPU or motherboard since there are safety thresholds in place to prevent that.
HWiNFO64_Diodes

For my personal preference, I want little to no noise when listening to music, typing, browsing or doing some editing on my web page. Therefore my ASUS Suite 3 RPM profile is set in such a way that within a certain temperature range the fans will spin at low speed. And will ramp up the fans when putting the system under load when gaming, rendering or performing tests with Prime95 or similar programs. As with finding the low noise limit under no to little load, the noise limit in your gaming sessions is also important to ensure your fans offer enough cooling. But with either a headset or speakers the noise of your fans will be hard to hear unless they ramp up to 100%, in this case, find the median temperatures. And set your fans RPM accordingly, this will take some time and I have been tinkering with my settings for weeks now.


Ambient Noise.

As mentioned above noise generated by your fans is where you trade between cooling performance and ambient noise. Besides using your ears there is a wide assortment of apps for mobile phones and even better equipment if you happen to have access to that. Below is a sample of some of the noise ranges with different workloads with. The Idle and light load is nothing running in the background after a (re)boot or doing some browsing or typing on my PC. A medium load would consist of a gaming session an easy way to mimic this is running a game that comes with a benchmark. The heavy load is running Prime95 with Small FFT's to generate the maximum amount of heat or a video render using all cores. Measurements were taken with the phone application on the mouse mat and on top of the case close to the fans giving an appropriate range noise, whereas one measurement is where the end user would sit and the other measurement is as close to the source as possible. No special materials were used in terms of padding this could lower the amount of noise generated.

Idle/Light Load 20 Db 25 Db
Medium Load 30 Db 40 Db
Heavy Load 40 Db 50 Db

The latter sounds like a wind tunnel and I highly doubt the average user will ever need their fans to run at 100% unless they are benchmarking their system. I overall satisfied with the results after weeks of tinkering in-between work and gaming sessions, and yes I have spent more than I usually want to spend. But in the spirit of writing this article, I did some extra test and made sure the hardware I am using works and works on demand. If you have any questions or feedback, would like me to test a different setup or some hardware please feel free to contact me here: Contact Me. For my next article, I have purchased a Coolermaster Master Liquid 240 to test partial liquid cooling combined with air cooling and what yield the best results.
Remember that this is based on the hardware I use in combination with a full tower case the Phanteks Enthoo Luxe you could have slightly different results. However, results should not vary by much if they do read me previous article located here or contact me and I will do my best to help you on your way.

- Paul Ripmeester

 
PC Case Airflow the Basics

User Rating: 5 / 5

Star ActiveStar ActiveStar ActiveStar ActiveStar Active

Case Airflow, Cooling the right way.

While venturing on the internet looking for some tips on airflow and to see if cooling is done by air, for the most part, has changed I was disappointed. The lack of good material or even bad material was stunning so I decided to contribute with a fellow overclocker showing good cooling practices. Nothing has changed it remains pretty much the same while fans have greatly improved and so does the fan assortment. For this article, there will be 2 examples of a Ryzen based system and an Intel-based system with different cases.


The Basics.

1. When placing fans in your case or even other hardware ensure that airflow is in the right direction. In any case, this means cold air goes in and hot air goes out, a common mistake what will result in higher temperatures or even hot air blowing in your face. Even if it is extremely hot outside the air will still have a lower temperature than inside your case, this also goes for liquid cooling solutions. Intake Fans: the front and the bottom of your case, Exhaust Fans: the back and the top of your case.
Very important to note is that hot air rises and the rear of your case is confined especially on enthusiast builds with a big CPU cooler. And the overall trick for the best cooling solution is that cool air is not mixed with the hot air but that air on the intakes has enough pressure to reach the centre so that the hardware fans on your GPU and CPU will be able to scoop up the cold air to cool the components and then push hot air towards the exhaust fans. Below is a looped video of my new Phanteks Enthoo Luxe case that depicts the flow of air, stage 1 intake, stage 2 hardware picks up the air, stage 3 hot air exhaust.


2. Always have negative pressure inside your case by having more exhaust fans than intake fans or by calculating your CFM and high static pressure. You can opt for overpressure if your system does not generate excessive amounts of heat but this is only with budget setups without overclocking. Also important to note that especially with negative pressure to use dust filters on your fans where you can, either pre-installed or aftermarket filters. The general rule for fan placement is that high static fans are used as intake fans while high CFM fans are used for exhaust. For those who are new CFM stands for cubic feet per minute and high static pressure the ability to overcome obstacles and travel distance.

To aid in finding the right cooling solution use this excel sheet Case Cooling CFM, Static Pressure, and Watt Calculator located on Google Drive. To use the Excel sheet download and open an excel sheet or move a copy to your own Google Drive. Simply enter the numbers of your fans located in your case, above the column is a note that this part is either intake or exhaust. With the exclusion of hardware and internal fans who are calculated with hardware CFM/mmH20 for a different calculation. Now you can see there are different results, CFM Rating(+ or - airflow), Case vs Hardware actual CFM, Case vs Hardware optimal CFM. Also included are watts and decibels, PWM hubs and Fan controllers have ratings if want to buy one check if you are buying the right one. Noise generating can be indicated, not taking into account acoustic deformation of the room or any noise-reducing padding your case might have.

CFM Rating(+ or - airflow): take the intake CFM and deducts it with the Exhaust CFM this will either give a positive or negative result, this will indicate whether your fans will generate a negative or positive pressure inside the case and you can adjust accordingly, removing/adding fans.

Case vs Hardware actual CFM: Weighs the CFM by deducting Hardware Total CFM from Case Total CFM to give indicate surplus CFM. Useful to indicate if you installed too much or too little fans, too many fans could create too much turbulence making it harder for hardware fans to scoop up the air, and that could great stall pockets of hot air increasing the temperature overall.

Case vs Hardware optimal CFM: This will calculate the CFM of your Hardware CFM vs your Case CFM if the amount of airflow is too much or too little, the throughput of your hardware CFM is an indicator when cool air is pushed in and then hot air pushed out if the airflow can be used efficiently by your installed hardware. Normally 25% ~ 50% on top of your Hardware CFM is optimal, here I used 25% so anything above it should be sufficient.


3. When shopping for fans ensure they are of good quality even if that means paying a bit extra, cheaper fans means less performance. When cooling your system you want the best CFM and static pressure at the lowest noise levels to fully enjoy your build. High-end fans are money well spend and will offer the best airflow scenario for your build optimal cooling temperatures. As mentioned above you want to generate negative pressure by generating more exhaust CFM then intake CFM.
The difference between static pressure is merely air that travels at higher speeds than the actual volume that translates in CFM. Therefore by ensuring you the cubic feet per minute(CFM) is higher with the exhaust fans then the intake fans you will generate negative pressure. High static pressure fans are always fitted with less but bigger blades generating a lower CFM and higher CFM fans always have more but smaller blades.

4. PWM, PWM Hubs, and Fan Controllers are vital for regulating your fans speed and the noise they generate. However you can only use one even if there are several PWM connectors with most motherboards, check your manual to ensure you can use multiple PWM signals. You will either use your PWM signal that can ideally have enough signal strength to support 6 to 9 fans at a time through PWM hub. Or use a fan controller that controls the fans speed through its PWM signal setting the RPM, or using them in or decrease of watts. Motherboard PWM signals are more accurate and will react better to heat fluctuations over a fan controller since the heat sensors will interact with the motherboard. A fan controller will detect temperatures through a series of sensors you have to place around your case, closer to a heat source the better. But a fan controller allows you to tweak your RPM better with smaller steps over a motherboard PWM signal + motherboard software. Also important to note that fans have steps some have more like others that are usually more costly with more steps but offer more control.

5. To make a fully informed decision regarding what type of cooling flow you want to use here are some of the basics. While it remains true that negative pressure will result in the best cooling when setup correctly there are other options you could try out. Positive Pressure: More combined CFM on intake fans and/or more intake fans, this will result in far less dust attracted to your cooling loop. Negative Pressure: More combined CFM on exhaust fans and/or more exhaust fans, will attract more dust to your cooling loop there for filters are a must. Neutral Pressure: Roughly the same combined CFM on your intake and exhaust fans with a balanced fan setup. To give you a more accurate picture below is a video painting an accurate picture of what the above setups will do in terms of airflow with pros and cons.


6. Dust is your enemy, where dust accumulates it well hamper cooling performance, less cooling when dust sits on your filters or heatsinks. Cable management is also very important, dust will stick to most surfaces so having wires in the airflow path beside hampering the airflow altogether. Investing in a good case that has cable management features will have a better look, better airflow and less surface for dust to settle. Besides dust filters and a solid tight-fitting case placing your rig on your desk will reduce dust intake by 80%, never place it on the floor or carpet. And make sure your PSU is modular try to use the least possible amount of cables for a clean look and fewer places for dust to accumulate.


Closing Notes:

This concludes an introduction to the best cooling practices, covering the basics of setting up a proper airflow with some guidelines to get you going. The first step towards setting up your cooling showing that air cooling and getting the right airflow is a skill, as much as water cooling. Make sure to test out your setup and move some fans around to gain experience and the perfect solution for your case, each case is different. Stay tuned to this article and website since 2 more articles will follow soon with 2 case by case examples of setting up an airflow.

Case Airflow: Best Cooling Practices Part II - Air Cooling.

- Paul "HisEvilness" Ripmeester


User Rating: 5 / 5

Star ActiveStar ActiveStar ActiveStar ActiveStar Active

PC utilities, Monitoring, Burn-in Tests and Maintenance.


In past articles I have mentioned some program I use to overclock or do other misc work on my rig. Any PC needs a bit of maintenance and love and at times when you tweak your settings and go into overclocking you need to run tests.
Therefore I thought it would be wise to write this short article covering my favorite utilities that I frequently use. The programs I list will be free of charge, no trial period or similar sales tricks. I do use paid programs to run tests at times but those are far and few in between but are very good.


3DP Chip.
>> http://www.3dpchip.com/3dpchip/index_eng.html

A little free tool that allows you to check for outdated drivers. While 3DP Chip does not offer 100% coverage it will find most drivers, I run it roughly once a month. Be aware of the adds it tries to install just decline that request, security software could flag this program because of that.

ASUS Real Bench.
>> https://rog.asus.com/rog-pro/realbench-v2-leaderboard/

ASUS released this toolkit using open source program some are covered in this article, however, this program combines several. It can be a bit time consuming to run the program it offers a benchmark setting and a stress test setting covering the full range of hardware. Mainly used by ASUS ROG users but it is for every system, test your PC performance or subject it to a stress test.

CCleaner.
>> https://www.piriform.com/ccleaner

PC cleaning and optimization it offers a full version for free with an option to upgrade to a pro version that offers more automating features. In its core, the free version cleans your browser(s), various hidden or hard to find folders that tend to collect junk files. Keeps your registry free of empty and dead links that will consume resources or even causes errors and crashes, startup program management. Very useful and easy to use tool to keep that rig running at peak performance with little to no effort on your part.

CPU-Z.
>> http://www.cpuid.com/softwares/cpu-z.html

The go to program to find out what hardware you are running with numbers, data, and specifications. Offers some benchmarking and validation must need if you wish to partake in overclocking contests.

DiskMax.
>> https://www.koshyjohn.com/software/diskmax/

DiskMax is a handy free disk and windows optimization tool that I use to supplement CCleaner. It looks for a range of files such as windows cache, windows event logs and sorts files for faster access through windows. This is by far the best program to keep your windows from unstable and clutter your hard drives with random junk.

FurMark.
>> http://www.ozone3d.net/benchmarks/fur/

The go to GPU benchmark and OC stress test tool, ensuring your freshly overclocked GPU is up to the task. Furmark uses intensive OpenGL fur rendering algorithms to measure GPU performance due to that heavy load it is ideal for stress testing. Because of that, it offers several modes, a benchmark setting, and a stress test / burn-in test either in full-screen or in a window.

HWiNFO64 / 32.
>> https://www.hwinfo.com/download.php

System and monitoring for your hardware with options to make reports/log files for overclockers a useful tool to monitor temperatures. Anything from CPU clock speeds, RAM clock speeds and timings to an in-depth temperature reading from all motherboard sensors. Furthermore, it reads the voltages of various installed hardware and fans speeds vital for stable and safe overclocking. For Ryzen this program at this point in time offers the most accurate temperature readings.

HWMonitor.
>> http://www.cpuid.com/softwares/hwmonitor.html

Does exactly the same as HWiNFO but from the same website that offers CPU-Z. Different people will like different programs for hardware monitoring, temperature, clock speeds and fan speeds so people will advice one of these. Another small difference is that a pro version is on offer that allows for remote access, graph generator, and custom labels.

Project Mercury.
>> http://www.techcenter.dk/

An unconventional program Project Mercury will optimize your PC resources multi-core processors may that be Intel or AMD. Consider this a more advanced program and go to the info tab to see what the features can do for you. Among the features is disable core parking, disable standby on CPU load, no multi-core stutter etc.

Recuva.
>> https://www.piriform.com/recuva

A file recovery program that will allow you to recover deleted files from any hard drive or even overwritten files. For this reason, drive wiping programs with DOD standards always rewrites up to 32 times so no files can be recovered. But for the regular users, this program can be a lifesaver if you deleted files or want to attempt a recovery from an old hard drive. Recuva can even offer hope when a drive has been damaged although this depends on the severeness of the drive if that will be successful.

Speccy.
>> https://www.piriform.com/speccy

A system information tool like CPU-Z and temperature readings like HWMonitor and HWiNFO. It has a far easier interface than other tools I listed but as a general tool, it offers less in-depth reporting. Easy when you have a friend or relative with hardware problems you can guide them and find the information you need to resolve the problem(s).

Unigine Valley Benchmark,
>> https://benchmark.unigine.com/valley

A performance and stability test for various PC components that are related to your GPU. It offers realistic rendering load on your GPU and components related to your GPU as the cooling and PSU. I normally test with FurMark then use Valley to check performance under a realistic load to confirm a stable overclock of my GPU.


This concludes this short article on some of the utility software I frequently use on my PC's or tests and troubleshooting for others. Programs like this will save you time and effort or offer you better-overclocking capabilities and stability overall to keep that rig at peak performance. It is by no means a final list but these programs are the most common others will point out if you are searching the internet. All the programs I listed are still supported and receive frequent updates from the developers.

- Paul Ripmeester

 
AMD Ryzen 5

User Rating: 5 / 5

Star ActiveStar ActiveStar ActiveStar ActiveStar Active

AMD Ryzen 5 1600 overclocking guide.

This guide will be an overclocking guide for AMD Ryzen 5 1600 with the setup listed below. Using a B350 chipset motherboard, I have another manual listed below for an X370 motherboard. Explaining the basics and will only list volts and numbers with basic settings setting up the VRM. I am assuming you have done this before I am writing this to supplement AMD Reddit and other AMD overclocking sources.

My Ryzen 5 1600X guide is located in the links below as well as a guide for the 8086k/8700k, Z390 and X370 motherboards and some upgrades included as well.
Ryzen 5 OC'ing the 1600X.
Intel i7 OC'íng the 8086K on Z390.
Streaming and/or recording using OBS NDI Tutorial.


My Rig.

  • Case: Phanteks Enthoo Luxe.
  • Motherboard: ASUS Prime B350-Plus.
  • CPU: Ryzen 5 1600 Retail.
  • RAM: Corsair DDR4 LPX White 16 GB 3000.
  • GPU: MSI GTX 960 4GB.
  • PSU: Sharkoon 600 Watt semi-modular.
  • OZC Agility 3 256GB C Drive, WD Green/Blue 1TB storage drives.
  • Cooling: CoolerMaster 212 EVO and AMD Wraith Spire.
  • Case fans: 2 x 120mm and 1 x 140mm push fans, 1x 120mm and 3 x 140mm pull fans.

A medium-range setup, nothing fancy for a workstation but it works like a charm. This rig will run programs like Photoshop, some recording with Nvidia shadowplay, gaming, some web page editing, music, browsing etc. daily. While I could get away with not overclocking Ryzen shines when you push it and get the best results performance-wise.


Getting Started with the AMD Ryzen 5 1600.

Skipping the part of installing all the hardware in your case since that should be covered in the manuals. To ensure that you apply the RIGHT amount of thermal paste so that your CPU cooler will work as it supposes to. When booting up the first time make sure to go right into your BIOS and update the BIOS to the latest version, this will enhance stability from the get-go. Also, memory and other hardware support will be in the latest BIOS version if feeling brave use a Beta release BIOS but that might not be wise. The updating BIOS in the ASUS motherboards can be done inside the BIOS, in the worse case you need to use a flash drive. Boot up your system one time to see if you installed the components correctly and make a baseline performance test with Passmark or Cinebench. Restart and boot back into your BIOS, ensure that you have the latest drivers and updates for stability and support purposes!

You also want to download the following programs for stress testing your overclock. These are a vital tool for stress testing and monitoring if you already have tools you can use those but these programs I highly recommend and were used while writing this overclocking guide.

ASUS Prime B350 Plus BIOS version


BIOS Settings.

Make sure your RAM profile is set to 2133mhz, not DOCP/XMP/A-XMP max 3000/3200mhz and up, just the basic 2133mhz all DDR4 runs on. Set the optimal RAM clocks speed after achieving a stable CPU overclock since Ryzen still has some compatibility issues. What RAM MHz you can pick also has to do with the die quality of the components, Samsung allows for the best results anything else will be lower. You can check your die quality with THAIPHOON BURNER and see for yourself, manufacturers have a list, but this tool is far easier and quicker. 1st Gen Ryzen is notorious for being very picky with RAM selection ensure yours is at least QVL from the motherboard vendor. Samsung B-die is known for always working with 1st Gen Ryzen CPU's. Finding Samsung B-die kits follow the rule of thumb 3200mhz with C14 timings, or 3600mhz should always be Samsung B-die kit.

ASUS Prime B350 Plus BIOS, RAM Base Clock

Now it is time to set the Ryzen 5 clock, in ASUS it is called CPU Core Ratio, MSI calls it CPU Frequency. Each chip Intel or AMD Ryzen will behave differently, the OC community phrase would be "silicone lottery", and it is winning or losing.
That said any Ryzen should be able to reach 3800mhz or I would recommend a refund and replacement with a better chip. They can go as high as 4000mhz or even higher, but that is winning the silicon lottery or being blessed with an engineering sample.


DIGI+ VRM Settings Ryzen 1600.

These settings help with achieving greater overclocks and stability of the overclocks, setting this in the BIOS over AI Suite is better since it might reset. Putting them to Extreme will only affect power consumption do make sure to select the VDDCR CPU Switching Frequency to 350 MHz and not higher. You can tinker with these settings once you have achieved a stable overclock, see if you can reduce power consumption, this is a starting point, not the end.

  • VDDCR CPU Load Line Calibration: Set to Extreme or LLC 3 or equivalent.
  • VDDCR SOC Load Line Calibration: Set to Extreme or LLC 3 or equivalent
  • VDDCR CPU Power Phase Control: Extreme.
  • VDDCR CPU Switching Frequency: Set to 350.

Some other BIOS options might be available to you as I have with my other guide using an X370 motherboard. VDDCR Current Capability should be set the highest possible option in your BIOS both for CPU and SOC. 


ASUS Prime B350 Plus BIOS, DIGI+ VRM settings


AMD CBS.

Here you can find some critical settings, for now, leave everything on Auto but Disable Core Performance Boost and Global C-state Control, this will hamper stable overclocking if left on. Core Performance Boost to put it is the boost function of your CPU within set guidelines from AMD to increase core clocks and VDDCR CPU voltage. Global C-state Control does the opposite and will lower core clocks and VDDCR CPU voltage when the CPU idles. This could be left on, but with higher a overclock, I found this resulted in instabilities.

  • Core Performance Boost: Disable.
  • Global C-state Control: Disable.


ASUS Prime B350 Plus BIOS, AMD CBS settings


AMD Ryzen 1600 CPU Core Volts.

There are several volt ranges you need to consider, for those who are new to overclocking Voltage and CPU core ratio/frequency will attribute to your overclock. The ratio of your clock should be seen as x multiplied by 100, mostly 99.9 and 99.8 what then translates into overclock speed; higher ratios need more volts. The Voltage will result in more or less heat being produced there for you need cooling, the Voltage can be different per chip due to the silicone lottery. Lower volts is always better but is not always possible, and will set a limit on how far you can overclock combined with the CPU core ratio/frequency.

  • AMD Recommended Voltage: 1.350 and 1.375 volts.
  • Community Recommended Voltage: 1.400 and 1,450 volts.
  • Absolute max and not recommended: 1.500 and 1550 volts.

Here we start with an overclock speed of 3800 MHz, set CPU Core Ratio to 38.00, disable EPU Power Saving mode and OC Tuner. Now it is time to adjust the CPU voltage, VDDCR CPU Voltage in this BIOS also to note this offers an offset and not a manual mode. Set the CPU Voltage to Offset Mode, Offset Mode Sign to + and Offset Voltage to 0.13750. Exit the BIOS and save these settings, you can also opt to save as a profile under the Tool section of this BIOS and reboot. If you want to use Manual mode, you can directly dial in the VDDCR CPU Voltage. Ensure the Voltage does NOT exceed 1.400 VDDCR CPU Voltage. Going higher than 1.400 CPU voltage will require a better cooling solution like a Noctua Dual 120mm or 140mm tower cooler or a 240 or 360 AIO. Now save these settings and exit the BIOS and run a quick stress test with Prime95 with small FFT's. If this remains stable boot back into the BIOS and dial in 38.50 or 39.00 and keep the VDDCR CPU Voltage and repeat the process. If this fails to pass the stress test, then increase the CPU voltage. For Offset Mode 0.2000 and Manual Mode dial in 1.400 save these settings and run another stress test in Prime95 with Small FFT's. Pass or fail you can move the CPU clock speed 500mhz up or down and adjust the Voltage where needed. Most 1600 none X or 1600X will cap out around 3.9Ghz with the best CPU's able to reach 4.0Ghz. This with a voltage of 1.400 or higher but keep an eye on temperatures and stability.

  • 3.9Ghz with 1.375 CPU Voltage.
  • 4.0Ghz with 1.400 or more CPU Voltage.


ASUS Prime B350 Plus BIOS, voltage offset settings


Stability and Tweaks.

Unless the silicone lottery hates you, it should reboot, and now you use Cinebench and Prime to run a quick stability test. If your settings are stable and they should be you can try to lower the CPU Offset Voltage to lower your temperatures.
As shown in the picture, the increments are 0.00625 volts use that to lower the CPU Voltage while remaining stable in Prime95/Cinebench. Make sure to keep an eye on those temperatures for that I would recommend HWMonitor, no individual core temperature programs are updated yet. You can also set your XMP/A-XMP/DOCP profile above the basic 2133 MHz; I was not blessed with a Samsung B-die so mine, for now, is set at 2666 MHz.

Here is my CPU-Z validation link for my 38.25: https://valid.x86.fr/z9ia69

My Absolute Max, 3900 MHz.

I spend days reading up on Ryzen and the overclocking potential I have not touched my DDR4 RAM yet, waiting for some BIOS update. Temperatures even with the stock cooler are acceptable, but the core voltage is above the AMD recommended value. Therefore I opted to go back to my 38.25 clocks what yielded me to best results, with BIOS updates I hope this will become more viable.


ASUS Prime B350 Plus BIOS, 3900 MHz

ASUS Prime B350 Plus BIOS, 3900 MHz Offset

The new AMD Ryzen CPU chip is impressive especially considering the price, with a good overclock you can take on CPU's double in price. Happy I took the plunge and invested in a Ryzen 5 chip with my upgrade, Intel better steps up its game because this is stiff competition. With that, I conclude my small guide; I hope this has helped the readers and saved them some time.

- Paul Ripmeester

 
.htaccess for SEO

User Rating: 5 / 5

Star ActiveStar ActiveStar ActiveStar ActiveStar Active

 Using .htaccess to improve SEO.


In my previous article where I showed how to SEO optimize a Joomla instalment, link here: SEO for Joomla. The article became quite large and I could not dive deeper into the SEO aspect for .htaccess therefor I will dive deeper into .htaccess. When it comes to web hosting or any kind of website .htaccess will be very important in terms of security what also ties into a higher SEO score. The .htaccess file has been around since the dawn of time when it comes to HTTP/WWW protocols any can change the behaviour of your site. While configuring an Apache server through the http.conf itself it is rarely you will have access to that file on shared hosting solutions. But do not worry the .htaccess file is almost as powerful at the http.conf file but it can be tricky to work with. However in the long run understanding, this file will make your life much easier, and your website much better in the long run. For Joomla users I have a pre-made .htaccess file you can download, the website you current viewing is configured with the same file. --> Joomla .htaccess File <-- Remember to rename to .htaccess by removing the .txt extension when placing this in your ROOT.

 
A guide to the .htaccess file below with some pointers and configurations that might work for you, be sure to make a backup of your original file! While working on my SEO score I found numerous articles that cover the subject however with my previous article more information is needed. Before we start to ensure that if you make an edit to check with your hosts help files there are small variations per host this can lead to errors. I've added some snippets you will find handy to use, make sure to configure them according to your taste and test results.

Google PageSpeed Module.

The Google PageSpeed Module is a server-side open-source module that is used by most 3rd part hosting service like GoDaddy. And is enabled through your .htaccess file and improves the performance of JavaScript, HTML, CSS, and, JPG/PNG images. mod_PageSpeed as it is also known works on Pache and Nginx servers. For 3rd party, hosting check the provider hosting FAQ. For those who manage their web servers, Google offers a wide range of install packages.

Debian & Ubuntu.

sudo dpkg -i mod-pagespeed-*.deb
sudo apt-get -f install

CentOS & Fedora.

sudo yum install at  # if you do not already have 'at' installed
sudo rpm -U mod-pagespeed-*.rpm

Packages.

Visit the following page: Google PageSpeed Module Packages.

Adding Google PageSpeed Module functionality to the .htaccess file.

Below are a copy and paste of the PageSpeed modules for this website. This main purpose here is to clean HTML and CSS as well as moving the CSS to the header for optimized loading. Important to note here that some hosting services you will need to add PageSpeed functions per line in your .htaccess file or they will not work properly.

## Google Page Speed##
<IfModule pagespeed_module>
ModPagespeed on
ModPagespeedEnableFilters extend_cache
ModPagespeedEnableFilters move_css_to_head
ModPagespeedEnableFilters combine_css
ModPagespeedEnableFilters collapse_whitespace
ModPagespeedEnableFilters elide_attributes
ModPagespeedEnableFilters remove_comments
</IfModule>

Snippets for.htaccess.

Below is a selection of code snippets you can use in your .htaccess file. Snippets include security mods, redirects, and, rewrites.

Redirect Everyone Except IP address to an alternate page.

ErrorDocument 403 http://www.yourdomain.com/
Order deny,allow
Deny from all
Allow from 208.113.134.190

#301 Redirects for .htaccess

#Redirect a single page:
Redirect 301 /pagename.php http://www.domain.com/pagename.html

#Redirect an entire site:
Redirect 301 / http://www.domain.com/

#Redirect an entire site to a sub folder
Redirect 301 / http://www.domain.com/subfolder/

#Redirect a sub folder to another site
Redirect 301 /subfolder http://www.domain.com/

#This will redirect any file with the .html extension to use the same filename but use the .php extension instead.
RedirectMatch 301 (.*)\.html$ http://www.domain.com$1.php

#You can also perform 301 redirects using rewriting via .htaccess.

#Redirect from old domain to new domain
RewriteEngine on
RewriteBase /
RewriteRule (.*) http://www.newdomain.com/$1 [R=301,L]

#Redirect to www location
RewriteEngine on
RewriteBase /
rewritecond %{http_host} ^domain.com [nc]
rewriterule ^(.*)$ http://www.domain.com/$1 [r=301,nc]

#Redirect to www location with subdirectory
RewriteEngine on
RewriteBase /
RewriteCond %{HTTP_HOST} domain.com [NC]
RewriteRule ^(.*)$ http://www.domain.com/directory/index.html [R=301,NC]

#Redirect from old domain to new domain with full path and query string:
Options +FollowSymLinks
RewriteEngine On
RewriteRule ^(.*) http://www.newdomain.com%{REQUEST_URI} [R=302,NC]

#Redirect from old domain with subdirectory to new domain w/o subdirectory including full path and query string:
Options +FollowSymLinks
RewriteEngine On
RewriteCond %{REQUEST_URI} ^/subdirname/(.*)$
RewriteRule ^(.*) http://www.katcode.com/%1 [R=302,NC]

#Rewrite and redirect URLs with query parameters (files placed in the root directory)

Original URL:

http://www.example.com/index.php?id=1
Desired destination URL:

http://www.example.com/path-to-new-location/
.htaccess syntax:

RewriteEngine on
RewriteCond %{QUERY_STRING} id=1
RewriteRule ^index\.php$ /path-to-new-location/? [L,R=301]
Redirect URLs with query parameters (files placed in subdirectory)

Original URL:

http://www.example.com/sub-dir/index.php?id=1
Desired destination URL:

http://www.example.com/path-to-new-location/
.htaccess syntax:

RewriteEngine on
RewriteCond %{QUERY_STRING} id=1
RewriteRule ^sub-dir/index\.php$ /path-to-new-location/? [L,R=301]
Redirect one clean URL to a new clean URL

Original URL:

http://www.example.com/old-page/
Desired destination URL:
http://www.example.com/new-page/
.htaccess syntax:

RewriteEngine On
RewriteRule ^old-page/?$ $1/new-page$2 [R=301,L]
Rewrite and redirect URLs with query parameter to directory based structure, retaining query string in URL root level

Original URL:

http://www.example.com/index.php?id=100
Desired destination URL:

http://www.example.com/100/
.htaccess syntax:

RewriteEngine On
RewriteRule ^([^/d]+)/?$ index.php?id=$1 [QSA]
Rewrite URLs with query parameter to directory based structure, retaining query string parameter in URL subdirectory

Original URL:
http://www.example.com/index.php?category=fish
Desired destination URL:
http://www.example.com/category/fish/
.htaccess syntax:

RewriteEngine On
RewriteRule ^/?category/([^/d]+)/?$ index.php?category=$1 [L,QSA]
Domain change – redirect all incoming request from old to new domain (retain path)

RewriteEngine on
RewriteCond %{HTTP_HOST} ^example-old\.com$ [NC]
RewriteRule ^(.*)$ http://www.example-new.com/$1 [R=301,L]
If you do not want to pass the path in the request to the new domain, change the last row to:

RewriteRule ^(.*)$ http://www.example-new.com/ [R=301,L]

#From blog.oldsite.com -> www.somewhere.com/blog/
retains path and query, and eliminates xtra blog path if domain is blog.oldsite.com/blog/
Options +FollowSymLinks
RewriteEngine On
RewriteCond %{REQUEST_URI}/ blog
RewriteRule ^(.*) http://www.somewhere.com/%{REQUEST_URI} [R=302,NC]
RewriteRule ^(.*) http://www.somewhere.com/blog/%{REQUEST_URI} [R=302,NC]

Serve all .pdf files on your site using .htaccess and mod_rewrite with the PHP script.

RewriteCond %{REQUEST_FILENAME} -f
RewriteRule ^(.+)\.pdf$ /cgi-bin/pdf.php?file=$1 [L,NC,QSA]
Rewrite to www
RewriteCond %{REQUEST_URI} !^/(robots\.txt|favicon\.ico|sitemap\.xml)$
RewriteCond %{HTTP_HOST} !^www\.yourdomain\.com$ [NC]
RewriteRule ^(.*)$ http://www.yourdomain.com/$1 [R=301,L]

Rewrite to www dynamically.

RewriteCond %{REQUEST_URI} !^/robots\.txt$ [NC]
RewriteCond %{HTTP_HOST} !^www\.[a-z-]+\.[a-z]{2,6} [NC]
RewriteCond %{HTTP_HOST} ([a-z-]+\.[a-z]{2,6})$ [NC]
RewriteRule ^/(.*)$ http://%1/$1 [R=301,L]


Implementing a Caching Scheme with .htaccess

# year
<FilesMatch "\.(ico|pdf|flv|jpg|jpeg|png|gif|swf|mp3|mp4)$">
Header set Cache-Control "public"
Header set Expires "Thu, 20 Apr 2010 20:00:00 GMT"
Header unset Last-Modified
</FilesMatch>
#2 hours
<FilesMatch "\.(html|htm|xml|txt|xsl)$">
Header set Cache-Control "max-age=7200, must-revalidate"
</FilesMatch>
<FilesMatch "\.(js|css)$">
SetOutputFilter DEFLATE
Header set Expires "Thu, 20 Apr 2010 20:00:00 GMT"
</FilesMatch>


Password Protect a single file.

<Files login.php>
AuthName "Prompt"
AuthType Basic
AuthUserFile /web/askapache.com/.htpasswd
Require valid-user
</Files>


Password Protect multiple files.

<FilesMatch "^(private|phpinfo).*$"> AuthName "Development" AuthUserFile /.htpasswd AuthType basic Require valid-user </FilesMatch>
Prevent hotlinking.
RewriteCond %{HTTP_REFERER} !^$
RewriteCond %{HTTP_REFERER} !^http://(www\.)?yourdomain\.com/.*$ [NC]
RewriteRule \.(gif|jpg|swf|flv|png)$ http://www.yourdomain.com/feed.

Partial Source Code for 301 rewrites: https://gist.github.com/ScottPhillips/1721489

 
Joomla Logo

User Rating: 5 / 5

Star ActiveStar ActiveStar ActiveStar ActiveStar Active

SEO tips & tricks for Joomla CMS(2019 Update).

Introduction.

This guide for Joomla is filled with useful tips and tricks for SEO to get the most out of your content using the Joomla CMS. The big difference between Joomla and say WordPress is that you will initially have to put in more work, but in the end, you will be able to rank higher if you follow this guide. While working on my website looking for the right balance and SEO options, the initial task was mind-boggling. Most articles said that for the right SEO, you spend a lot of time for the least amount of gain they are right to some extent. I do enjoy tweaking everything from my PC to mobile phone and hence my website as well. While I did find useful articles that gave me a more significant insight none were just the right article that covers Joomla SEO. This is where this article comes in. I will show you my route to a 99% PageSpeed score and a 98% Yslow score. Remember, SEO can be boring with little short-term gain; the gain is long term and better user experience. While this article covers SEO for Joomla CMS, it can be used as a source for other variants of CMS's and websites. The big difference will be you will need to find some modules/plugins that are explicitly built the CMS you are using.

SEO 2019 Update.

The article has been updated to reflect some changes for 2019 SEO optimisation as well as some Joomla plugins and modules that have been either updated or removed altogether. If you revisit this article, my overall ratings have slightly declined, and I am specialising more into Google since that is the most common search engine. Still, I also try to consider my options for other search engines such as Yahoo and Bing. My site has become more complex as well as it has grown since I wrote this article. However, the basics remain the same for the most part, but I have further tweaked my site, and I changed the sitemap generator to OSMap and made use of the Google Structured Data extension to make use of rich snippets.

Reference my progress here: GTMetrix Report and select the history tab and see my website's performance throughout the years.


SEO?

Just covering the basics of what SEO is, there are plenty of articles on the internet that will cover this in debt. But to understand what SEO does and means for you some of the basics for you to digest. SEO stands for Search Engine Optimisation, in layman's terms how to optimise your site to be digested by search engines. The better your SEO score is, the higher you will rank among sites that compete for your market share. Running a blog or an online shop, you will end up competing with someone somehow and somewhere. Whether you post ideas, experiences, or you are selling a product, and you want to reach out to the right people.

For those who came across this article searching for more in-depth not regarding SEO for sites not using Joomla. I have found a great beginners guide that covers the basics of SEO for any site. May it be Joomla, WordPress, Wix etc. you can get started by visiting: Essential SEO Beginners Guide. The article also provides some insights on tools that are used for SEO on any website.


The basics of SEO.

The does and don't of SEO; some practices are heavily advertised on the internet regarding SEO. When caught in the act, you will get a penalty, and the likes of Google tend to remember those offenders for a long time. Whatever you do stay away from so-called "black hat" practices like a contagious decease.

Black hat & no go of SEO.

  • Stuffing of meta-tags relevant or not and never exceeds 20 meta tags.
  • Hiding random text stuffed with keywords like using white text on a white background.
  • Pay for links to your site, also known as link farms.
  • Involvement in a PBN, Private Blog Network resulting in linking loops.
  • Posting your website link on websites and blogs that are not relevant to your content.
  • Specific SEO tools that claim to offer automated link building.

Good SEO practices.

  • Content is king, quality of the content you serve is vital.
  • Use your social media to gain exposure to your content & backlinks.
  • Try to use SEO writing, the most challenging learning curve of SEO.
  • Guest writing on websites with a higher authority.
  • Correct use of HTML markup such as header text.
  • Using a CDN, Content Delivery Network.
  • Enable Gzip on your Server.
  • SEO friendly URL's, also known as SEF.
  • Prevent broken links, essential maintenance of checking linked content.
  • Minify HTML, CSS and Java scripts, reducing page size increasing loading speeds.
  • And then, I will go through the above in greater detail below.

Diving deeper into SEO.

As listed above, their SEO involves everything you use while managing a website. The Server (s), content, programming languages, getting natural backlinks to your website, etc. You can take my word for the black hat SEO practices if not please feel free to google for more information. Now it is time to get down to the nitty and gritty of SEO and go over everything from A to Z in detail. If you want to have a sneak and peak of your actual SEO score, I use this website for my score tests called GTMetrix.

Preparing your Server for SEO.

Once you have installed the basic Joomla, added some of your content and selected your template you have the framework to kick of SEO. The core of your effort will be your Server; it will be vital to get the right settings depending on the host most locations, and they will be set from the get-go. Several settings need to be checked if not set to have the best settings and those all start server side.

The first part is the robot.txt file this will point and set rules for the crawl bots that are used by all search engines. You can allow and disallow access to files and folders using this handy little text file. Joomla sets these settings for you; for the most part, I did not change anything with allowing or disallowing. There are however two vital settings that need to be added, first pointing the robots to the URL your sitemap is located. Copy and paste: Sitemap: http://www.yourdomain.com/sitemap.xml into the robots text file. The .xml and robots.txt should be in the main directory unless you want separate files, but those are not needed. For most servers, this is /public_html unless you installed Joomla in a different folder to ensure the right location for your files for it to work correctly. Next is a simple pointer to the URL you want to use this is either http://yourdomain.com or www.yourdomain.comCopy and paste: Host: www.yourdomain.com into the robots.txt, so the robots will see the preferred URL markup your site should be archived under.

Next up is the .htaccess file for the larger part Joomla has added some rules, and for SEO you might need to add some rules or change them where needed. However, before you start editing, please make a backup, I can not state this clearly enough to make a backup because this file can make your life miserable. You can get the original if you do not have a backup by downloading the full Joomla .zip file and use that if you can not find it at all or forgot to make a backup. While it is rare, you want to check that you can use the .htaccess file for SEO, check out this article to check whether your host is capable of using the .htaccess file. Now you can start to make your edits remember rules are set unless they have a # added in front or behind them, they've also used a spacer and to point out information. For browsers to see how long they can store files in the browser cache unless files on the Server are updated you need to add some code to inform the browser. The browser handles the caches there is no editing required, but the browser needs to know how long it can keep the files, not too long and not too short. Copy and paste the code below or change the periods but these base values are SEO optimised.

## EXPIRES CACHING ##
<IfModule mod_expires.c>
ExpiresActive On
ExpiresByType image/jpg "access 1 year"
ExpiresByType image/jpeg "access 1 year"
ExpiresByType image/gif "access 1 year"
ExpiresByType image/png "access 1 year"
ExpiresByType text/css "access 1 month"
ExpiresByType text/html "access 1 month"
ExpiresByType application/pdf "access 1 month"
ExpiresByType text/x-javascript "access 1 month"
ExpiresByType application/x-shockwave-flash "access 1 month"
ExpiresByType image/x-icon "access 1 year"
ExpiresDefault "access 1 month"
</IfModule>
## EXPIRES CACHING ##

The next bit of .htaccess is a security portion, and yes, security is something that falls under SEO rules. When adding this line, you plug a small security leak that allows for specific exploits to gain illegal access to your Server. If you are using a server where you can access the actual apache configuration such as have a dedicated hosting machine, you want to read this part. Copy and paste the code below as is, it is SEO optimised.

## Misc Security ##
ServerSignature Off

RewriteCond %{HTTP_USER_AGENT} libwww-perl.*
RewriteRule .* ? [F,L]

The next part is setting up the Server for the nice, and so much needed clean URL's. This is part of the SEF part where you start SEO Joomla from the back end. Search engines crave clean URLs since they give a clear picture of what the page is about by using in most cases title of the article or file name. Scroll down to the part that says ## Mod_rewrite in use. and make sure that you uncomment by removing the # in front of RewriteEngine On. This will prep your Server to parse SEF settings later on in the Joomla administrator backend and this part also you need to add a rewrite to a URL make up. You can access your web page through several combinations with URL makeups, HTTP:// or with www. the code here will force a browser to use one markup. All traffic will now point towards a single URL makeup you can also replace the HTTP:// with https:// if you have an SSL certificate. Copy and paste the code below you can change it around to the URL make up of your taste and the URL you will use in search engine webmaster tools.

## Mod_rewrite in use.

RewriteEngine On

rewritecond %{http_host} ^yourdomain.com [nc]
rewriterule ^(.*)$ http://www.yourdomain.com/$1 [r=301,nc]

Scroll down you will find the final rule that must be uncommented to enable SEF to look for RewriteBase / and remove the # in front. There is no need to edit any more items or add more coding now you need to save the .htaccess file.
Ensure you have a copy of the .htaccess this file is now ready to be uploaded again or saved directly on the Server. One final action must be taken while this is on the Server for the .htaccess to work and starts doing it's magic, click on the file on your Server. Remove the.txt from the end and place a .(dot)at the beginning, so the file is called .htaccess and the Server can read the file and deploy the settings.


Preparing Joomla for SEO.

For this part, we need to dive into the back end of Joomla you probably have guessed you need administrator rights to gain full access. Part of SEO is the web page loading speed and the size of the pages, especially the landing page, your main URL: yourdomain.com in most cases. To ensure you have the best loading speed refrain from installing modules and plugins you won't need or don't use if that is the case remove these. They tend to clutter the calls your web page makes on the Server slowing down the loading process, reducing your SEO score. Even modules and plugins that are not in use could potentially leave clutter on your web pages so remove them if you do not need them. For some SEO work, I only had to use two modules/plugins that will aid in a better experience, robots access, and loading speeds. There are other modules and plugins I have tested these two, giving me the best experience you could test out other modules or plugins if you wish. The first plugin/module is called OSMap it will crawl your Joomla content and index it into a sitemap.XML you later must submit to search engines. Crawl robots will have an easier time indexing your website, and you can assign a priority number indicating the robots the importance of your content. The 2nd extension is called Google Structured Data; it will add schema.org to your website and content that will aid with CTR & SERP.

Now to start from the top, the most significant portion is located in the Global Configuration panel under System on your right-hand side, you see the SEO Settings. Preparations have been made for this portion by editing the .htaccess file, set Search Engine Friendly URLs, Use URL Rewriting and Adds Suffix to URL to YES. Save & Close these settings now go to Extensions --> Plugins and type System - SEF plugin enable and save this plugin to finish the SEF settings. This will rewrite your content URLs to something like https://www.yourdomain.com/contact.html you can test this by browsing the front end of your website. Below is the Cookie settings, the pain is too much over the gain; thus, I will not cover these settings furthermore the SEO score will not benefit significantly from it anyway.

Open System --> Global Configuration and the left-hand side you have Site Settings here are some site Meta to fill out, describe your website in the Meta Description. Add your Meta Keywords you can use several words and space but close the keyword with a, to add the next Meta Keyword remember to use no more than 20. It will look something like: your name,site name,content 1,content 2,location 1,location 2 also worth mentioning try to have at least 10 Meta Keywords. Google has lowered the weight of scoring for Meta Keywords, but it is still widely used, so having them is handy either way. Right below that is the Robots option make sure that is set to Index, Follow so Joomla does not block access to your content unless wished otherwise.

Joomla site configuration

Staying in the Global Configuration panel, we move on to the System several settings need your attention both to have a high SEO score weight. The Cache Settings set Platform Specific Caching to YES and System Cache to ON - Progressive caching you can lower or increase the Session and Cache Time if you wish.

Joomla system configuration

Moving to the next tab called Server there is HTTPS option if you have HTTPS certificate and you can get it for free with Cloudflare a CDN provider. HTTPS can be left OFF since you will be using a CDN that will give you HTTPS from their Server to the end-users. Unless you are using an HTTPS certificate from your hosting provider, you will have to configure this and turn it ON. The CDN portion I will cover further down in this article it will have an impact on SEO so having HTTPS is a good idea and you can for free, so that is even better. Then there is one final option called Gzip Page Compression you turn this on, reducing content size for people browsing your website considerably. Gzip has a nice weight on SEO score as well, and it will reduce resource usage by browsers. This will help if you run on a resource-stretched server. Error reporting can be turned off while testing out your settings, but when you are done and satisfied, you can turn this off, it can be useful for finding errors if any occur.

Joomla server configuration

Next up are the plugins as mentioned above, go to Components to find OSMap, and you can find Google Structured Data under Components. OSMap and Google Structured Data both work out of the box for me you can just turn it on by selecting the Status to the drop-down menu and select Enabled. You can tinker with the options, but the out of the box settings work perfect, and you will get a little gain from tweaking them further.

OSMap.

OSMap is also very easy to use; it is a couple of clicks. Just to give you a short run down if you feel overwhelmed, there is a default sitemap this will work for most users out of the box. The .xml version is the URL you want to submit to search engines and place them in your robot.txt file. You can use the .html version on your website for easy access to all content on your site. The image sitemap will simply collect all the images so they may be indexed separately. The news sitemap can be submitted to Google News; this is useful if you provide content on current events such as news or gossip. By click on the Default Sitemap any other sitemap, you can set the crawl rate for the search engine bots as well as the priority.

Google Structured Data.

Google Structured Data is very easy to use Joomla extension to enable Rich snippets and will improve our CRT with the Google BERT update. This, however, will take time since Google will need to crawl your site and index all the schema.org markup for each page and process that. Depending on your site rank this can take from a couple of hours to weeks. The code is, however, highly optimised, so there is no impact on your site performance. Make sure when you add structured data that you use the correct schema, such as FAQ schema for an FAQ, Article schema for your generic content, be aware that selecting the wrong schema might result in Google not using your structured data automatically or manually. You can test your rich snippets with a free tool from Google located here: Rich Result Test it will show you what rich snippet(s) a given page is eligible for. Another great free tool from Google is the: Structured Data Testing Tool. This will test a given page on all structured data such as breadcrumbs, site logo, etc.


Search Engine Webmaster Tools.

The three main search engines that have the largest market share have a unique backend for webmasters where you can monitor and digest website details from the search engine side. Here you can also add your sitemap what results in a better crawl rate and indexing of your website besides the robots.txt file on your server root. Search Engines give a high score to sitemaps with the right markup even more so one that has been submitted on the webmaster tools backend. What is the difference between the sitemap pointed out in the robots.txt and the sitemap submitted directly to a search engine is that you need to prove ownership of the domain. There are several ways of having ownership verified a common practice is uploading an HTML/XML file to the website root another one is adding a record to the DNS registrar. Search engines give a high rating to content served through the sitemap from the webmaster tools since this is confirmed content with ownership details providing credit to the content. It will not negate the rest of the SEO rules; you still need to serve good content and use good SEO practice overall. Make sure to register an account so you can make use of all features and submit your sitemap to each search engine. You can submit the same sitemap to each and all search engines.

After confirming ownership, you can submit your sitemap it will take up to several days for the first crawl to happen. More time is required for statistics to be displayed such as backlinks, keyword search results and crawl statistics for each search engine. In the meantime, there is a website I like to use with some handy SEO tool called smallseotools.com use this to check your keywords, another SEO score checker, among others. There is a backlink maker tool there as well that I want to highlight it will submit your website URL to various website SEO and information sites such as alexa.com these are good backlinks. The only reason I took the plunge, so to speak is that I know this website has reliable tools and does not recommend or uses black hat SEO tricks that will get you a penalty.


CDN, Content Delivery Network or Content Distribution Network.

Using a CDN will gain you a nice chunk of SEO score with Yslow vastly increases your page loading speed and increased security with a shared SSL. For my website, I am using Cloudflare what offers free services with an option to buy a subscription every month. A CDN will store the content of your website over a cloud network of data centres and then serve the content to the end-user from the closest data centre. You will have to create an account with Cloudflare to use their services, but the basic plan will be free if you have more websites you can add them as well but make sure to update your DNS settings for each domain. Important to remember that the SSL certificate will take up to 24 hours to be issued to your site do not enable HTTPS links in Joomla and the .htaccess file. If you already own an SSL certificate you can also use that throughout the Cloudflare CDN service make sure to check your settings. The process of adding your website to the Cloudflare service is a click by click process the only real effort is pointing the name server to those of CloudFlare in your domain registrar. Two name servers will be displayed that you need to add in your domain DNS registrar, most likely your host provider has examples for most hosting company's. Cloud Flare also expanded their support and has various examples on how to update your DNS.

  1. Enable DNS Settings in Cloud Flare in DNS Settings.
  2. Enable SSL and wait for 24 hours and select the Flexible option. Unless you have an SSL certificate with your hosting, then you will need to enable Full setting.
  3. Enable Speed, Caching and Network settings as you desire. These will be site-specific, but Auto Minify, Brotli, Caching Level Standard, and Always Online TM are reliable options to use.

SEO Writing.

Writing in itself is an art to top it off you need to write in SEO. In short, that means you need to sprinkle in keywords and your tags throughout the article you are writing. While doing all that you need to ensure you do not overdo it, there is no way I can show you as I am currently even as I am writing this article a student regarding the subject matter. This will be a skill you will pick up over time experienced writers like a journalist will have a much easier time being a good SEO writer. SEO writing is not going to put you on the first search rank on every keyword; it will make it easier getting there, especially over the long run since the quality content is king. But at the end of the day, you are still writing for humans and not for robots, the user experience itself must not be lost another critical factor to consider as an SEO writer. A great tool in becoming a better writer is Grammarly a free plugin you can use while typing and comes with a spell and grammar check. Another critical factor is the article length in the number of words used per page you ideally want to have more than 300 words and the number of words increases you can use the Page Break option in your favourite editor and split your page into several subpages like with this article with an index on the top right.

Header Tags.

Using the correct header tags will be vital for the readers and crawlers to understand your pages there are many misconceptions when using header tags like using H1 for the first paragraphs then H2 for the 2nd paragraph. This is, however, no the case, H1 is the article name preferable the same words as in the URL. H2 is for every paragraph within your article, so it is fine as you use multiple H2 tags. Use H3, H4, etc. when you want to structure a lengthy paragraph. This way man and machine can understand the layout of your content by just scrolling your page and see the headers.

  • H1 Header: Used only once in an article at the top of an article as the title.
  • H2 Header: Used for every paragraph like every header for each page break in this article.
  • H3 Header: Used for every sub-paragraph below H2 header to break up large volumes of text.
  • H4 Headers etc.: Used to break up sub-paragraphs hardly ever used but handy when you need it.

Illustrate.

There is more to writing then just text you will also want to use media such as images or infographics while people would prefer to consume video content, but for something like guides, the text is easier to read and also loads faster on mobile devices. However, media can also highlight a specific feature within your content like a product photo or highlight a step(s) within a guide or how-to article. But ensure that when you add media that you add the metadata as well such as title and description so a search engine crawl bot can understand how the media relates to your article.

Ghost Writer.

If for some reason you find yourself to busy handling the writing aspect of your website, you lack the time or even lack the writing skill because English is not you're native language. Or simply you have to much content you can not handle on your own you could consider hiring a GhostWriter. To find a Ghost Writer, this article called How to Hire a Ghostwriter and get a great ROI will go into greater detail, especially when considering when investing capital. The article, as mentioned above, covers that for financial advice, a critical point in the article is to find a GhostWriter with the technical know-how on your niche.


Backlinks.

Getting links to your site is a process you that will take time with good content you could become a reference or your content is shared among the social webs. Cross-promotion can also serve you well and exchange links on the same content with other websites to gain backlinks, Posting on relevant forums and websites will also help you gain backlinks but ensure that the content from websites and communities align with your website. Gaining good high-quality backlinks will take time, and you will have to keep adding good content to gain links without having to ask for it and for crawlers to find the links. In SEO it is vital to get backlinks even more so is the unique backlinks so getting 100 backlinks from one site might be nice but getting 100  backlinks from different sites is better for your ranking in search engines. But make sure the backlinks you gain are of the highest quality linking from and too bad websites will hurt your SEO and defiantly make sure that the backlinks are not injected with malware.

Outbound links.

Outbound links help with gaining authority for your page but do not link to low-quality and ad-filled websites that could hurt you. You want to add at least three outbound links per 1000 words in each article more is allowed when you require to refer to resources. When adding links, make sure they open in a new tab if they open in the same window you will get a higher bounce rate since the user will leave your web page.


Page Loading Speed.

Ranking higher in a search query you will have to have good loading speeds on your website. You want to keep your loading speed below 2 seconds, or a user might leave your site before even seeing your content. This will mostly affect mobile users who tend to be on lower connection speeds even more so in developing countries. Loading speed is also affected by your hosting provider and how much resources your hosting account comes with as well as the above mentioned CDN. Many steps in this Joomla SEO guide are there to increase your loading speed and why the GTMetrix score is so crucial for attracting more viewers. 

Image optimisation.

The most significant factor on your site in terms of page size is the use of images you want to use as many images as possible to illustrate your content without slowing down the loading speed. Images like high resolution or even infographics will use more Kb's then really needed. Also, to consider here is the width and height size of a 4K picture that will only be displayed in 400px will impact your website performance.

  • Ensure you use the right physical sized image in pixels.
  • Decrease the image size by compressing it using TinyPNG.
  • Add Title tags, Alt tags and descriptions to your images.
  • JPG is preferred unless you need a transparent background.

Rich Snippets.

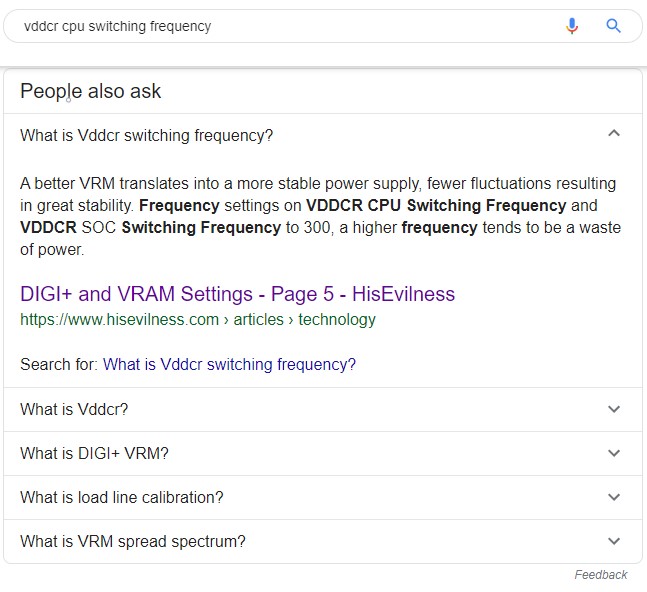
In 2019 Google made a major update to its search engine algorithms called BERT(Bidirectional Encoder Representation from Transformers)where rich snippets have become more important and also affect voice search. BERT should be seen as an addition to the current SEO, not an overhaul and to rank better, you will have to make use of rich snippets. In short, rich snippets are a structured data mark up that webmasters can add to their website(HTML), so an algorithm like BERT can better understand what the information on each webpage on your site is about and serve this to users in the form of snippets. Rich Snippets work for desktop, mobile, tablet any other device with a basic web browser and will significantly help with your CTR. Joomla currently does not has inbuild support for rich snippets, but there is a great extension called Google Structured Data there is a free and paid version of this extension. This extension will add the schema.org markup to our articles and allows for integration with most 3rd party extensions like K2, SP Page Builder, and Virtuemart. Google Structured Data will also enhance your website overall by adding your site name and logo, our search box, social profile links, bread crumbs, and local business listing. But Google is not the only search engine that uses structured data other search engines like Bing and Yahoo will also be able to use the structured data that is even better it does not slow down your site one bit. In short, the BERT update is the biggest in 5 years for SEO, and you defiantly want to make good use of it you might even notice a decrease in traffic since other sites started to rank higher. Below is an example of a search query where an article from hisevilness.com is used as a rich snippet result.


Click-Through Rate(CTR) & SERP.

These are important terms in SEO as they are a translation of your website's performance in search engines. These metrics will tell you how good your site is doing with certain search terms in the Google Search Console. In short, after following this Joomla SEO guide your CTR and SERP should increase.

Click-Through Rate(CTR).

This metric will show you from the X amount of impressions(the number of times your sites was listed in a search query) users click on a link to your site, a higher CTR is always better and will tell you how good your content is by appealing users to click on the link to your site. A CTR of 2% or more for your entire site over it life spawn is good. CTR will increase when you rank higher in search results and when your rank no1 for a search query, the average CTR is around 32%.

SERP.

SERP stands for Search Engine Result Page and is the number of pages displayed when a user enters a search query in a search engine. Search engines, therefore, have to rank search results on relevancy by the use of algorithms. The higher your SERP listing, the higher your CTR will be thus leading to more traffic. And for this reason, you want to optimise and increase your SERP ranking to reach a bigger audience. The main goal to have at least a SERP ranking of the 1st page in a search query relevant to your content. And then further optimise to try to reach the top listing on the first page.


PR & SEO

Another consideration to make especially when running a website that revolves around selling products online is PR(Public Relations)this, however, can be costly since it usually involves hiring a PR company that writes and hires writers to create content around your brand. Another option to consider is guest writing for other websites. This works for both regular content-centric websites as well as websites with an online store. However, hiring PR companies is most cost-effective for online stores. And this article is mainly inspired by writing content-focused websites and lacks an online store for greater insight for PR concerning an online store I would refer to this content piece called PR and SEO. It covers the topic in much more significant and accurate depth and will offer greater insight. Another easy step that you could consider in terms of PR is tweets, retweets and any other social shares, although those will not provide the same impact as a reference link from authoritative websites. For instance, Instagram has grown greatly in popularity with short stories and has become a main staple to generate links towards a site. But with the sheer volume of an Instagram post, it is hard to stand out in a crowd. In short, you wan to create compelling short stories to generate genuine clicks a good reference guide for using Instagram short stories can be found in this guide: How Long Should Instagram Stories Be? There are many ways to generate links however be careful where you get those links from as they might hurt your website authority if they come from spammy websites and you will need to Disavow their links through the Google search console.

Closing Thoughts.

Completing this process will take some time, and when you are done, remember to head back to GTMetrix to check your SEO Score. As well as checking your website with a tool called Uber Suggest to dot the I's and cross the t's. Both tools will give hints if your performance can be improved and resulting in gaining the top search position related to your site and remember to link my article I could use the backlinks for sure! And check out the below articles for more in-depth information regarding SEO for Joomla or SEO in general.

Signed,
Paul "HisEvilness" Ripmeester


Subcategories

AMD Ryzen 3700X overclocking guide intro banner

Ryzen 7 overclocking the 3700X

AMD Ryzen 7 3700X overclocking guide. This is an easy to use and comprehensive overclocking guide for the AMD Ryzen 7 3700X with a wide
Intel i5 100600K overclocking guide banner

Intel i5 overclocking the 10600K.

Intel i5 overclocking the 10600K on a Z490 Motherboard. This is easy and illustrated overclocking guide for the i5 10600K using a mid-range MSI Z490
AMD Ryzen 2600 overclocking guide intro banner

Ryzen 5 overclocking the 2600.

AMD Ryzen 5 2600 overclocking guide. This is a comprehensive and easy to use guide with illustrations to overclock the Ryzen 5 2600 CPU from
DDR RAM Overclocking Banner

DDR RAM Overclocking Terminology FAQ

DDR RAM Overclocking Terminology FAQ This Terminology FAQ covers overclocking for DDR RAM for both Intel and AMD platform and adds a reference material for various
AMD_logo_x400.png
Samsung_logo_x400.png