• This email address is being protected from spambots. You need JavaScript enabled to view it.

Tech, OC'ing, SEO and more

Here I post a very wide range of articles regarding tech that I use and then optimize, overclock and improve. Anything from overclocking the new Ryzen CPU's, Intel CPU's to SEO for Joomla and some Photoshop tutorials. While the above mentioned is to be seen as a sample I will add more tutorials/manuals as I progress. Furthermore, I will be adding some links to people and organizations that I find useful content wise and might help you further on subject matter for each category.

SEMRush SEO audit for your content: How To Boost Instantly! Your Site/Blog Performance with SEMrush Site Audit Tool
- Article for SEMRush an SEO tool I also use for my website on an SEO audit on your website and improve your content so it may rank higher.


TWRP

User Rating: 5 / 5

Star ActiveStar ActiveStar ActiveStar ActiveStar Active

Guide to custom recovery and root on the Samsung Galaxy series.

This guide is a general step by step process on how to install a custom recovery(TWRP) and gain root(Magisk) access. This guide will contain reference pictures, links to resources and the step by step process on installing TWRP and Magisk. It is important to note that tempering, replacing or modifying a stock Samsung ROM will void the warranty. Although rarely this may cause damage to your phone so proceed on your own risk.

Glossary of some of the terms used in this guide can be found here: Samsung Galaxy devices root, recovery, and custom ROM FAQ.

Preparations.

The first step is to download all the utilities and files linked below. And move all these files into a folder on your PC and then copy the folder to an SD card on your Samsung device. 

  1. Download Odin: https://odindownload.com/
  2. Download TWRP, make sure to select the correct Samsung device: https://twrp.me/Devices/Samsung/
  3. Download Magisk, https://magiskmanager.com/#How_to_Install_Magisk_Latest_Version_201_on_Android_Non-Rooted_Phones
  4. Download RMM-State-Bypass, https://drive.google.com/file/d/1UvqcYUbVTFomAmKCVkMyfTWeuz1sEz8n/view
  5. Download Disable_Dm_Verity_ForceEncrypt, https://zackptg5.com/android.php#disverfe
  6. Download a custom ROM(H-ROM & Lineage work with TWRP)) but make sure it is for your specific Samsung Galaxy device, https://forum.xda-developers.com/

Preparing your phone.

Now the first step of preparing your phone is to head over to Settings and scroll down and tap on About Phone.

About Phone

Scroll down to Software Information and tap that.

Software Information

Scroll down and look for build number and tap that 7-10 times to unlock Developer options.

Build Number

Head back to Settings and scroll down and tap Developer Options.

Developer Optios

Scroll down to USB Debugging and swipe to enable. Some phones like the Galaxy J6(2018) have an OEM Lock options disable that after USB Debugging.

USB Debugging

Installing TWRP. 

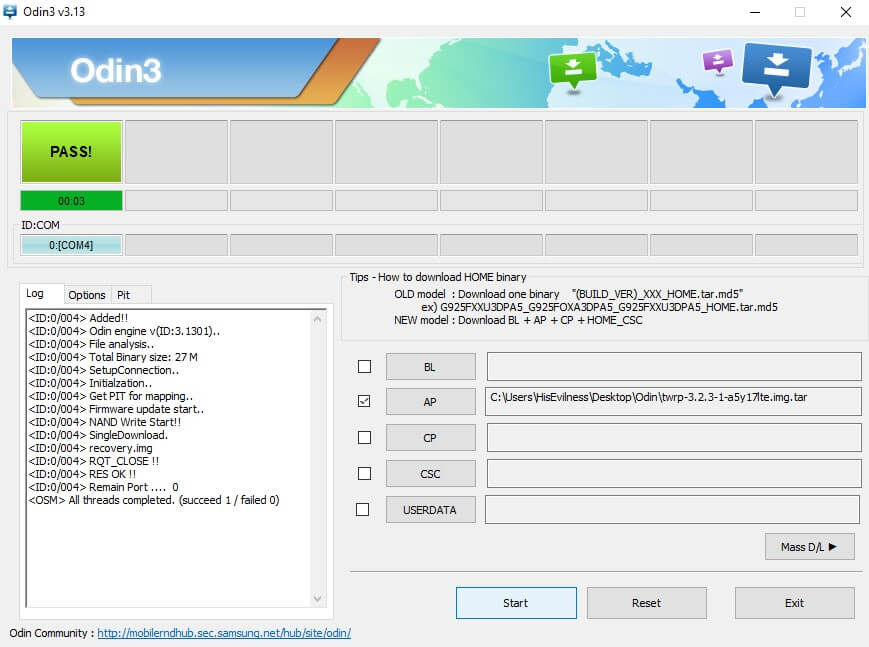
Power down your Samsung device and enter download mode. Depending on your device either by holding Volume Down + Power button + Home button or when there is no Home button hold Volume Down + Power button or Volume Up + Volume Down + Insert USB. Release the buttons as soon as the Samsung logo appears. And now open Odin and make sure your Samsung device is detected.

odin phone added.

Click on the Options tab and make sure to untick Auto Reboot and tick F. Reset Time.

Odin Options

Now add the correct TWRP file for your Samsung device under AP.

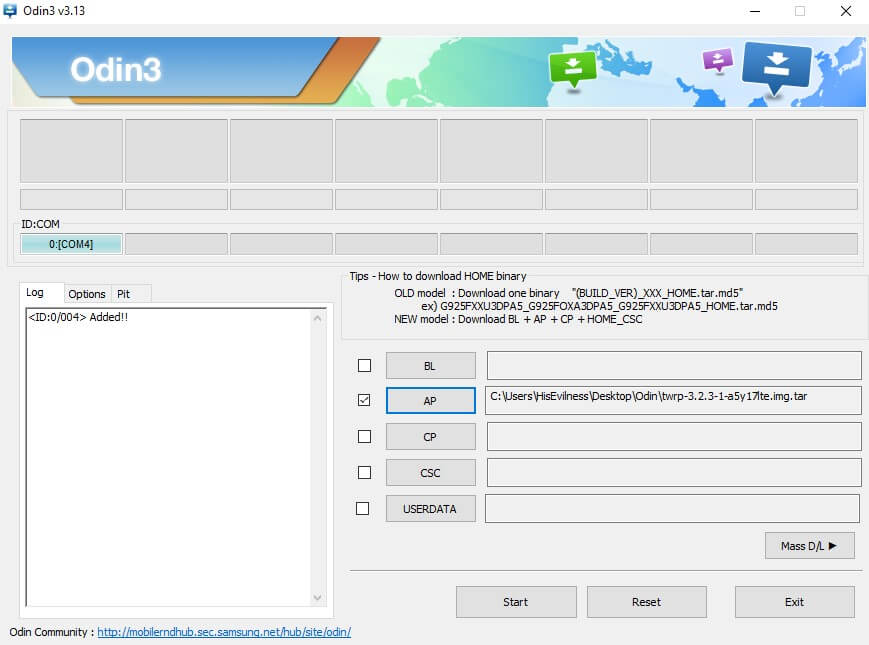
Click start and wait for Odin to flash TWRP to your device.


Using TWRP.

Now to go from Download Mode to Recovery/TWRP Mode follow the steps below in sequence.

  1. Hold Volume Down  + Power button + Home button or Volume Down + Power button when there is no Home button until the Samsung Device powers down.
  2. Then directly hold the Volume Up + Power button + Home button or Volume Up + Power button when there is no Home button and release the button as soon as the Samsung logo appears.

TWRP custom recovery menu

Go to Install and select the storage you saved all the files on.

 All files needed installing custom ROM and root.

Tap on the RMM-State_Bypass and Swipe to confirm Flash.

 TWRP RMM-State_Bypass

Go to Wipe and select Advanced Wipe and select Data and Swipe to Wipe.

Data wipe 


Head back to Install and tap on Magisk*version number* and Swipe to confirm Flash.

TWRP Magisk install 

Now you have installed all the required files to safely Root your Samsung device you can now use TWRP to flash the custom ROM. Important to note is when selecting a custom ROM from XDA-Devs that you can flash it through TWRP. It is just easier and you try out different custom ROMs before committing to one without too much hassle.

Head to Wipe, select Advanced Wipe and select Dalvik / ART Cache, Cache, Data, System, and Swipe to Wipe.

TWRP wipe

Simply head back to Install and select your preferred Custom ROM and Swipe to confirm Flash if you have any extras with your Custom ROM like apps etc you can install them now by heading back tp Install and select the files and Swipe to confirm Flash.

TWRP custom ROM install.

Head back to Install and select the Disable_Dm-Verity_ForceEncrypt and Swipe to confirm Flash.

Installing Disable_DM-Verity

If not you can now select Reboot from the main menu and select System. This should boot straight into your new OS some Custom ROMs might require up to 20 minutes to boot the first time and perhaps several reboots after selecting your language. Using this guide should be the easiest way for gaining root access and installing a custom ROM to your Samsung device(s) with that said you can now install all your apps and I would highly recommend installing the Magisk and TWRP app as well you can find them both in the Google App Store.

Soft & Hard Brick.

This occurs when your device has received for instance the wrong data file for a custom ROM, flashed the wrong TWRP version for your device, etc. In this case, your Samsung device can either soft brick or hard brick.

Fixing a Soft Brick.

If bricking occurs soft brick is the most common kind of bricking. This happens when there your phone keeps boot looping so it powers up and then at some point switches off and powers up etc and keeps doing that in a loop as well as crashing on boot giving errors etc. This can be simply fixed by booting into the TWRP Recovery Mode and either flashing a correct custom ROM or the stock ROM or use a backup.

Fixing it is following the steps named above on how to flash a custom ROM, do the Wipe and then do the next step selecting a custom ROM and Swipe to confirm Flash.

Fixing a Hard Brick?

Hard bricking is rare but it means your device won't even boot and keeps flashing the Samsung logo and won't power down, or won't show more than a black/grey or a battery screen when connecting a USB cable. Recovery from this is harder and your only chance of recovery slim since it can also mean there might be hardware damage however hardware damage is extremely rare.

The only fix for this is to let the battery drain this may take hours to days depending on the charge in the battery and then charging the Samsung device around 5% and then putting the Samsung device in Download Mode and flashing the correct TWRP version using Odin and powering up in TWRP Recovery mode. The steps are the same as above Installing TWRP

In the case of hardware damage, you will need to buy a new Samsung device. Or visit a local repair shop and ask for a rough estimate on repairs.

You can find some of my Samsung specific devices guides here: Samsung A3/A5/A7 2017 Root & Android Oreo 8.0 OS upgrade Tutorial and Samsung Galaxy J6(2018) guide to Root and Custom ROM.

- Paul "HisEvilness" Ripmeester

 
Samsung Galaxy J6

User Rating: 5 / 5

Star ActiveStar ActiveStar ActiveStar ActiveStar Active

Samsung Galaxy J6(2018) guide to Root and Custom ROM.

This will be a guide on how to root and install a custom ROM on a Samsung Galaxy J6 2018. Before you start with this guide remember to back up your files such as photo's etc. Also included in this guide will be to revert the phone to stock using the factory ROM from Samsung. Also, make sure you have about 50% battery left to ensure the J6 will not shut down during this guide. And finally, it is VERY important to note rooting and installing a custom ROM will void any warranty so proceed at your own risk.

A glossary can be found here: Samsung Galaxy devices root, recovery and custom ROM FAQ.

Preparations.

Firs your Samsung J6 need to be unlocked using the following steps to enable USB debugging and OEM Unlock by following these steps.

  1. Go to Settings.
  2. Go to About.
  3. Tap on build number 7-10 times.
  4. Go back to Settings and select "Developer Options".
  5. Select USB Debugging first and then select OEM Unlock.
  6. The device will reset now but verify the above-named options are on.

Now to download the correct files.

Installing TWRP.

Copy files to your phone or SD card, Oreo ROM, forced encryption disabler, RMM State Bypass and, no verity opt encrypt. Power down your Samsung J6. Now boot into Download Mode by holding Volume Up and Volume Down and plug in the USB cable at the same time WITHOUT hitting the power button. This will Boot your Samsung J6 into Download mode and do the following steps.

Open Odin flashing tool after extracting it into a folder of your chosen location. Your phone should be in download mode make sure you select Continue to activate the download mode so Odin can detect it. Under options in Odin make sure F.Reset Time is selected, and make sure Auto-Reboot is turned off. Now click on AP and select the TWRP *.tar file and let it load. Now click Start, it will say pass in green in the top left of Odin. Now the important step you will need to power down your device and directly boot into TWRP so read the following steps before attempting.

  • Press and hold Power + Volume Down.
  • Directly press Power + Volume Up as soon as the screen blanks.

TWRP install steps in Odin

Using TWRP.

Now it is time to prep the Samsung J6 with installing the previously mentioned files to safely install a custom ROM.

  1. Select Install
  2. Select RMM-State_Bypass_Mesa_v2
  3. Swipe to install.
  4. Wait for the install to complete.
  5. Select Install.
  6. Select no-verity-op-encrypt.
  7. Swipe to install.
  8. Wait for the install to complete.

Installing a custom ROM.

Just stay in TWRP and it is time for the final steps fist you need to clean the Samsung J6 in order for the custom ROM to work. First, some folders need to be wiped so head select Wipe in the TWRP home screen.

  1. Select Wipe.
  2. Select Advanced Wipe.
  3. Tick system.
  4. Tick data.
  5. Tick dalvik & cache.
  6. Tick cache.
  7. Swipe to wipe.

Now head back into the TWRP home screen and select install and select the custom ROM and swipe to install. Now reboot your phone by selecting Reboot in TWRP and select System. Depending on your custom ROM there will be some options most important here is that you use Magisk with the correct kernel. Also important to note booting the first time may take up to 20 minutes, select your language and reboot TWICE. The main reason to use Magisk it will still allow banking apps etc to work over SuperSU so you will retain the full functionality of your phone.

S8 Port, use the Phoenix or Stock kernel with Magisk.

A8 Port, Use the Phoenix or Stock kernel with Magisk.

Soft Brick & Hard Brick.

This may happen but in the case of a soft brick, you will be able to power down the phone and repeat the above steps Using TWRP. When your device is hard bricked it will stay in a boot loop and the Samsung logo will keep flashing other than the up to 20 minutes first boot time. In this case, you will have to drain the battery when the device powers down then charge the battery to 1% to 2% and hold Volume Up + Volume Down and insert the USB cable to enter download mode and flash TWRP again. Steps are the same as mentioned above.

Check out my other guide for Rooting the Samsung Galaxy A3, A5, and A7 here: Samsung A3/A5/A7 2017 Root & Android Oreo 8.0 OS upgrade Tutorial. And my guide for installing TWRP through Odin and root access with Magisk here: Guide to custom recovery and root on the Samsung Galaxy series.

- Paul "HisEvilness" Ripmeester 


AMD 2200G APU

User Rating: 5 / 5

Star ActiveStar ActiveStar ActiveStar ActiveStar Active

Overclocking guide for the AMD Ryzen 3 2200G and 2400G APUs.

This overclocking guide is for the Ryzen 3 2200G and Ryzen 5 2400G APU taking the Ryzen 3 2200G as an example to go over the BIOS settings using an X370 from ASUS. In this guide, there will be a range of screenshots showing all the settings you need to tweak for quick reference. The only difference between the 2200G and 2400G is the core count thus the heat output will be greater for more core count as well as the silicone lottery in general. My build is total overkill for the APU but it was intended for the Ryzen 5 1600X with an upgrade path to the Ryzen 5 3600X any B350 or B450 Motherboard will be just fine for a Ryzen APU but you can consider an upgrade path even with B350 and B450 motherboards if you wish to do so. 

My Rig.

  • Case: Phanteks Enthoo Luxe.
  • Motherboard: ASUS STRIX X370-F.
  • CPU: AMD Ryzen 2200G APU.
  • RAM: Corsair DDR4 LPX 16 GB @ 3200.
  • GPU: Radeon RX Vega 8 APU.
  • PSU: EVGA SuperNOVA G3 750W Gold.
  • C Drive: Crucial MX300 M.2 525GB
  • CPU Cooling: Gelid Phantom Black.

Getting Started.

The usual hardware checks and make sure your BIOS is updated. With the new Ryzen series, older motherboards might need a BIOS update before being able to run the 2000 series. You may apply for a bootkit and assistance if you happen to have an older motherboard: AMD 2000 series Support. Also, ensure to install the latest driver for your chipset(B350/X370/B450/X470) and enable to AMD Ryzen power plan. Also, make sure when buying RAM it is on the QVL list however by now most DDR4 kits should work with Ryzen since the BIOS Mirco code has matured greatly.

You also want to download the following programs for stress testing your overclock. These are a vital tool for stress testing and monitoring if you already have tools you can use those but these programs I highly recommend and were used while writing this overclocking guide.

 ASUS Strix X370 check for BIOS version


BIOS Settings.

Start with setting your RAM to 2133mhz or 2400mhz this is the base speed for DDR4 kits. Changing the RAM speed to the advertised speeds should be done later on after establishing a stable overclock on the CPU and internal GPU. Also noteworthy here is to point out that faster RAM will increase performance since the infinity fabric clock speed is tied to the RAM clock speed however after 3200mhz you will see diminishing returns. And lastly, both the CPU and Vega GPU overclocking will be covered in this overclocking guide. Make sure if you are using a separate GPU not to use the Vega GPU overclock settings as is while it being overclocked will do no harm but it will generate additional heat. For this guide, both the CPU and Vega GPU were overclocked to the max this will give you a pretty good idea where you may end up with your overclock using the settings within this guide.

ASUS Strix X370 DDR4 frequency


DIGI+ VRM Settings 2200G/2400G.

Depending on your motherboard quality there will be some settings here you can adjust to take into account lower end VRM's I used conservative settings. Some settings as described might not be there on lower-end motherboards but try to set them as high as possible and revisited this portion once you have achieved a stable overclock. Settings here will affect you're overclocking and how high you can go in the overclock so your mileage may vary.

Load Line Calibration will overshoot slightly at LLC 6 or higher and slightly undershoot at LLC 5 and lower this will affect the stability of your overclock changing LLC and VDDCR volts could lower your temperatures while remaining stable. A B350 motherboard I tested only had options to adjust LLC to Extreme leaving very little control resulting in having to dial in slightly higher VDDCR voltage to compensate for Vdroop. Also when using the 2400G over the 2200G you will have to adjust LLC and VDDCR to retain a stable overclock to account for the increased core count.

ASUS Strix X370 DIGI+ VRM settings


AMD CBS.

Under the Advanced tab, there is a section called AMD CBS head over there and change the following settings. Core Performance Boost should be left off since you want to manually enter the Core Ratio and not boost at all. And Global C-state Control will cause instability if it is left one since it will attempt to lower voltages when the CPU is idle.

  • Core Performance Boost: Set to Disable.
  • Global C-State Control: Set to Disable. 

ASUS Strix X370 AMD CBS settings


VDDCR CPU Voltages & GFX Core Voltages.

This final step will be to adjust the CPU Core Ratio, GFX clock frequency, VDDCR CPU Voltage, and GFX core voltage. You want to start however with the CPU overclocking and stress test if the overclock is stable and then adjust the GFX settings and test them with the CPU overclock combined this will make it easier to find out if there is any instability in your overclock.

VDDCR CPU Voltages.

  • AMD Recommended Voltage: 1.350 to 1.375 volts.
  • Community Recommended Voltage: 1.400 to1,450 volts.
  • Absolute max and not recommended: 1.500 to 1550 volts.

GFX core voltages.

  • AMD Recommended Voltage: 1.1 to 1.2 volts.
  • Community Recommended Voltage: 1.3 to 1.4 volts.
  • Absolute max and not recommended: +1.4 volts and above.

Start with entering a Core Ratio of 39.00 and adjust the VDDCR CPU Voltage to 1.4 most Ryzen APU's will boot and pass a stress test do a quick Cinebench run and see if it is stable at all if that passes run a Cinebench and a 10 minute Prime 95 Small FFT's stress test. If this fails you want to go back into the BIOS and set a Core Ratio of 38.50 and repeat the above-named process. If it passes you can keep the Core Ratio as it is but lower the VDDCR CPU Voltage to 1.3750 and do Cinebench run and validate that with a Prime 95 Small FFT's stress test 10 minutes. When that passes keep lowering the voltage and repeat the Cinebench and Prime 95 Small FFT's stress tests until it fails. Now save these settings in a BIOS profile and try to run a Core Ration of 40.00 with a VDDCR CPU voltage of 1.4 and do another Cinebench and Prime 95 Small FFT's stress test. When it passes lower the VDDCR CPU voltage by 0.25 and repeat the Cinebench and Prime 95 Small FFT's stress tests until it crashes. When you are satisfied with your Core Ratio and VDDCR CPU Voltage save those settings as well and do at least a 30 minute Prime 95 Small FFT's stress test.

When your CPU overclock is stable than its time to overclock the internal Vega GPU start by adjusting the GFX core frequency to 1600, VDDCR SoC Voltage to 1.25, and GFX core voltage to 1.3 save those settings and boot into windows. Now do a quick Heaven Benchmark of 10 minutes and check your monitor for stuttering or artifacting. When it passes you can go back into the BIOS and adjust the GFX core frequency to 1650 and stress test with Heaven benchmark, Or lower the GFX core frequency when it fails. Rinse and repeat adjusting GFX core frequency, GFX core voltage, and VDDCR SoC Voltage. Once you are satisfied with your Vega GPU overclock do a stress test with Heaven benchmark for about 30 minutes.

The final step would be setting your DDR4 kit to the advertised speed and making sure that is also stable with doing one final burn-in test, just select the D.O.C.P./XMP profile and it should set all the settings for you.

ASUS Strix X370 Frequency settings

ASUS Strix X370 Voltage settings


VDDCR CPU Voltages Curve.

This is my voltage curve for this specific AMD 2200G APU yours may be different due to the silicone lottery however this can be used as an indication and what voltages you want to use for what clock frequency. If you can use lower voltages with a higher clock frequency you have a better chip thus you might be able to clock it even higher.

2200G @ 3.7Ghz.

  • 37 Core Ratio.
  • VDDCR @ 1.18125
  • CPU LLC 6
  • SOC LLC 6
  • Validation with P95 Small FFT's and Custom 8K FFT's.

2200G @ 3.8Ghz.

  • 38 Core Ratio.
  • VDDCR @ 1.25
  • CPU LLC 6
  • SOC LLC 6
  • Validation with P95 Small FFT's and Custom 8K FFT's.

2200G @ 3.9Ghz.

  • 39 Core Ratio.
  • VDDCR @ 1.3
  • CPU LLC 6
  • SOC LLC 6
  • Validation with P95 Small FFT's and Custom 8K FFT's.

2200G @ 4.0Ghz.

  • 40 Core Ratio.
  • VDDCR @ 1.4125
  • CPU LLC 7
  • SOC LLC 6
  • Validation with P95 Small FFT's and Custom 8K FFT's.

 Now you should have a stable overclock on your AMD 2200G or AMD 2400G APU, you could even opt in to consider a longer stress test of both overclocks by testing for a couple of hours and monitoring temperatures as well. With my 2200G I reached 4.0Ghz with a noise level of 20 - 25 DB @ 4.0Ghz with a Gelid Phantom Black tower cooler But you want to consider the noise level as well if you have a cheaper cooler.

- Paul "HisEvilness" Ripmeester

 
AMD Overclocking Terminology FAQ

User Rating: 5 / 5

Star ActiveStar ActiveStar ActiveStar ActiveStar Active

AMD Overclocking Terminology FAQ

This Terminology FAQ will cover some of the basics when overclocking AMD based CPU's from the Ryzen series. This covers the Zen, Zen+  and Zen 2 architectures and all products stemming from those architectures. Going over some of the basics of BIOS settings and what a function is or why it should be turned on or off and under what condition(s). These settings will vary from motherboard and CPU as well as the degree to which they can be set in the BIOS.

The Basics.

What is a VRM?

VRM stands for Voltage Regulator Module and is located close to the CPU socket to provide a reliable and clean power supply. The VRM regulates the power from the PSU. In overclocking you modify BIOS settings to instruct the VRM for increased performance at the expense of increased heat output. Motherboards for overclocking come with a high-quality VRM that uses better components. But a VRM always consists of MOSFET's, Chokes, Capacitors, and a PWM Controller. The IC(Integrated Circuit)is there to control and regulate those components.

What is the difference between Ryzen and Zen?

Ryzen and Zen are the same, whereas Zen is the architecture and Ryzen is the product name of the AMD consumer-based CPU's. So Ryzen CPU's are based on the Zen architecture, Zen 1 architecture is used for the Ryzen 1000 series CPU's(Ryzen 1600X et), Zen+ is used for the Ryzen 2000 series CPU's(2600X etc.). Zen 2 architecture is used for the Ryzen 3000 series(3600X etc.) Zen 3 architecture is used for the Ryzen 5000 series(5600X etc).

What is AMD CBS?

Custom settings for your Ryzen CPU's that are provided by AMD, CBS stands for Custom BIOS Settings. Settings like ECC RAM that are not technically supported but work with Ryzen CPU's as well as other SoC domain settings.

What is PBO?

Precision Boost Overdrive(PBO) is the AMD automatic overclocking solution for the Ryzen CPÚs. Initially released on the Threadripper HDT CPU's and should not be confused with Precision Boost what dictates the Frequency Range boosting table. It comes default on motherboards that have a design spec of 88w and/or 60A or higher using CPU's that have a 65W TDP or higher.

What are save voltages for Ryzen APU internal GPU?

The internal Vega GPU is the same on all Ryzen APU variants. The RX Vega 11 and RX Vega 8 internal GPU frequency can be overclocked. 

    AMD   Community
RX Vega    1.100v ~ 1.200v    1.200v ~ 1.400v 

What are save voltages for Ryzen SoC?

SoC voltage is the same for all architectures with the Ryzen CPUs. And are used when overclocking the FCLK(Infinity Fabric) and MCLK(Memory Frequency). And in some cases can help to stabilize CPU overclocking.

  AMD Community
Ryzen SoC  1.000v ~ 1.150v  1.150 ~ 1.250 

What are save voltages for Ryzen CPU's?

Each Zen architecture has it's own AMD recommend, and Community recommended voltages. Save voltages are to ensure your CPU will have a long life span. Dangerous voltages may damage or degrade a CPU. The table below has the save voltages for each of the Zen architecture released by AMD. 

    AMD   Community
Zen1 (Ryzen 1000 series)    1.350v ~ 1.375v    1.375v ~ 1.450v 
Zen+ (Ryzen 2000 series)    1.300v ~ 1.350v    1.350v ~ 1.400v 
Zen2 (Ryzen 3000 series)    1.250v ~ 1.300v    1.300v ~ 1.350v 
Zen3 (Ryzen 5000 series)   Stock   1.000v ~ 1.100v

BIOS Settings.

What is VDDCR CPU Load Line Calibration?

CPU LLC adds extra voltage to compensate for Vdroop when a CPU or GPU is put under heavy load. LLC gives overclocking stability by preventing low or high voltage fluctuations and tries to maintain a stable voltage supply to the CPU or GPU. Higher LLC tends to overshoot more in voltage supply, and a lower LLC tends to undershoot in the voltage supply to the CPU.

LLC infographic

What is VDDCR CPU Current Capability?

It is a threshold for the VRM to shut down and monitors the current supply to the CPU, setting Current Capability higher will allow for more current supply to the CPU but will increase heat output. This works best if you have an overclock that shuts down the motherboard/PC because the threshold is triggered.

What is VDDCR CPU Switching Frequency?

Switching frequency is the transient response of your VRM MOSFETs settings this higher in Mhz will allow for a better transient response at the expense of increased heat output and using a lower setting in Mhz will lower the heat output but lower the transient response. Better transient response in overclocking translates into a more stable voltage supply from your PSU to the CPU.

What is VDDCR CPU Power Duty Control?

This will allow for setting the current supply to the internal CPU voltage regulator at the expense of increased heat when set to extreme and lower heat when using optimized or standard. This will help with stability in overclocking and give the best result when using optimized or extreme.

What is VDDCR CPU Power Phase Control?

This affects your VRM Power Phases to the CPU and will be depending on the setting, achieve greater stability in overclocking. Setting Power Phase Control to extreme keeps the number of active CPU power phases at the maximum. If you set Power Phase Control to optimized, there will be a power-saving, but less stability, phases to the CPU will power down.

What is SOC?

SOC(AMD) stands for System On Chip and is also known as uncore(Intel) and encompasses all the components, not in the core of the actual CPU but on the same substrate like internal GPU, Cache, I/O Ports, Memory Controller etc. Overclocking SOC settings can help in varying degrees with keeping CPU core components stable.

Zen 1 and Zen 2 Core vs SoC infographic

What is VDDCR SOC Load Line Calibration?

SOC LLC adds extra voltage to compensate for Vdroop when uncore is put under heavy load LLC gives overclocking stability by preventing low or high voltage fluctuations and tries to maintain a stable voltage supply to the uncore. Higher LLC tends to overshoot more in voltage supply, and a lower LLC tends to undershoot in the voltage supply to the SoC.

LLC infographic

What is VDDCR SOC Current Capability?

It is a threshold for the VRM to shut down and monitors the current supply to the SoC, setting Current Capability higher will allow for more current supply to the SoC but will increase heat output. This works best if you have an overclock that shuts down the motherboard/PC because the current threshold is triggered.

What is VDDCR SOC Switching Frequency?

Switching frequency is the transient response of your VRM MOSFETs settings this higher in Mhz will allow for a better transient response at the expense of increased heat output and using a lower setting in Mhz will lower the heat output but lower the transient response. Better transient response in overclocking translates into a more stable voltage supply to the SoC.

What is VDDCR SOC Power Phase Control?

This affects your VRM Power Phases to the uncore and will be depending on the setting, achieve greater stability in overclocking. Setting Power Phase Control to extreme keeps the number of active SoC power phases at the maximum If you set Power Phase Control to optimized there will be a power-saving, but less stability, phases to the CPU will power down.

What is VDDCR SOC Voltage?

This setting affects the voltage supply to the SoC components. It should be increased when overclocking the CPU core frequency/ratio to aid with better stability of the SoC components as well as the core components. Increasing the VDDCR SOC Voltage will increase the heat output of the CPU package as a whole.

What is CPU Core Ratio?

Sets the clock rate of your CPU by a factor of 10X. So a Core Ratio of 40.00 will multiply the external clock with a base value of 100 to 4,0Ghz.

What is VDDCR CPU Voltage?

Sets the voltage for your CPU on a 1:1 ratio, depending on your motherboard you can either enter a manual value of an offset value. So a value of 1.4000 will set the CPU voltage to 1.4 volts using the manual setting.

What is FCLK?

Stands for Infinity Fabric Clock Speed(FCLK) and can be adjusted with the new Ryzen 3000 series(Zen2). In previous Zen and Zen+ architecture, the Infinity Fabric Clock speed would be set by the DRAM frequency(MCLK). Ideally, you want FCLK to run synchronously(1:1 ratio) with the MCLK for best performance. In short, a DDR4(Double Data Rate) kit is rated for 3600Mhz MCLK and therefore will run synchronously with 1800Mhz FCLK, a 1:1 ratio.

What is the GFX clock frequency?

Sets the clock rate of the internal Vega GPU on Ryzen APUs by a factor of 1:1, so a 1600 value translates into a 1600mhz GPU clock speed.

What is the GFX core voltage?

Sets the voltage for the internal Vega GPU on Ryzen APUs on a 1:1 ratio, so a manual value of 1.25000 is 1.25 volts.

What is AMD SAM?

Stands for Smart Access Memory and work with the AMD 5000 series CPUs and AMD 6000 GPU's. In short, it is a new way for your PC to access the whole memory capacity(VRAM) of an AMD 6000 series GPU. Previously this was done with 256MB paging of the VRAM called BAR(Base Adress Register). Depending on your motherboard brand it can be found in the PCIe section of the advanced menu or advanced settings and turn on Above 4G Encoding and Re-Size BAR Support.

What is DRAM Voltage?

Is the voltage supply to your RAM aka Memory sticks, increasing the DRAM voltage will allow your RAM to run at a higher frequency at times without changing the DRAM Timings but will increase heat output.

What is Global C-State Control?

This sets the idle states of a CPU when it is not executing commands there a various C-States and serve as a power-saving function. For overclocking, this should be turned off since you want maximum performance at the expense of increased power consumption and helps with keeping a stable overclock.

Closing thoughts.

The main reason to write this FAQ is to supplement guides for AMD Ryzen based CPU's found on this website, and I could not find a one-stop-shop solution for ensuring I nail the explanation for each BIOS settings correctly. You can find my guides for the AMD Ryzen CPU's in the bullet list below.

- Enjoy overclocking, Paul "HisEvilness" Ripmeester

 
How to set up a Virpil VPC WarBRD Base and Constellation Delta Grip in Lite Mode

User Rating: 5 / 5

Star ActiveStar ActiveStar ActiveStar ActiveStar Active

This guide will cover how to set up a Virpil VPC WarBRD with a Virpil VPC Constellation Delta Grip the old guide is no longer relevant since Virpil has some major software improvements. The newer software is, in general, easier to use and far more stable but can still be a bit overwhelming when using it for the first time. This guide is for the VPC Configuration Tool in Lite Mode since the Pro Mode can lead to bricking the base therefor is only advised for prosumers.

Update.

A new and better VPC Configuration Tool has been released and therefor the guide was updated to reflect that. The updated software release version is VPC-JOY-200325.

Assembly.

When your package arrives you will notice bubble wrap and other packing materials. You will have some spare parts like cams and springs, I use mine stock without changing anything. What you will need is a CR-V #10 bit remember to have one on hands.

Next up is attaching the base to the Constellation Delta grip, there is a connection male plug in the grip. Gently pull it out a bit so you have enough slack to attach it to the connector in the WarBRD base. Then align the grip with the base so it is centred and use the knob on the base to screw it in place. Remember when taking off the grip to gently remove the connection cable.

Connector plug for the grip

The next part is attaching the base plate to the WarBRD base, there are 4 screws in one of the bags. Take the CR-V # 10 bit and align the screw holes and put each screw in, do not screw them in 1 by 1. Screw them in halfway down and then start on 1 corner, any corner you like and screw it down. Then do the same with the opposite screw so the plate aligns correctly and the screw will fit in the flush. Now tighten them all down to the base plate is firmly attached but do not exert too much force. You will also find some M3 rubber pads in the box place them on the bottom of the base plate. This concludes the assembly part, do a quick visual check if the Constellation Delta grip is correctly aligned.

Base plate CR-V # 10


Getting Started.

Plug-in the USB male to a USB 2.0 Female on your PC make sure you use your 3.0 ports for external HDs and USB sticks. Download the latest version of the VPC Configuration Tool from Virpil here: https://virpil-controls.eu/downloads/software.html and install the software on a desired HD or SSD. When connecting your joystick for the first time windows will install some default drivers and it should show up in Devices and Printers. Also, check if your RGB light turns on when connecting the joystick if it does not turn on make sure you have connected the plug inside the grip to the base correctly.

Firmware Update.

Next step is to update the firmware of your Joystick with the latest version, an image is added to show the steps and the location of each step inside the VPC Config Tool.

  1. Click on Firmware in the VPC Configuration Tool,
  2. Select the correct device, if using multiple devices unplug all but 1 to prevent confusion.
  3. Select the correct *.hexc, if multiple files exist check your devices with the latest file date.
  4. Click on the big blue "Start auto firmware update"
  5. This window tells you when the update is done and to go to the next step in the process.

Firmware update steps.

The update should last a minute maybe more if you're on an older PC but the software will tell you when it is done in the dark grey window with the steps taken for the update process.

Profile.

This section is more clear since the instructions are included within the VPC Configuration Tool but the step is included in this guide to prevent confusion.

  1. Select the Profile tab.
  2. Select your Base.
  3. Select your Grip.
  4. Select the side your device is located and used.
  5. Select Create Profile.
  6. Save to VPC Device.

Profile settings.

You can export the profile however the final step will be calibration and you also want to save those settings. Another final step mentioned is the "Save VPC DEVICES" this is required in the final step hence also selecting the "Save current calibration".

Calibration.

Now it is time to calibrate all the axis on your Virpil WarBRD base and Constellation grip. Very important here is NOT to use the windows calibration and that you must use the calibration from the VPC Configuration Tool and you will have to remove any windows calibration by Windows Settings and by typing the search bar "Set up USB game controllers" and then selecting "properties" select the "Settings" tab and click "Reset to default". This should clear windows calibration now head back into the VPC Configuration Tool.

  1. Click on the Axis tab.
  2. Click the "CALIBRATE AXIS"

Axis configuration

Now your in the calibration screen this screen also has instruction included you will see various visual sliders with a red background this represents your axis and they are out of alignment, in this case, there are mechanical parts inside the base measured with sensitive sensors. For this Constellation grip, you have the X and Y-Axis you gently move the stick up, down, left and right. The Z-Axis can be calibrated by twisting the Constellation grip. And now to calibrate the rY and rX that is the small joystick above the scroll wheel and gently move that up, down, left and right. Now you can see the sliders aligned to their mechanical centre and their background changed to blue.

Axis calibration screen

Saving to Device.

Now the final step is to head back to the Profile tab and select "Export Profile to File". Give the profile an easy to remember to name and select save. Each step is now saved to the joystick after each step but keeping a profile will be useful.

Joystick LED.

The LED is still functional but the function is hidden in the VPC Configuration Tool. Follow these steps to enable modify the colors of your LED(s)

  1. Select Pro.
  2. Select LED.

Enabling LED functionality

Your WarBRD and Constellation DELTA is now ready to be used in-game now you will have to configure the buttons to your choice and make sure to save those settings as well since it can be time-consuming. Below you can find a screen of all the buttons they remain the same from the previous guide.


ROG Ryujin 360

User Rating: 5 / 5

Star ActiveStar ActiveStar ActiveStar ActiveStar Active

This is a FAQ for common questions and troubleshooting for the new ASUS ROG series of AIO's. Therefore am writing this article because I could not find much in terms of troubleshooting the new ASUS ROG AIO, this covers the ROG Ryujin 360 and ROG Ryujin 240 AIO's as well as the ROG Ryuo 240 and ROG Ryuo 120 AIO's. Therefore I decided to write a short FAQ and walk through some of the solutions I figured out. Included are also some files to create gif files with or without a transparent background.

OLED picture is stuck, does not refresh or load a new picture.

There is a small chance when testing out various pictures with the ROG AIO OLED screen it seems to jam and does not allow you to refresh the picture. But you can still add text but that keeps building upon the small OLED screen.

  • Turn off your PC.
  • Locate the USB header that connects to the AIO.
  • Unplug this USB 2.0 header and reconnect it.
  • Reboot your PC.
  • Startup LiveDash and change the picture.

Fans or VRM pump head fan spin upon booting.

When booting your PC the fans on your PC are controlled by the BIOS and not the Fan software. Hence they will spin up based on those BIOS settings. To fix this boot into the BIOS and go to Monitor --> Q-Fan Configuration. And select the header(s) you are using. Ensure you are using the PWM Mode and set the CPU Fan Speed Lower Limit to the lowest value possible. Below is an example where the CPU Fans header is used.

Fan Configuration

How to install ASUS plugin for Corsair iCue.

Corsair and ASUS teamed up for a plugin and will be expanding into more ASUS products. For now, only ASUS motherboards with RGB zones are supported and will show up in Corsair iCue. Support for other ASUS components is coming in the future. Follows these steps below to install the plugin.

  • Aura Sync compatible motherboard.
  • iCue v3.23 or higher.
  • Aura v 1.07.79 or higher.
  • iCue ASUS Plugin.

Installation Steps.

  1. Install or update Corsair iCue if not yet installed, Exit iCue.
  2. Install or update ASUS Aura, Exit AURA.
  3. Extract the folder in Corsair\CORSAIR iCUE Software\plugins
  4. Start iCue and do not use AURA.
  5. ASUS Motherboards and in the future other ASUS products will show up in iCue.

Connected devices from Corsair and ASUS in iCue

LiveDash does not uninstall properly, therefore, it stops functioning.

This problem occurs when installing LiveDash and shows no popup that shows the installation progress however a LiveDash icon does appear on the desktop. Can occur when simply trying to uninstall LiveDash as well. LiveDash will shows as installed under "Apps and Features" and trying to install LiveDash will just give a popup that asks if you want to remove LiveDash and simply will not uninstall. This is due to the fact the registry is not cleared of LiveDash thus Windows will think it is still installed.

LiveDash uninstall part 1

  • Double click on LiveDash and wait for the restore point to be created.
  • Confirm the uninstall by clicking OK.
  • Click Finish.
  • Select Advanced and click Scan.
  • This will show the leftover windows Registry items select the items as shown below.

LiveDash uninstall part 2

  • Click next(yellow button) and click yes again on the confirmation pop-up.
  • Select the 2 leftover programs links in the next window.
  • Click finish(yellow button) and click yes on the pop-up window.
  • Now you can install LiveDash again and this should fix this problem, do make sure you have the latest version of LiveDash for more features!

LiveDash blocked by (another) Administrator.

Certificate issue where LiveDash is blocked from running on your PC by Administrator or by an Administrator(the inbuild Admin account). Requires a reinstall of the drivers by doing the following.

  • Open Windows Settings, Win key + x + n.
  • Type in Find a setting: User Account Control Settings.
  • Select the: Change User Account Control Settings.

User Account Control Settings

  • Set to the slider to the bottom, Never Notify.
  • Click Ok and click Yes on the pop-up window.

User Account Control Settings

  • Now install LiveDash or uninstall and reinstall LiveDash.
  • Set to UAC(User Account Control Settings) back to the default setting.
  • Click Ok on the pop-up.

Creating .gif(animated images) or .jpg(static images) for the OLED screen.

First and foremost ensure you stick to the max dimensions of 160 pixels by 128 pixels to ensure you have a nice centered image. And ensure that this is not bigger than 1MB. Any program will work but to make animations you need to use something like GIMP or Adobe Photoshop. A simple jpg can be created with Paint that comes with windows. Even if your image does not exceed the pictures restrictions ensure you use the 160 pixels x 128 pixels or your picture will be off-center.

  • Creating a transparent background.
  • Remove the background layer.
  • Or use the paint bucket tool or convert the background and use color code: #FF0000
  • If there is no solid background then you need to select the portion you want with a Lasso Tool or Magic wand.
  • If you can remove the background due to the selection process hit Ctrl + Shift + I in PS or select Inverse.

For those who want even less hassle don't worry I made a small .zip file that contains a transparent gif file, black background gif file and a PSD work file with the layers you need so you can use them in an editing program like Adobe Photoshop and GIMP. Those files are called ROG_AIO_gif_files can be found here: AIO OLED Templates

Update fails in ASUS Armoury Crate.

When using the ASUS Armoury Crate application update does not parse the update for the ROG Ryujin and Ryuo even after a reboot of the PC. Seems to be a problem with the Armoury Crate app and can easily be fixed by heading over to the corresponding support page and download the installer for the newest version of the Armoury Crate app.

- Paul "HisEvilness" Ripmeester


SEO Tools 2019

User Rating: 5 / 5

Star ActiveStar ActiveStar ActiveStar ActiveStar Active

Simple and free SEO tools, 2019 Edition.

Below you will find a list of online free SEO tools you can use for various websites to improve your SEO, may it be a custom webpage from a WordPress or Joomla installation. Many free SEO tools lists are filled with paid or semi-paid solutions my list will cover those you can use for free may it be you have to register for a free account. This free SEO tools list covers the whole range of SEO needs, so anything from someone starting out with SEO to more advanced SEO users. SEO tools you may find in this list are for keywords, backlinking, site and image optimization, and Google PageSpeed such as load times and total requests. This is my free SEO tools list for 2019 you may use all or some to increase your site traffic.


Webmaster Tools.

There are 3 search engines that allow to submit sitemaps and analyze your site performance based on their own ruleset. These are powerful SEO tools in itself because the data comes straight from the source. Important to note here that with Bing that they provide the data for Yahoo as well. Data mine search results that apply to your website and the number of clicks you get from search results. As well as showing the number of pages from your website that have been indexed or ignored or have errors. And do not forget to submit your site map so the crawl bots will visit your site sooner than later.

  • Google Search Console: Google Search Console
    T
    he biggest search engine and a must if you want to start with SEO if you want to improve your traffic with big data straight from the source.
  • Bing Webmaster: Bing Webmaster
    M
    uch smaller than Google and they still use meta tags however it can still give you a good amount of traffic.
  • Yandex Webmaster: Yandex Webmaster
    T
    he Russian search engine they offer their services in English as well and a great way to reach out to a Russian audience.

Webpage optimization and performance.

Several websites offer several services and result to analyze the various aspects of your websites such as loading time, minifying various coding aspect such as .css and .html as well as the number of requests. An important ranking factor in SEO is the loading speed and content optimization. As well as some aspect to indicate the end-user experience something that has become a more important ranking factor over time, this includes meta and title description and the structure of your website. The most important ranking factor to consider is that for Google since that yields the most traffic for your website but it is wise not to neglect the other search engines and take them into consideration. 

  • GTMetrix Weekly: GTMetrix
    By far the most popular optimization and performance test on the web it will give you a good idea and what you need to improve on as well as providing a waterfall tab that shows in sequence how your site loads how much time it takes. What makes it even better is that you can test for PC and mobile devices from various location to test how your website will perform to a global audience.
  • Gift of Speed: Website Speed Test & Performance Optimization Tools
    A
    nother optimization and performance test that also allows you to test from different locations but only for PC. They do offer a small selection of tools to use with their test so you can optimize on the fly.
  • Google PageSpeed Insights: PageSpeed Insights
    S
    traight from the source this test is from Google and will give you an indication of how you will do in ranking based on your website speed. Wise to use to compare to other tests if the results are roughly the same.
  • Webpage Test: WebPageTest - Website Performance and Optimization Test
    T
    his test is much more granular than any of the other tests and allows for a wide selection of test locations as well as devices with a waterfall. Great for deep optimization of your website for SEO.

Backlinks and Analyzers.

Everything for backlinks and SEO related data linked to links, the amount of external and internal links, new links and lost links with that sprinkled in some content analysis with your links. Important to know who links to your website and if they do link to what page. Collecting links is vital for your growth as well as being a ranking factor in SEO. Here are some great free tools that allow you to give a better break down of links to your website and links within your website.

  • SEO Web Page Analyzer: Web Page Analyzer Free Tool for SEO
    Offering a short summary of your website regarding links, keywords, and social media offers some features from the previous section. Simple and easy to use tool with all the data contained in one page.
  • Open Link Profiler: Free link analysis tool - Link research
    By far the best free link analyzer out there offers a wide range of statistical analysis of your backlinks. You can see the age, anchor text, domains and pages of backlinks to your website.
  • MOZ: Moz Pro
    The free version offers some analytics for backlinks as well as page and domain authority. Great way to verify some of the backlink data you get from other tools.
  • Browseo: Your New SEO Browser: Browseo
    Look at your website from a search engine perspective without any style sheet and what is important for SEO.

Keyword and Search Trends.

See how your content stacks up in the world and see what the trends are. Very important for SEO even more so if you want to take a deeper dive into SEO. These are the tools to find the trends related to the content of your website and search queries from users.

  • Answer The Public: AnswerThePublic: that free visual keyword research & content ideas tool
    An absolutely great tool to visualize a massive amount of data regarding specific queries for keywords you are using or want to use. Breaks down your search and visualizes them in an easy way great for SEO.
  • Google Trends: Google Trends
    Coming straight from the source see the latest search trends by country so you can adjust your website content accordingly. See current and past search trends coming straight from Google.
  • Google Correlate: Google Correlate
    T
    he little brother of Google trends this gives you are a more granular opposite method of searching for keywords. It will look for patterns regarding your input and tries to find correlating data sets.

Images and Optimization.

Images make up the larger portion of your website site there for it will impact your SEO score if you do not optimize them. These tools will ensure you will keep your quality images but reduce their size so your website will load faster. What is also important is a favicon for your website in various sizes and a search engine to see who is using your images on the web. Great free tools to help you optimize your end-user experience.


Misc.

Some other tools that I consider to be vital for use in SEO they fill in a niche you won't find on any other the other categories. Ranging from Content Delivery network to a sitemap XML generator and a little tool that pings various crawl bots that you have updated your website content all in all these tools should give you an extra edge when it comes to SEO.

  • Cloudflare: CloudFlare
    My favourite CDN it will greatly help SEO and speed of your website loading times and improve your overall SEO score. Easy to use and free with a lot of options with most of them being a couple of clicks.
  • Small SEO Tools: 100% Free SEO Tools - SmallSEOTools.com
    An SEO swiss army knife this site provides some great free tools that basically covers every category in this article an absolute overdose of tools however you might some not as great a specific tools previously mentioned.
  • SERP Simulator: SERP Simulator - SEO Title & Meta Description Tool 2018 | SERPsim
    See how your the microdata markup of your website translates into a visual representation.
  • Ping-o-Matic: Ping-o-Matic!
    Notify a wide range of search engines and websites that you have updated the content of your website.
  • XML Sitemap Generator: Create your Google Sitemap Online - XML Sitemaps Generator
    Everything you need to generate an XML sitemap that you can then submit to the various search engines.

This concludes my list of great free and useful SEO tools for 2019. Hope this helps everyone out there who just started with SEO or just looking to improve their website a bit and venture into the phenomenon of SEO. By no means, is this list a bible but a selection of tools from my experience trying to optimize my websites. Also, consider that you do not need every tool every day or week you can use most of the SEO tools on a monthly basis or every time you launch a new website.  Be sure to share and of course, a link would help me out a ton.

- Paul "HisEvilness" Ripmeester

 
SEO in 2019, updated tips & tricks.

User Rating: 5 / 5

Star ActiveStar ActiveStar ActiveStar ActiveStar Active

SEO in 2019, updated tips & tricks.

Google has updated it's SEO rules and scoring mechanics and sites will also be subjected to manual review by actual people. This means that the "old" SEO game of tricking the system will be harder or even useless. That said if you practised good SEO before not much will change for you since you never tried to trick the system, to begin with. A 200-page manual was released/leaked with instructions from Google to the reviewers on how to proceed/rate websites from now on. With the vast amount of websites out there, it will take some time before you will be reviewed but manual reviews are here to stay and will most certainly weed out the bad SEO practices of the past. This will be a short and sweet article going over the basics and some end-user examples from me the author.


What is SEO?

SEO stands for Search Engine Optimization it basically is about how a human will try to make a site in terms of the actual coding so that a machine/algorithms/AI can understand so it may be ranked and listed in a search engine. Various factors will set your ranking XYZ, trying to cheat the system will be penalized as well as being harmful to web users, helpful content, as well as content from reputable people, will be ranked higher.


Content is King.

Google and any other search engine for that matter provide one service and one service only that is to provide a list of results from a web user query. so it is in a search engine's best interest to answer any query the best possible way. To do so search engines as Google will use programs/algorithms to visit a site and see how it may be listed on their site. For the 2019 update, Google now tries to determine the user's reputation as a writer on the content he/she provides. You do not per se have to hold for instance a Ph.D. in a field but it would help if you do and Google can find that on the web. What also counts is experience Google tries to determine that by finding out more articles of a subject matter you have written about or that you collaborated on with others. It is not just written content it can also be images and videos or even podcasts. Another factor will be back-links to your site or a specific article as well as the authority of those links, the big change this time around is the authority of the link(s) so it is wise to ensure if you want to work on backlinks that those come from good sites in an organic way, so no paid linking as well as advertisement. In short, go for quality over quantity when you try to generate/create backlinks. The next change is the user experience, how easy is to access the information and how do you provide useful content to the web. A fast responsive website that is not cluttered with advertisement and has a proper markup in terms of coding as well as the markup of the text so the end-user can read without distractions and does not leave your site and goes elsewhere. A higher bounce rate is a good indication that a user found what he/she is looking for. And finally in somewhat ties into backlinks what do other random web users think of your site and the content it provides. Reviews or links as a source are a great way to determine that factor.


Content Delivery Network.

A CDN or content delivery network is a great way to gain access to more people all over the world by having your website caches in a cloud-like network. This means that the main server you work on and hosts your site is located near you, your content will be served to web users by a local server decreasing load times and increasing responsiveness. Google as others also considers load times and optimization a factor when ranking your site so even though you have basic hosting a CDN will help with those factors by speeding up that process since they always use high-end servers and internet connections.

SSL and HTTPS.

Another important change is the enforcement of the https protocol for all websites, not just websites that have online transactions. So your entire website has to be using the https://your content, to increase its ranking. This will prevent the spreading of malware and make the web a safer place. This also ties into the end-user experience. You can either get an SSL certificate to start using the https:// protocol from your hosting provider or from your CDN network.


What does it mean in practice?

Let's take my website hisevilness.com and this article as an example, it is a personal webpage of a person who writes about technology as a hobby and the YMYL would be my work in the Defense industry. And the website content is a whole spectrum of subject matter and not a single subject. I do not buy links nor do an advertise on the web all my work is organic and spreads by word to mouth.

Reputation.

My reason to write this article is simply that I also do overclocking of pc hardware which can also be found on the website and SEO is like overclocking your website and I like to share this on my website. In order to establish this, an algorithm or reviewer will look at my social media platforms, steam profile and other content regarding the subject matter on this website. So if you want to establish a reputation link to your social media profiles, profiles like steam, etc. This will reflect who you are as a person, in the case of a business you will have separate profiles so you should link and backlink from those to your website. Try to find older examples of any of your activities or business activities mention and link to those. Share your links on social media like tweet out if you finish an article so people can find it that way. Put your work on Pinterest but ensure you do not have a small sample size of backlinks but a wide variety of relevant backlinks to your site. By relevant is that I get backlinks from overclocking sites to my articles and not from a car sale shop. A secondary source is my online gaming adventures there a logos, screenshots of scores, etc showing that I also spend a considerable amount of time working with hardware and using that hardware. The YMYL would be my work while most of this would not even be on the internet and is even classified it does have mentions in video's like a Peshmarga T-55 tank bouncing of an ATGM(Anti-Tank-Guided-Missile)of the front armor by angling its armor just before impact resulting in a non-lethal impact and the survival of the T-55 tank crew. Google algorithms and reviewers can find these all on YouTube another Google platform. So ensure if you have YMYL content Google can find this by having an online profile that reflects that. While most people will have a much easier time getting their YMYL by getting reviews I, unfortunately, can not due to the nature of my work.

Content Markup.

The end-user experience is important and is made easier by providing content that has a good markup in terms of the coding and in terms of the markup of the actual text. The way your code is presented to Google is important do not clutter your website with crap. Here is a snapshot of my website by GTmetrix.com: https://gtmetrix.com/reports/www.hisevilness.com/NwgNb4Cs My PageSpeed score(Google) is 96% and 83% for Yslow(Yahoo). Run the GTmetrix tool on your own website and see where you can make improvements these will cover both the coding and the content. Just to highlight one major scoring aspect is the image size in size as well as dimension make sure you serve images that fit your page and that they are not resource-intensive in terms of size(kb/mb). An easy way to optimize your images is by using https://tinypng.com/ and re-upload images that were too big in size to a smaller size also speeding up the user experience in the process.  Text markup it is important to remember not to spam caps or use H1 headers, use H1 header once to lead in the article then use H2 headers to lead in paragraphs and subparagraphs with H3 headers.

Content Delivery Network.

Make sure you can deliver your content around the globe from local servers without too much hassle and a CDN can be free or paid. I am used www.Cloudflare.com as my go-to CDN. A CDN will also make it faster for Google to load and search your content. As mentioned above the scoring of GTmetrix thus Google shows minifying CSS/JavaScript/HTML a CDN service provider can do that for you with the click of a button. My SSL certificate is also from my CDN so my entire website is using the https:// protocol. As well as using basic GoDaddy hosting that is a shared solution the CDN has greatly increased loading speeds on PC and mobile devices.


Final thoughts. 

These are just some of the changes but by far the biggest and will have the most impact on how the web user will be able to find your content for the most part on Google. It is still wise to submit your website to Bing and Yandex so it may be found by a wider audience. For a more in-depth analysis in the form of a webinar, I would refer to this YT video below as well as Google PDF distributed to the reviewers linked below. And for an in-depth SEO article, I previously have written surrounding the Joomla CMS found here: https://www.hisevilness.com/articles/technology/seo-tips-tricks-for-joomla-cms.html 

Google Manual User Review Guide PDF: https://www.hisevilness.com/images/PDF_Files/searchqualityevaluatorguidelines.pdf

- Paul "HisEvilness" Ripmeester.

 
Intel i7 overclocking the 8086K.

User Rating: 1 / 5

Star ActiveStar InactiveStar InactiveStar InactiveStar Inactive

Intel i7 overclocking the 8086K on Z390 a Motherboard.

This helpful guide is for overclocking the i7 8700K as well as the i7 8086K the only difference is that the i7 8086K skew is binned at the expense of the i7 8700K skew, that said the i7 8700K should reach 5.0Ghz in most cases whereas the i7 8086K should be able to get between 5.1Ghz and 5.2Ghz or even 5.3Ghz if you have a golden chip. The settings here are an example to guide you to achieve your own overclock and will be different on a case by case basis. Each component is different per build as well as the silicone lottery playing its part. Furthermore, this will be for the Z390 platform, but it should also work for the Z370 platform with the main difference is wifi support for Z390 on the chipset as well as some minor BIOS tweaks. I have also added my Vcore curve for my 8086k overclocking experience as well as the LLC, AVX offset, Ringbus, and validation methods.


My Rig:

  • CPU: i7 8086K limited edition.
  • Cooling: Corsair H150i Pro AIO.
  • Motherboard: ASUS Maximus Hero XI Z390.
  • G.Skill TridentZ RGB 32GB 3200Mhz, 4 x 8GB.
  • GPU: ASUS ROG Strix 1080ti.
  • PSU: Corsair RM850x with Cablemod Pro cables.
  • 6 x Corsair LL120 RGB fans, 3 x Corsair ML120 fans.
  • Storage: m.2 960 EVO, 1 x 500GB 860 EVO, 1 x 1TB 860 EVO, 2 X 2GB Seagate Barracuda.
  • Case: Lian Li PC-O11-Dynamic Tempered Glass.

This is first and foremost a gaming PC with high overclock in mind, optimized for gaming and showcase PC. AMD Ryzen is still a great value option and in my opinion and makes a better workstation, NAS Rig and Capture Rig. With more cores for less AMD Ryzen is a great entry into a work station and productivity and does not require a higher clock speed and overall benefits more from more cores. However, this does not go for all applications that for instance benefit the Intel integrated graphics however if you stack core per core AMD offers much greater value. For that instance, I made my main gaming build with Intel and AMD is the productivity build.

You can find my other guides related to the above here:


Getting started with the 8086k overclocking.

The usual checks, BIOS update, Windows update, driver updates, and remove bird shit from the silicone(delid). For delidding and relidding, I used the Aqua-Computer Dr Delid tool. The Der8auer Delid Die Mate 2 should also work. If you do not want to delid, you will run into higher temperatures and CPU throttling at lower voltages. The Z390 motherboards offer a more robust VRM over the Z370 motherboards, but they also should work fine for the Intel i7 8086K and 8700K. In this case, I am using the Maximus Hero XI that has an excellent Prediction display section on the left side it will give you a rough range of voltages and clock speeds for you to work with as well as a rating for your cooling solution. However, this is still guesswork on the ASUS motherboard side and is not featured on other brands like MSI and EVGA etc. Do take this with a grain of salt my initial overclock range was lower and I managed to get to 5.2Ghz stable and even boot into 5.3Ghz on my i7 8086K. Something else to consider is your clock with AVX loads. It will give a ballpark idea on what your voltage is for the overclock with AVX and without AVX loads.

You also want to download the following programs for stress testing your overclock. These are a vital tool for stress testing and monitoring if you already have tools you can use those but these programs I highly recommend and were used while writing this overclocking guide.

ASUS Maximus Hero XI UEFI BIOS Prediction


BIOS Settings.

Time for some preparations and do some of the basic settings these are the Digi+ Power Control and Internal CPU Power Management settings. As usual, the settings naming convention might be different for other motherboard vendors like MSI, but here an ASUS Maximus Hero XI was used. The most critical part here will be the CPU Load-line Calibration you want to predict your Vdroop and ensuring you do not over or undershoot. In my case, I picked LLC 6, so I have a slight undershoot vs picking LLC 7 that would overshoot and generate a lot more heat. Again this will come down to the silicone lottery in each case and how much voltage you need for your overclock vs the Vdroop you have and the LLC you need to compensate for it.
For a more detailed rundown on LLC, VDroop and voltages for overclocking reference this article: https://en.wikichip.org/wiki/load-line_calibration.

Extreme Tweaker --> External Digi+ Power Control Settings.

  • CPU Load-line Calibration: to level 6 or 7, once achieving a stable overclock you could try to set Load Line Calibration 5 even.
  • CPU Current Capability: to 170% or the highest possible % on other motherboards.
  • CPU VRM Switching Frequency: set to Manual and set it to 500.
  • CPU Power Duty Control: set to Extreme.
  • CPU Power Phase Control: set to Extreme.
  • DRAM Current Capability and DRAM Switching Frequency settings are only needed when you want to overclock your RAM, for now, you leave that as is.

Boot Voltages is only needed when you want to extreme overclocking on LN2 etc. These settings do not apply for overclocking on Air or a Closed or Open Liquid Loop.

ASUS Maximus Hero XI External Digi+ Power Control

 Extreme Tweaker --> Internal CPU Power Management.

ASUS Maximus Hero XI Internal CPU Power Management

Advanced --> CPU Configurations --> CPU - Power Management Control.

  • Boot performance mode: I've set this to Turbo Performance however this can be left as the default setting.
  • Intel(R) SpeedStep(TM): Should be Disabled due to previous settings changes but double-check.
  • CPU C-States: Set to Disabled.

ASUS Maximus Hero XI CPU Power Management Control


Overclock Settings: CPU Core Ratio, voltages, Ringbus, and misc voltages.

First, an important to note about the core voltages, also known as Vcore, there are different save voltages for other cooling solutions and whether you delidded your CPU. As mentioned above, having a delidded CPU with liquid metal and a closed or open loop will have more significant overclocking potential. While the actual voltages will not kill the CPU the current could kill your CPU thermal protection, and other safeguards are in place, but it is better to play it save so adhere to the Vcore guidelines listed below. Ignoring these could lead to faster chip degradation and instabilities as well as thermal throttling.

  • Save Voltages for light overclocking, 1.2 Vcore @ 4.8Ghz for the 8700K, 1.2 Vcore @ 4.9Ghz for the 8086K.
    This is a good and safe starting point even if you have a good chip lower voltages will help to keep temperatures lower, start here if you are air cooling.
  • Save Voltages for medium overclocking, 1.3 Vcore @ 4.9Ghz, 1.3Vcore @ 5.1Ghz for the 8086K.
    Most data for the 8700K and 8086K stipulates that these are suitable starting voltages when using open or closed-loop cooling.
  • Above 1.4Vcore @ any frequency you will run into thermal throttling, any overclock on the 8700K or 8086K should be below 1.4Vcore to prevent thermal throttling and maintain save operating thermals.

Again it will vary what your CPU will run on voltages wise however the general rule is that lower voltages are better and you will overclock higher if your chip reaches higher frequency on lower voltages. Now let's dive into applying those overclock settings, some settings vary between motherboard types and vendors you should be able to double-check on the internet for your motherboard. However, the ASUS series should have the same naming conventions, and lower-end motherboards might have fewer settings you can change.

Extreme Tweaker.

Starting from the top, set your memory XMP under Ai Overclock Tuner to XMP you can tinker with your RAM settings once you have confirmed your CPU overclock stable. BCLK Frequency will affect your entire overclock, so any changes here will change the CPU core frequency, Ringbus frequency, and RAM frequency leave this alone for now. ASUS MultiCore Enhancement is for stock settings; it does not affect manual overclocks so it should be Disabled. SVID Behaviour I went at a Typical Scenario; however, it does not affect your 8086k overclock or 8700k overclock since you will manually override these settings. CPU SVID Support should be disabled unless you are using Adaptive or Offset voltages.

ASUS Maximus Hero XI Extreme Tweaker Part I 

ASUS Maximus Hero XI Extreme Tweaker Part II

The above settings are vital, so you're actual overclock will not be affected in any way shape or form now it is time to dial in the final settings and test the overclock. First, the important setting is the AVX Instruction Core Ration Negative Offset, AVX is in simple terms an instruction set for your CPU that gives it a heavy workload that requires more voltage thus generates more heat and is usually found in productivity and not in gaming or day to day tasks. Therefore motherboard vendors added the option to offset your CPU frequency for AVX loads so that you may achieve greater overclocks for none AVX loads like gaming. Some synthetic benchmarks like Prime95 will use AVX loads so be aware of that. Below are some suggestions for you to test out but I start with AVX frequency for the 8086k of 5.0Ghz and 4.8Ghz for the 8700K.

  • AVX offset for normal to bad chips should be 2 or 3.
  • AVX offset for golden chips can be 1 or 0.

ASUS Maximus Hero XI Extreme Tweaker AVX

Next up is setting the CPU Core Ratio this setting will determine your CPU frequency in GHz, so a setting of 50 will result in a 5.0Ghz frequency. For the Maximus Hero X and XI, you have the option to either set the frequency per core or Sync All Cores. To achieve the best performance it is best to use Sync All Cores so select that and fill in desired starting frequency under 1-Core Ratio Limit, for the 8086K we will start at 50 to get a 5.0Ghz frequency overclock. The 8700K it is best to start at 49 to achieve a 4.9Ghz frequency overclock. The BIOS will set the same frequency for all the other cores later on you can revisit this and see if you, for instance, can apply a higher overclock on cores 1 through 3 and lower the overclock on cores 4 to 6.

ASUS Maximus Hero XI Extreme Tweaker CPU Core Ratio

Next up is the Ringbus of your CPU, basically is the internal CPU communication speed for cache, IGP, memory controller etc. Performance gains here are very small none the less any gain of performance is wanted. But it is wise to start with the stock Ring Bus speed of 43 as in 4.3Ghz and revisit this setting once you confirmed a stable core overclock. A 1:1 overclock is considered the best, but I run mine at 4.8Ghz unofficial the best overlock is within 0.5Ghz(500Mhz) or less over the CPU frequency. Another important setting here is CPU Core/Cache Current Limit Max set this to the maximum, for the Maximus Hero XI that is a 255.75 setting. And leave the Ring Down Bin setting to Auto. Also, ensure the Min. CPU Cache Ratio and Max. CPU Cache Ratio remains the same.

ASUS Maximus Hero XI Extreme Tweaker RingBus

The final step is setting the Vcore or CPU Core/Cache Voltage, this setting will apply to the CPU and the Ringbus to maintain a stable overclock. And you will revisit this section multiple times when your overclock passes or fails. For now, you can set the CPU Core/Cache Voltage to Manual Mode other modes are more finicky and manual mode while being less power efficient does offer greater overclock stability. Under - CPU Core Voltage Override fill in 1.3 this will apply a 1.3 voltage to your CPU for the 8086K this should be more than enough to reach 5.0Ghz, and the 8700K should be able to reach 4.9Ghz. The CPU VCCIO Voltage and CPU System Agent Voltage should be initially left to Auto but should be changed later on to lower voltages and decrease thermal output but only once you established a stable overclock. You can opt to save your settings under Tool or proceed with hitting F10 to save your settings and reboot your PC. The first boot might power up and down this is your PC testing out your overclock settings but should boot into windows. If your PC fails to boot the overlock failed, and you should either lower the voltage of the CPU Vore/Cache Voltage or lower the CPU frequency CPU Core Ratio.

ASUS Maximus Hero XI Extreme Tweaker Vcore


Stability Testing.

Now that you have booted into windows you should do some stability testing to ensure your overclock is stable I usually start with Cinebench and do three runs to give me a good indication as well as ensuring the overlock does not generate more than 90C of heat preferable lower than that. If your initial Cinebench runs pass you can head back into the BIOS by holding Shift, then click restart from the windows menu, then select Advanced Troubleshooting Tools, Advanced Options and select UEFI Firmware Settings or simply restart and keep pressing Del or F2 when booting up. Depending on a pass or fail you either lower or increase the CPU Core Ratio and boot back into windows and run Cinebench again to see if you fail or pass. Failing again, you will need to lower the CPU Core Ratio until you are stable at the same CPU Core/Cache Voltage.

If you pass, you should increase the CPU Core Ratio until the Cinebench runs fail and then increase the Vcore but not above 1.4 volts. Once you have established the max possible overlock, you should do a final stability test using Prime95 using the Small FFT's setting and run that for at least 30 minutes without crashing or the program reporting errors. Very important as well is ensure with the final test to check your temperatures with a program like HWiNFO64 and make sure you do not go beyond 90C or thermal throttle altogether. When doing so, make sure you either have a fan curve that will run at 100% with temperatures above 75C or set your fans manually to run at max RPM.

Once you completed those test you can consider your overclock stable you can now opt to adjust the Ringbus speed and lower the CPU VCCIO Voltage and the CPU System Agent Voltage and repeat the stability testing with starting with Cinebench runs then confirming stability with Prime95 while keeping an eye on temperatures in HWiNFO64. And remember to give the Load Line Calibration a shot at setting 5.


8086k Vcore Curve.

To help out some other overclockers, I went back into the Bios and did some testing with various clock speeds to show the Vcore curve for my 8086k. Here are my results yours may vary due to the silicone lottery.

8086k @ 5.0Ghz.

  • 50 Core Ratio.
  • Vcore @ 1.230
  • AVX -1
  • LLC 6
  • Ringbus @ 47
  • Validation with P95 Small FFT's and Custom 8K FFT's.

8086K @ 5.1Ghz.

  • 51 Core Ratio.
  • Vcore @ 1.295
  • AVX -1
  • LLC 6
  • Ringbus @ 47
  • Validation with P95 Small FFT's and Custom 8K FFT's.

8086K @ 5.2Ghz.

  • 52 Core Ratio.
  • Vcore @ 1.380
  • AVX -1
  • LLC 6
  • Ringbus @ 47
  • Validation with P95 Small FFT's and Custom 8K FFT's.

8086K @ 5.3Ghz.

  • 53 Core Ratio.
  • Vcore @ 1.425
  • AVX -2
  • LLC 7
  • Ringbus @ 47
  • Validation with P95 Custom 8K FFT's Only.

Voltage Curve from 4.9Ghz to 5.3Ghz

Now you should have a firm grasp on how to overclock an 8086k or 8700K on a Z390 motherboard. The numbers used in the pictures are for my end-use case and might vary with you. Cinebench runs scores should be around the 1700 mark. Slight instabilities can also be spotted when Cinebench hangs for a second or more. Increasing the CPU Core/Cache Ration by 0.005 can even fix that. Remember to share my guide if you find it useful.

- Paul "HisEvilness" Ripmeester.

 
Samsung Galaxy A Series

User Rating: 5 / 5

Star ActiveStar ActiveStar ActiveStar ActiveStar Active

Samsung A3/A5/A7 2017 Root & Oreo OS upgrade Tutorial.

I found a great way of turning my Samsung A5 2017 into an A8 2018 in terms of the OS through a ported OS, as well as having root access. I found current guides somewhat confusing so I decided to write my own guide to root and install the OS. But before we start this can brick your device so make sure you make back up of all your files, contact list and data on a micro SD card and then back up those to your PC for redundancy. Again do this at your own peril however in a worst-case scenario you have to install a stock ROM and start over, something I will cover in the last part of this guide. Also, an important note bank apps tend to NOT like rooted phones, for this reason, I would advise against rooting and installing a custom OS or simply get a 2nd phone just for banking apps I am using a Samsung A3 2017 for banking apps that I left untouched and unrooted. This tutorial also works for the Samsung A3 2017 and the Samsung A7 2017 version but in this case, I am using a Samsung A5 2017 to write this tutorial.

A glossary can be found here: Samsung Galaxy devices root, recovery, and custom ROM FAQ.


Preparations:

The hardware side and enabling developer mode.

  • A Samsung A3/A5/A7 2017 Phone.
  • Micro SD Card of a capacity of 3GB or more.
  • Developer Mode Enabled(How to below).
  • Samsung USB Cable & any PC or Laptop.

The enable developer mode procedure:

  • Go to Settings.
  • Scroll down to "About Phone".
  • Software Information.
  • Look for the infobox "Build number".
  • Tap this 7 times, after 3 times you will get a notification "you are x tabs away etc"
  • Head back to "Settings".
  • Scroll Down.
  • Select "Developer options".
  • Enable: "OEM unlock".
  • Enable: "USB debugging".

And you are done preparing to root and install a new OS to your Samsung A3/A5/A7 2017 phone. The next steps will be downloading the right software versions and utilities to root and install the Android Orea 8.0 OS. Below I will list and link all the files you need including a link to a zip file stored on my site to download all the files but for those security nuts out there I will provide a link per download so you can verify the content of each individual zip file.

Download the following files:


Now extract the Odin3 zip file on your desktop or desired folder and place the TWRP zip file in there as well, place the RMM-State Bypass Mesa v2, Magisk v18.x and HadesRom Oreo Stock v6.0 on your micro-SD card.

  • Power off your phone.
  • Hold the following buttons: Home button + Power button + Volume DOWN button, this will load you into a green screen with "downloading".
  • Start Odin3.
  • untick the Auto-Reboot.
  • Under AP select the TWRP zip file you placed in your Odin3 folder.
  • Click Start.
  • Wait for the Odin3 program to say Pass, a big green box that says Pass right below the Odin3 program header.
  • Hold the following buttons: for all the 3 Galaxy A series Power button + Volume DOWN button to power down your device.
  • Hold the following buttons: For the A3 Volume Up + Home Button + Power Button, A5 Power button + Volume UP + Home button, for the A7 Volume Up + Volume Down + Power Button, and release on the Samsung, screen to enter TWRP.
  • Swipe to unlock or simply select Wipe.
  • Tap: "Advanced Wipe" and select: Dalvik Cache, Cache, Data, System.
  • Select wipe again and tap the: Format Data(this step is only needed when coming from the stock ROM"
  • Tap the "Select Storage" button and select your micro-SD card.
  • Select the RMM-State_Bypass_Mesa_v2.zip.
  • Now swipe the "Swipe to Confirm Flash"
  • Select and tap Reboot and select "Recovery".

The next step in TWRP is to root your device using Magisk v18.x or newer. And allows for root access on your phone.

  • Since you rebooted into TWRP in the last portion of this guide select Install.
  • Select the Magisk zip file.
  • Swipe the "Swipe to confirm Flash"
  • Select Reboot and select Recover.

So now your device is rooted it is time to install the custom Hades ROM you can also opt to just keep your device as is and not continue with the next step of installing a custom ROM.

  • Last step you booted back into TWRP.
  • Select Install.
  • Tap "Select Storage" and select your micro-SD card.
  • Select the "hadesRom_Oreo_Stock_v6.0"
  • And now swipe the"Swipe to Confirm Flash"
  • This will install the custom ROM.
  • Now select Reboot and tap "System"

This should now boot into your new Oreo 8.0 OS and will prompt you to do the setup as usual. If you followed this guide to the letter anyway below I will go over the steps when you hard or soft brick your device. When you do or corrupt any files by unplugging or stopping any flashing in the above-mentioned steps you will need to install the stock ROM and start all over. The main reason why everyone says make backups, while I never had any problems this is just a cover all the basics guide.

First of all, you will need to find a stock ROM of your phone, may it be the Samsung A3/A5/A7 2017 from the correct country and provider. Sites might require you to register and the download speeds might be somewhat slow of premium membership.

After obtaining the correct or generic stock ROM you will need to unzip the files in a folder on your hard drive that can van easily find them. The next step is to open Odin3 and connect your phone via the USB cable. If your phone does not even shut down or does not respond simply let the battery drain.

  • Power off your phone.
  • Hold the following buttons: For the A3 Volume Down + Home Button + Power Button, A5 Power button + Volume UP + Home button, for the A7 Volume Up + Volume Down + Power Button, this will load you into a green screen with "downloading".
  • Select the BL file, files you unzipped starting with BL_ in Odin3.
  • Select the AP file, files you unzipped starting with AP_ in Odin3.
  • Select the C P file, files you unzipped starting with CP_ Odin3.
  • Select the CDC file, files you unzipped starting with CSC_ Odin3.
  • Ensure that only F.Reset Time and Auto Reboot are ticked.
  • Select Start.
  • Wait for the big green box with Pass it will then reboot into your stock OS.

This will recover any damage, unroot/unbrick and unfck your Samsung Phone. And you can opt to redo the steps above or call it a day. In any case, I hope you enjoy this tutorial and the endless possibilities an unrooted phone gives you. You can find my guide for the Samsung J6 2018 here: Samsung Galaxy J6(2018) guide to Root and Custom ROM and a general guide on using TWRP, Magisk and Odin for all Samsung Galaxy devices here: Guide to custom recovery and root on the Samsung Galaxy series.

 - Paul "HisEvilness" Ripmeester


Subcategories

Page 2 of 4

AMD Ryzen 3700X overclocking guide intro banner

Ryzen 7 overclocking the 3700X

AMD Ryzen 7 3700X overclocking guide. This is an easy to use and comprehensive overclocking guide for the AMD Ryzen 7 3700X with a wide
Intel i5 100600K overclocking guide banner

Intel i5 overclocking the 10600K.

Intel i5 overclocking the 10600K on a Z490 Motherboard. This is easy and illustrated overclocking guide for the i5 10600K using a mid-range MSI Z490
AMD Ryzen 2600 overclocking guide intro banner

Ryzen 5 overclocking the 2600.

AMD Ryzen 5 2600 overclocking guide. This is a comprehensive and easy to use guide with illustrations to overclock the Ryzen 5 2600 CPU from
DDR RAM Overclocking Banner

DDR RAM Overclocking Terminology FAQ

DDR RAM Overclocking Terminology FAQ This Terminology FAQ covers overclocking for DDR RAM for both Intel and AMD platform and adds a reference material for various
GSkill_logo_x400.png
Samsung_logo_x400.png