- Tech, OC'ing, SEO and more
- Hits: 292780
User Rating: 3 / 5


Article Index
This easy, comprehensive guide illustrated with images is for the overclocking DDR4 using several brands such as Corsair and G.Skill with different IC's as an example. This guide is to supplement existing DDR4 overclocking guides whose knowledge was combined with the experience of overclocking the various DDR4 kits listed below(more to come).
Listed below are the specs of the motherboards, DDR4 kits and CPUs.
HisEvilnes:
- Motherboard:
ASUS Maximus Hero XI Z390.
ASUS ROG Strix X370-F Gaming.
MSI MPG Z490 Gaming Plus.
ASUS ROG Strix B450-F Gaming.
ASUS ROG Strix X570 Crosshair VIII Hero. - CPU:
Intel i7 8086K.
AMD Ryzen 5 1600X.
AMD Ryzen 5 2600.
Intel i5 10600K.
AMD Ryzen 7 3700X.
Intel 9700K
AMD Ryzen 7 5800X. - DDR4:
CMT32GX4M4C3466C16, single-rank Samsung B-die, 3466C16 XMP 32GB.
F4-3200C14D-16GTRS, single-rank Samsung B-die, 3200C14 XMP 16GB.
F4-3466C16-8GTZR, single rank Hynix C-die(CJR), 3466C16 XMP 16GB.
F4-3600C15D-16GTZ. single-rank Samsung B-die, 3600C15 XMP 16GB.
PVS416G440C9K, single rank Samsung B-die, 4400C19 XMP 16GB.
HX426C16FB3K2/32, dual-rank Micron E-die, 2666C16 XMP 32GB. - Topology Z390: T-Topology based on motherboard QVL.
Topology X370: Daisy-Chain based on motherboard QVL.
Topology Z490: Daisy Chain based on motherboard QVL.
Topology B450: Daisy Chain based on motherboard QVL.
Topology X570: Daisy Chain based on motherboard QVL.
Nanogenesis:
- Motherboard: Asrock Fatal1ty Z370 Gaming K6.
- CPU: Intel 8700K.
- DDR4: BLS16G4D32AESB.M16FE, dual-rank Micron E-die.
- Topology: T-Topology based on motherboard QVL.
There are several programs you need for stability testing, benchmarking, verification and a readout of your RAM IC's and PCB.
- AIDA64: RAM Benchmark, AIDA64 download section
- Prime95: RAM Stress test, Prime95 download section
- MemTest2 & MemTestHelper2, MemTest2 download section / MemTestHelper2 download section
- CPU-Z: Validation, CPU-Z download section
- Thaiphoon: Component readout, Thaiphoon Burner download section
Dual rank 2x vs Dual Rank 4x.
When purchasing a DDR4 RAM kit consider your capacity in GB as well as how many DIMMs it will populate. For overclocking a DDR4 kit of 2 is best however if you need more or just want more capacity with 32GB or more you can either end up with a 4 x 8GB kit or a 2 x 16GB kit. Most consumer CPU's will support dual rank like the Intel 9900k and the AMD 3600X. This means if you use more than 2 DDR4 sticks, you will share each channel. This will put more stress on the internal CPU IMC(Internal Memory Controller). Thus for extreme overclocking, Dual Rank DDR4 kits are better. When using Dual Rank kits, make sure you populate the 2nd and 4th DIMM slots or reference the motherboard manual.
Another consideration to make when using 4 DIMM slots on dual-channel motherboards is the topology of the motherboard traces. The traces leading to your DIMM slots can either be Daisy chained or use T-Topology. This is however not commonly advertised to guesstimate check the motherboard QVL. When the highest validation on the motherboard for RAM is with a kit of 4, then most likely that motherboard is using T-Topology. If the motherboard highest validation on the motherboard for RAM is with a kit of 2 sticks, then it is most likely Daisy chained. This is also a good indication of the motherboard quality. Even when using a RAM kit of 2 sticks, T-Topology is better for extreme overclocking(4000mhz or higher). But again for extreme overclocking it is always better to use two sticks of RAM on dual-channel for the best result.
PCB and IC"s
This is the bread and butter of overclocking your RAM kit. The better your ICs and PCBs are, the better your overclocking potential will be. To verify what your PCB and IC's use Thaiphoon Burner and read one of your RAM sticks. Open Thaiphoon Burner and select Read then select any of the installed RAM sticks by selecting an SPD.

Now you will get a readout of your specific RAM stick, and this should be the same on all RAM sticks. To gauge the potential overclocking reference the example Thaiphoon Burner illustration.
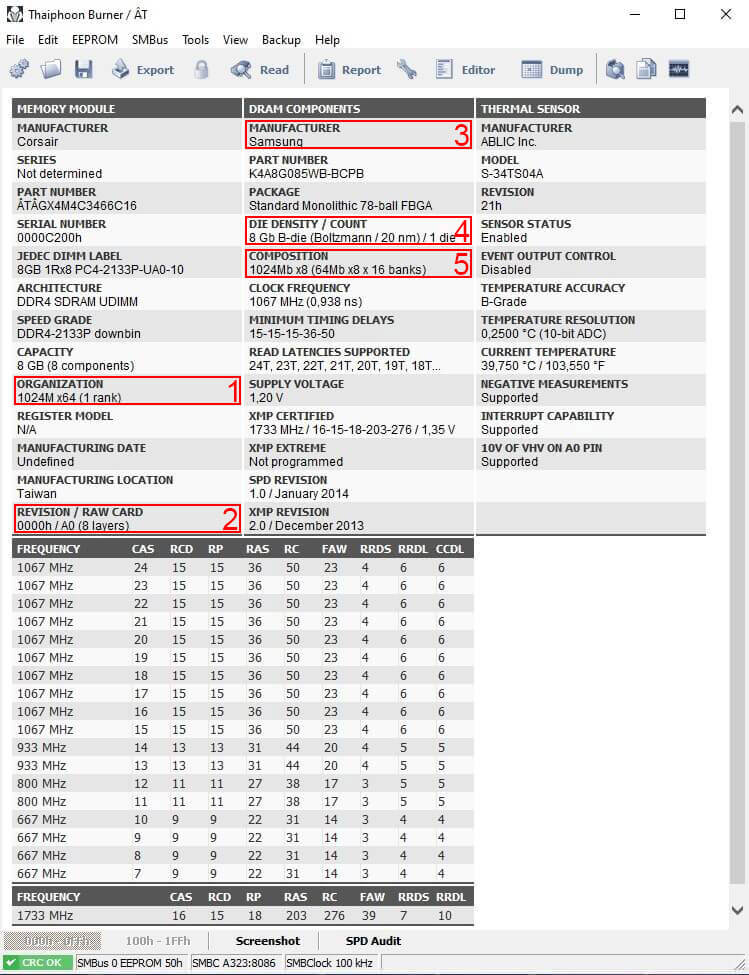
- This will tell you the amount of IC ranks on your PCB. You want one rank, so the ICs are located on one side of the PCB.
- This will tell you the PCB quality. AO is the preferred PCB for extreme overclocking.
- This will tell you the manufacture of the ICs.
- This will tell you the version of the IC and the total count per PCB.
- This will tell you the size in MB for each IC. 1024 MB means one rank of 1024MB ICs per PCB.
So, in short, I have Samsung B-die in a single rank configuration of 1024 Mb IC's and an A0 PCB. With a total of 8GB per stick with four sticks, a total capacity of 32GB.
PCBs.
There are several PCBs for DDR4 some will be better for overclocking than others.
- A0: The JEDEC original stock PCB, single rank(so only ICs on one side of the PCB) with a stock speed of DDR4-2133. The IC's are evenly spread under the heat spreader. And is the favourite PCB for extreme overclocking.
- A1: JEDEC stock PCB for DDR4-2400 and has an ECC sibling called D1. Not very popular with overclocker there for rarely used on high-end RAM kits.
- A2: JEDEC stock PCB for DDR4-2666. Commonly used with RGB RAM kits. A good PCB that has some issues with 2 DIMM motherboards.
- B*: Respective JEDEC spec as with the A-series. These are not good overclockers and are dual-rank(IC's on both sides of the PCB) PCBs.
- C0: JEDEC spec DDR4-2400 with larger IC's. Little is known about overclocking potential.
ICs.
There is a wide variety of ICs by the three main manufacturers of IC's. Listed below are known ICs that are known to overclock. But some will do better than others. If your ICs are not listed below, they will most likely overclock poorly. Reference the linked DDR4 Overclocking Wiki for more specific details for specific IC's. Below is a list of ICs with a good overclocking potential mileage that may vary on the specific IC. For a more accurate list of DDR4 IC's please visit this Reddit article for a more in-depth picture of all available IC's: Reddit DDR4 IC listing.
- Samsung B-die: The best ICs you can get for Intel or AMD builds. Scales well with voltage and does very well on tight timings and frequency 4000Mhz +. Save voltage for DRAM 1.5v and is the only IC that can safely run this voltage 24/7.
- Samsung E-die: Good ICs for Intel builds. Does not scale well with higher voltage but can reach frequencies higher than 4000Mhz. Save daily voltage for DRAM is 1.45v.
- Micron E-die: Good ICs for Intel and AMD. Scales well with voltage and can reach frequencies higher than 4000Mhz. Save daily voltage for DRAM is 1.45v.
- Hynix AFR(A-Die): Good ICs for Intel builds. Scales well with voltages and can reach frequencies up to 4000Mhz. Save daily voltage for DRAM is 1.45v.
- Hynix CJRC-Die): Good ICs for Intel and AMD builds. Unknown voltage scaling but can reach speeds up to 4000Mhz. Save daily voltage for DRAM is 1.45v
| Expected Frequencies* | ICs | ||
| 4000 Mhz or higher | Samsung B-die | ||
| 4000 Mhz or higher | Micron E-die | ||
| Up to 4000 Mhz | Hynix C-die(CJR) | ||
| Up to 3600 Mhz | Hynix A-die(AFR) |
* Manufacturers do bin their ICs so adjust for expectations accordingly. A DRAM kit XMP rated for 3600 Mhz C18 will struggle to reach frequencies above 4000 Mhz unless you are really lucky. On the other hand, a DRAM kit XMP rated for 3600 Mhz C16 is of the finest binning and should only be limited by the maximum frequency your motherboard can handle.
Heat Spreaders & Temperatures.
For overclocking this will be vital as well as airflow to remove heat from the heat spreaders. RAM sticks without a heat spreader you will either have to install aftermarket heat spreaders or pass on overclocking. Having heat spreaders is also a good indication if they are meant for overclocking and the quality of the heat spreaders how well they will overclock. So expect to overclock results based on the quality of your RAM kit heat spreaders if your RAM kit comes with internal temperature probes you want to aim to keep them below 50c. ICs can take more heat, but some instability occurs after 50c that you will need to compensate for in more voltages or looser timings.
Voltages.
There are up to 3 voltages important for overclocking DDR4. For Intel System Agent, VCCIO and, DRAM voltages. And AMD SoC and DRAM voltages. These voltages help to stabilize the uncore domain of the CPU that ties into RAM as well as the RAM itself. The difference between Intel VCCIO and VCCSA and AMD SoC is that VCCIO requires an increase in voltage when increasing memory frequency in Mhz. And VCCSA requires a voltage increase when tightening timings.
| DRAM | - | Daily Driver | - | Extreme |
| Voltage | 1.20v ~ 1.45v | 1.45v ~ 1.60v |
Voltages exceeding 1.45v is only recommended for Samsung B-die for daily use up to 1.5v. To consider is that DDR4 kits with a rated 1.5v also have PCB's that can run that voltage as a daily driver. Extreme voltages for daily use is only wise if you can water cool your DDR4 kit.
| VCCSA | - | Daily Driver | - | Extreme |
| Voltage | 1.10v ~ 1.25v | 1.25v ~ 1.35v |
VCCSA also is known as System Agent voltage is for the IMC and PCIe domain. Going higher than 1.25v can damage the IMC and motherboard traces and is only recommended with high-end motherboards and short benchmarking and record attempts. System Agent voltages are commonly tied to tighter timings but lower speeds in Mhz. Using more System Agent voltage than needed for a overclock can cause instability.
| VCCIO | - | Daily Driver | - | Extreme |
| Voltage | 1.10v ~ 1.25v | 1.25v ~ 1.35v |
VCCIO is voltage for the IMC and using more than 1.25v VCCIO can damage your IMC and motherboard traces and is only recommended for high-end motherboards, and short benchmarking and record attempts. More VCCIO is needed for higher speeds in Mhz. Using more VCCIO than needed for a overclock can cause instability.
| SoC | - | Daily Driver | - | Extreme |
| Voltage | 1.00v ~ 1.20v | 1.20v ~ 1.25v |
SoC voltages help to reach higher FCLK(Infinity Fabric), MCLK(Memory Frequency) frequencies, and tighter timings. Extreme voltages are not recommended and are commonly used for HWbot extreme overclocking scores. And will require a beefy cooling solution if not exotic cooling.
To put these numbers into perspective here are some number from overclocking a range of DDR4 kits. Covering both AMD and Intel with their respective timings, frequency, voltages, and capacity.
| Frequency | - | Capacity | - | Timings | - | SA | - | IO | - | SOC | - | DRAM | - | Kit Number | - | CPU/Chipset |
| 4000 Mhz | 16 GB | 14-14-14-30 | 1.360v | 1.230v | ~ | 1.480v | F4-3600C15D-16GTZ | 10600K/Z490 | ||||||||
| 4000 Mhz | 32 GB | 17-17-17-34 | 1.216v | 1.216v | ~ | 1.450v | CMT32GX4MC3466C16 | 8086K/Z390 | ||||||||
| 3200 Mhz | 16GB | 12-12-12-28 | ~ | ~ | 1.231v | 1.500v | F4-3200C14D-16GTRS | 2600/X370 |
Timings.
This guide will cover the main timings, and two secondary timings will get you little gains as well as you will either like working with 2nd, 3rd and 4th timings or you will hate it. For this guide, only primary timings and 2 of the secondary timings that will lower your Latency are covered. In due time this guide will be expanded to cover all timings.
- tCL: Aso known as CAS, is the first timing listed on every memory kit.
- tRCD: RAS to CAS delay is the 2nd timing listed on every memory kit.
- tRP: Row Precharge Time is the 3rd timing listed on every memory kit.
- tRAS: RAS Active Time is the 4th timing listed on every memory kit.
- CR: Command Rate is listed as CR, T or N in the BIOS.
- tRFC: Refresh Cycle Time is a secondary timing listed as tRFC under secondary timings. IF listed different look under secondary timings as the only three-digit number.
- tREFI: Refresh Interval is a tertiary timing listed as tREFI commonly listed as tertiary timing but considered by most a secondary timing as this is adjusted alongside RFC. IF listed differently look under tertiary timings for a five-digit number.
All the primary Timings will allow for a performance gain in Read, Write and Copy speeds while tRFC and tREFI will lower the Latency of your memory kit. Read, Write and Copy represent raw performance in applications, thus more FPS or lower render times. While reduced Latency will make Windows more snappy as well as games being snappier, the is especially useful when gaming in a competitive sense.
Preparations.
The easy way is to save any overclock on other components like the CPU and GPU and then reset to default this will ensure that any instability while testing can only come from the RAM overclock. As RAM overclocking is time-consuming, it is wise to exclude any other factors of possible instability. Also, ensure that any overclock is saved in the BIOS to profile and well as any GPU to a profile. Also, make sure you have a baseline of the XMP profile from Aida64 or MaxxMEM2 with any CPU overclock applied since the memory OC will show a significant increase with or without a CPU overclock. And you also want a baseline to measure against when you revert all other overclocks. You can write down or save a screen capture of the Read, Write, Copy and Latency of the memory performance and use it as a reference when overclocking your memory. Reset the motherboard to default settings from within the BIOS before proceeding.

Tips for AMD.
Runnings a 1:1 ratio with MCLK and FCLK is best for Ryzen. Only use higher RAM Mhz speeds when your infinity fabric can keep up. When maxing out the infinity fabric go for tighter timings as de-syncing will decrease performance.
Gear Down Mode is useful for reaching higher frequencies and can be seen as CR 1.5(T1.5/N1.5)but will lock out the option to select CR2. As well as forcing tCL to even numbers, for example, C15 is set to C16 with GDM.
CLDO_VDDG can in some cases help with stabilizing FCLK overclock on the Ryzen 3000 series. This only applies when manually adjusting both SoC and CLDO_VDDG voltages and should be done as a pair. With an SoC voltage of 1.10v, the CLDO_VDDG voltages will drop depending on the SoC LLC by roughly ~ 40mv to 1.01mv if left on Auto. So adjusting CLDO_VDDG manually you will have to ensure the SoC voltage drop under load is 40mv or less.
Tips for Intel.
Increasing Ringbus clock speed will increase performance; however, make sure the CPU overclock is stable before overclocking the DRAM and after.
ASUS Maximus Tweaks will tighten RTLs and I-OLs values. Mode 1 works up to 4000Mhz and Mode 2 works above 4000mhz.
Overclocking.
You are starting to overclock by simply booting into your BIOS and look for the DRAM, VCCIO, VCSSA and SoC(AMD) voltages. Make sure no XMP profile is selected and set the RAM profile manual. Also, check if MRC Fast Boot is turned off in the Timings section of your BIOS. Can be found in some high-end motherboard—Example BIOS from an ASUS Maximus Hero XI.

To start overclocking your DRAM you want to adjust your DRAM voltage to 1.45v for Samsung B-die and 1.40v for other dies like CJR, Intel VCCIO and VCCSA voltages to 1.15v or AMD SoC voltage to 1.10v. The following steps are in numerical order for overclocking gain.
Intel.
- Increase DRAM voltage.
- Increase VCCIO & VCCSA voltages. Both can be equal unless going for a low frequency but tighter timings then only VCCSA should be increased; otherwise, instabilities might occur.
- Increasing DRAM VTT voltage(not mistaken for CPU VTT) & VPPDDR voltage. Works best with stabilizing extreme overclocks that are over 4000Mhz.

AMD.
- Increase DRAM voltage.
- Increase SoC voltage. Ryzen 3000 series when adjusting frequency stay in the 0.95 ~ 1.15v range, Ryzen 5000 series SoC is very sensitive it is better left on Auto as changing the SoC value mostly has a negative impact on stability.
- Adjust ProcODT within the ohm range. Can be left on Auto most of the time.
- Set FCLK in sync, 1:1 Ratio. Should be on Auto by default.
- Gear Down mode disabled with single rank sticks, leave Gear Down mode enabled or on Auto with dual-rank sticks(IC's on both sides of the PCB)
Leaving all the timings to Auto you just want to increase the memory frequency with the voltages entered and see how fast your RAM kit can run. Depending on your XMP profile you want to start higher so with a 3200mhz XMP kit you want to start with 3600Mhz. If your RAM kit XMP profile is rated higher, you want to start 400Mhz higher than the base XMP profile. Make sure all the timings are set to Auto, which includes the Primary Timings, Secondary Timings etc. Just want to get the highest possible memory frequency and then work on the timings. With AMD Ryzen you want to set the FCLK half of your memory speed, so when using, for example, 3600mhz then set the FCLK to 1800mhz.

After selecting a frequency then save these settings in the BIOS and reboot. Your PC might reboot a couple of times adjusting the timings since you changed the frequency. If your RAM kit can run the speed, it will boot right into Windows. If it fails, it will show a failure to post a message. In the case of a failure, you can increase DRAM voltage for Samsung B-die to 1.50v and 1.45v for other dies. And adjust some of the settings listed below.
- VCCIO and VCCSA voltages for Intel from 1.15v to 1.2v or 1.25v.
- SoC voltage for AMD from 1.10v to 1.20v or 1.25v. The exception is the Ryzen 3000 series SoC voltage has very little effect above 1.15v when it comes to frequency. With the AMD 5000 series, SoC voltage is better left on Auto and apply LLC 3 to the SoC and adjust the transient response of the DRAM and SoC by changing the Switching Frequency to 400Mhz if the motherboard allows it.
- Ensure ProcODT for AMD is within the frequency range if so go 1 step up or down to the closest frequency range.
- For AMD as well, check if Gear Down Mode is enabled to help stability but remember you won't be able to set uneven tCL.
- Or dial back the memory frequency 1 step from the previously selected memory frequency while keeping the same voltages.

When it does boot into windows use Aida64 Cache & Memory Benchmark or MaxxMEM2 to gauge if your overclock is stable by checking the Read, Write, Copy and Latency. For Intel, you want a Latency between 55ns and 60ns without changing the timings and for AMD timings between 75ns to 80ns. And always an increase in Read/Write/Copy speeds. The first indication of instability is the memory having to correct for errors that will lower Read/Write/Copy speeds. You might also be able to boot into Windows, but when running a benchmark, your PC could shut down or BSOD which also is an unstable memory overclock. When using a Ryzen CPU, make sure you keep adjusting your FCLK to half the memory frequency. With booting or stability problems on Ryzen adjusting ProcODT and CLDO VDDP voltage will help stabilize memory overclocks. Important to note that CLDO VDDP is very sensitive, a 10mv range can be the difference between booting/unstable/stable.

Repeat this process to get the highest possible frequency on your RAM kit. Stop increasing the frequency as soon as it fails to boot into Windows or when you see a decrease in Read/Write/Copy speeds. Then you want to increase the DRAM voltage to 1.50v only for B-die or 1.45v for other dies if not already done so.
- VCCIO and VCCSA voltages for Intel from 1.15v to 1.2v or 1.25v.
- DRAM VTT voltage for Intel can be increased around 0.700v ~ 0.750v when stabilizing overclocks exceeding 4000mhz.
- SoC voltage for AMD from 1.10v to 1.20v or 1.25v. With Ryzen 3000 make sure not to exceed 1.15v when only adjusting the frequency.
- Adjusting CLDO VDDP voltage but only in the final stage of overclocking as it can be very sensitive.
- Here you can opt to loosen the timings.
If you have not done so already. Also, something to look for the timings that are automatically set by your PC and make sure that those do not get overly loose. When you get a high frequency but your timings are so loose in the range of 25-25-25-50 or more you might want to consider running a lower frequency. With higher VCCIO, VCCSA or AMD SoC voltages you can try to keep the frequency that failed to post or did not return a better benchmark. But in general DRAM voltage gives a bigger boost and VCCIO, VCCSA and SoC help to stabilize overclocks that boot but won't pass a stress test. Below is a table of expected VCCIO and VCCSA voltages for AMD they are mainly tied to SoC voltage.
| Memory Frequency | - | VCCIO/VCCSA* |
| 3000 - 3466 Mhz | 1.10v - 1.15v | |
| 3466 - 3800 Mhz | 1.15 - 1.20v | |
| 3800 - 4200 Mhz | 1.20v - 1.25v | |
| 4200 Mhz and higher | 1.25v - 1.30v |
* Combining VCCIO and VCCSA works best for higher frequencies and their timings, for running 3200mhz with 14-14-14-32 as an example it is wise to drop VCCIO to 1.15v as it might introduce instability. For AMD SoC voltage a bit of similar advice when it comes to the Ryzen 3000 series. SoC voltage should not exceed 1.15v when only adjusting the frequency but can exceed 1.15v SoC to 1.20v ~ 1.25v SoC when tightening the timings of your DDR4 overclock.
| Memory Frequency | - | FCLK Frequency* | - | SoC Voltage |
| 3000 - 3200 Mhz | 1500 - 1600 Mhz | 1.10v - 1.15v | ||
| 3466 - 3800 Mhz | 1733 - 1900 Mhz | 1.15v - 1.20v | ||
| 3800 Mhz and higher | 1900 Mhz - and higher | 1.20v - 1.25v | ||
| Ryzen 3000 series | Any FCLK Mhz | 0.95v ~ 1.20v |
* FCLK should be synced with the memory frequency, and in all of the BIOS versions, I've seen this was done automatically. De-Syncing FCLK from MCLK could increase Latency and lower Read/Write/Copy speeds.
When you have established the highest possible memory frequency, it is time to tighten the timing. Here you start with the Primary Timings. To consider is that the best RAM kits run timings of 14-14-14-32 @ 3200mhz or 16-16-16-38 @ 3600mhz with 1.35v. This gives you a good indication of whatever max memory frequency you have for what memory timings you want to aim for and what is possible. Make sure the Command Rate is set to CR1/T1/N1 unless you are using a memory kit of 4 sticks then use CR2/T2/N2. If your timings on Auto went to CR2 regardless of the number of sticks keep these settings since using CR2 is slightly less demanding to overclock. You can consider using CR1/T1/N1 but expect less Mhz and loosen timings only really well-binned ICs do well on CR1.
For AMD Gear Down Mode can be enabled as well as adjusting ProcODT and CLDO VDDP voltage for AMD CPUs to help with stability, CLDO VDDG voltage can also be manually adjusted but make sure that SoC voltage is 40mv or more above CLDO VDDG voltage. As mentioned in the above paragraph regarding adjusting the frequency on the AMD 3000 series SoC should not exceed 1.15v when ONLY adjusting the frequency. However, when adjusting the timings tighter you can exceed the 1.15v for SoC as it will help stabilize your overclock in the 1.20v ~ 1.25v range for SoC this mostly applies to the AMD 3000 series. As SoC voltage has a wider impact on frequency and timings on the AMD 1000 and 2000 series as a whole. With the AMD 3000 series the impact has become far less but it could benefit from a slight boost in SoC voltage. As an example, an XMP kit of 3600C15 did run fine on 1.15v SoC using the XMP profile but when tightening the timings to 3466C14-14-14-28 SoC voltage had to be increased to 1.20v on the SoC or it would be unstable. With the AMD 5000 series, SoC has become very sensitive and changing it leads to instability very quickly. And with the 5000 series as an example with the 5800X, the SoC voltage is left on Auto and sits around 1.088 volts and changing the Switching Frequency and LLC in the VRM options yields great results for higher overlocks.
You can consider a wider range of overclocked profiles and pick your daily driver from there, but it will take considerable more time to test and stress testing each profile for 100% stability. And it must be said that stress testing is vital even if done for hours with Linpack, Prime95 at times you might find instabilities down the road, rare but it can still happen. In that case, some minor voltage tweaks could work but consider you might have to loosen or lower the frequency when it does happen.
Some important notes on adjusting the timings you want to make sure the 1st timing is only 1 or 2 steps away from the 2nd and 3rd timings. Only B-Die can run the same timings on the first three timings, for example, 16-16-16 for the first set. Other IC's you want to keep the first timings as low as possible but only loosen the 2nd and 3rd timing, as an example 16-18-18 for the first set. The 4th timing you want to double the 3rd timing and if needed to loosen + 4 steps ideally. Examples included in this guide are the most common used timings used for most IC's. It is, however, possible to run different sets like 14-15-14-31. However, this does not always work with a wide range of motherboards and DDR4 RAM kits. For this purpose, examples like 14-14-14-32, 19-19-19-38 and 17-19-19-38 are used since these always work on their respective DDR4 kits and all motherboards. Below are some more primary timings to consider as an example.
Example B-die Timings.
- 14-14-14-32
- 15-15-15-34
- 17-17-17-34
- 19-19-19-38
Example RAM Timings.
- 14-15-15-32
- 14-16-16-32
- 16-18-18-36
- 17-19-19-38

You want to keep making the timings tighter until the PC fails to boot or you start seeing a drop in Read/Write/Copy speeds in Aida64 or MaxxMen2. Adjusting Primary Timings will also lower the Latency, so there should also see a drop in Latency. The Latency of about 45ns is good, but you can get the Latency to drop below 40ns. In short, you want the Primary Timings as tight as you possibly can. If you want to make sure that these timings are stable you can run a demanding benchmark like Fire Strike Ultra in 3DMark. And do a 2 hours custom 512FFT to 4096FFT stress test before working on Secondary and Tertiary Timings.
The final timings you want to adjust are tREFI and tRFC these works best if adjust as a pair be can be done separately. The tRFC timing you want to lower as much as you can a tRFC of 300 or lower is very good, but this will also depend on the motherboard and RAM kit quality. Starting with a tRFC of 450 is a safe starting point and work the tRFC down as low as you can. tREFI is the opposite of all timings, and you want this value as high as you possibly can, some overclocks have a tREFI of 65000 or higher, but those are on the high-end motherboards like the Maximus Hero XI Extreme. And an easy tREFI to have stable is 25000. Adjusting tRFC and tREFI just like the Primary Timings by adjusting them until Windows fails to boot and/or the Aida64 or MaxxMem2 benchmarks show a drop in Latency but not an increase in Read/Write/Copy speeds.

Stability Testing.
Testing the stability of your memory is key, and this will be much harder than CPU and GPU overclocking as it is more time-consuming. This is different from your initial stability testing in the overclocking process and takes hours to complete.
- Prime95: At least a 2-hour or longer stress test with big custom FFTs.
- MemTest2: At least 350% coverage on each instance.
Besides the synthetic testing, you want to run some demanding programs like games that make use of your RAM or applications such as video rendering if it is work-related. And look for stuttering in gaming, buffering speed while editing and rendering time. All in all, you want to see how your PC is doing after the overclock and that everything is fully stable.
When using Prime95, you want to run Custom Torture Test with large FFTs as shown below. 512 FFTs to 4096 FFTS and make sure you use at least 75% of your total memory capacity. So with a memory capacity of 16Gb, you want to at least run 14Gb or more. With a memory capacity, of 32Gb, you want to run at least 24Gb or more. Make sure that you leave some memory for Windows; Windows 10 needs at least 800Mb of memory. And you might want to consider running a hardware monitoring app like HWiNFO64 keeping an eye on voltages and temperatures. You want to complete at least 2 hours with no errors or longer stress test.
With overclocking any DDR4 kit comes trial and error this could present itself in BSOD, Watchdog and WHEA errors. To ensure your Windows stay healthy run CMD in Admin mode and running sfc /scannow to scan and fix corrupted files. This only takes a couple of minutes but it will ensure OS stability.

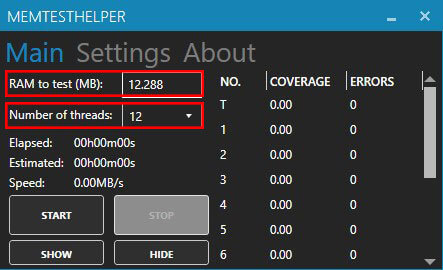
For the sake of certainty, a 2nd stress test was applied to the memory overclock using MemTest2 with MemTestHelper2 and is a highly recommend stress testing tool besides Prime95. The program MemTest2 is limited to only 2048MB per thread, and this is not the total capacity; it is the capacity used for each thread. When using an 8086k/8700k, you have six cores with 12 threads, and when using a 9900k, you have eight cores with 16 threads. So make sure you use all available threads. MemTestHelper should run at least a 350% coverage per instance, but more coverage in % per instance is better. When using MemTestHelper2, you can dial in the total capacity for RAM used for testing here you want to make sure you use 75% or more of your total capacity. Here you also want to make sure you run a hardware monitoring app like HWiNFO64 to keep an eye on voltages and temperatures.
On previous-generation CPU's from AMD on X370/B350 or X470/B360, some memory issues can occur when even running an XMP profile. You can find a separate article linked below that does not involve overclocking the RAM but adjust some minor settings to fix the problems that might occur with AMD Ryzen CPUs with QVL and none QVL DDR4 and can be found here: How to stabilize DDR4 with infinity fabric.
DDR4 Profile.
Listed here are some DDR4 RAM kit profiles with some of the timings. This is useful in case you have the same DDR4 kit while the silicone lottery still applies you can copy and paste some of the timings.
CMT32GX4M4C3466C16.
This kit from Corsair comes with a single-rank Samsung B-die and an A0 8 layer PCB and even comes with RGB. And two final stable overclock profiles were tested with a 3rd still in the works. The highest possible profile of 4266Mhz 17-19-19-38-CR2 with 400tRFC, 50000 tREFI with DRAM voltage of 1.465v, VCCIO and VCCSA voltages of 1.25v but failed the longer stress test of 2 hours and returned an error. Possible due to the fact B-die has instability issue's when reaching a temperature over 50c. In stress testing temperatures reached 58c on the inner 2 DIMMs.

The 2nd overclock profile was an attempt to get tight timings first and foremost and see what the highest possible frequency would be. This profile runs 3600Mhz 15-15-15-30-CR2 with tRFC 350, 50000 tREFI with a DRAM voltage of 1.45v and VCCIO and VCCSA voltages of 1.175v. This overclock profile passed the 2-hour Prime95 Custom FFTs test.

The 3rd profile is used as a daily driver and was the best possible trade-off in voltages, memory frequency and timings. This profile runs 4000Mhz 17-17-17-34-CR2 with tRFC 300, 60000 tREFI with a DRAM voltage of 1.45v and VCCIO and VCCSA voltages of 1.2v. This overclock passed a 2-hours Prime95 Custom FFTs and MemTestHelper2 350% coverage stress test.

The 4th profile is on an X570 ASUS Crosshair VIII Hero combined with a 5800X and runs a frequency of 3800Mhz with 16-16-16-32 timings, Command Rate 1 with a 1:1 Infinity Fabric of 1900Mhz with a DRAM voltage of 1.45.

F4-3466C16-8GTZR.
This kit from G.Skill comes single rank Hynix C-die(CJR) and an A1 10 layer PCB with RGB. And has these stable overclock profiles tested. The highest possible frequency runs 3800Mhz 18-20-20-40-CR2 with tRFC 500, 50000 tREFI with a DRAM voltage of 1.45.

The 2nd overclock profile is an attempt to lower the timings to gain performance with memory frequency being secondary. This profile runs 3200Mhz 15-17-17-34-CR2 with tRFC 450 and 50000 tREFI with a DRAM voltage of 1.40v.

F4-3200C14D-16GTRS
A G.Skill Royal kit that comes with single rank Samsung B-die on an A0 10 layer PCB with RGB. This kit has several stable overclock profiles tests. The 1st profile is on an X370 motherboard with a Ryzen 2600. Opting for real tight timings on the XMP frequency of 3200Mhz 12-12-12-28 CR1 with tRFC of 300 and a DRAM voltage of 1.5v.

The 2nd profile is Intel-based and centres around getting the highest possible frequency with the tightest timings. This profile runs 4000Mhz 16-16-16-34 with a 300 tRFC, 65535 tREFI with a DRAM voltage of 1.475v.

F4-3600C15D-16GTZ.
The go-to G.Skill kit when it comes to DDR4 overclocking with Samsung B-die has no RGB just a beefy heatsink. The highest possible profile and this was on a mid-range Z490 motherboard was 4200Mhz 15-15-15-30-CR2 with tRFC of 310, and 65000 tREFI with a DRAM voltage of 1.50v.

The 2nd profile was set to get very tight timings with the highest possible frequency. Even on a mid-range Z490, this is far easier and the overclock was locked in at 3800Mhz 13-13-13-28-CR2 with tRFC of 310, 65000tREFI and a DRAM voltage of 1.5v.

BLS16G4D32AESB.M16FE.
This kit comes with a dual-rank Micron E-die and a B1(Dual Rank IC PCB) PCB without RGB. And has two stable overclock profiles tested. The highest possible frequency profile runs in 3700Mhz 16-19-19-38-CR1 with tRFC 560, 28800 tREFI with a DRAM voltage of 1.45v.

The 2nd overclock profile is a to try to get the timings as tight as possible with memory frequency a secondary. This profile runs 3333Mhz 14-17-17-34-CR1 with tRFC 515, 11430 tREFI with a DRAM voltage of 1.45v.

- Good luck!