- Tech, OC'ing, SEO and more
- Hits: 35923
Article Index
PWM Signal, PWM Hub, and Heat Management:
You might want to consider making RPM profiles or setting RPM ranges in the BIOS this would require either 4 pin PWM connectors or a PWM hub. A PWN hub will allow for 3 pin as well as 4 pin connectors to be used but will read the PWM signal and set voltage accordingly to all connecting fans. If you have a wider assortment of 4pin PWM connectors splitter cables could work just as good but it would require you to tune each PWM/RPM profile. The PWM hub in the Phanteks Enthoo Luxe is included there are aftermarket PWM hubs you can buy, be sure to check your motherboard specs when adding fans. In my case, the ASUS Prime B350 Plus has 3 x 4pin PWM headers, all giving a PWM signal some cases the 4 pins might not offer a true PWM signal. Check again if these are 4pin PWM connectors or normal 3pin connectors and that all if not some offer a true PWM signal from the motherboard.
There are 3 more options for setting your fan RPM, a program called Fan Speed what works great if your motherboard is supported. However, not all motherboards are included and I could not get it to work with the AMD Ryzen platform it will simply not read the BUS info correctly. The 2nd option would be setting your fan speeds through your bios a common workaround if no software offers a good solution. Simply reboot and head into your BIOS settings and look for Q-Fan settings to set your fans accordingly. The 3rd option is installed a Fan Controller in one or more of the front panels slots and offers full control that way, a good option for Q-fan or Fan Speed. I go into greater details regarding the above-mentioned options in my first article here if you are unsure what your best option would be.
My current setup is my back 120mm fan is a PWM fan with 4 pin connector straight to the motherboard. My fan hub is connected to the CPU PWM connector and has the pull fan on the first hub connection followed by the push fan on the second connection. Then I have 4 connections left for 6 more fans with the front 2 x 120mm fans as well as 2 x 140mm top on splitter cables. Leaving me with 1 PWM connector from the motherboard I am considering using with testing a CPU water cooling setup for my next article. A caution here though since connecting to many fans to a hub might lower the RPM since that is regulated with voltage, each hub as a total voltage output. Going over the total output will not fry your hub merely limit the RPM due to the total voltage ceiling your hub has to ensure your fans stay under the total limit. Either use a 2nd PWM HUB or use more of the PWM connector you might give on your motherboard to prevent limited cooling performance.
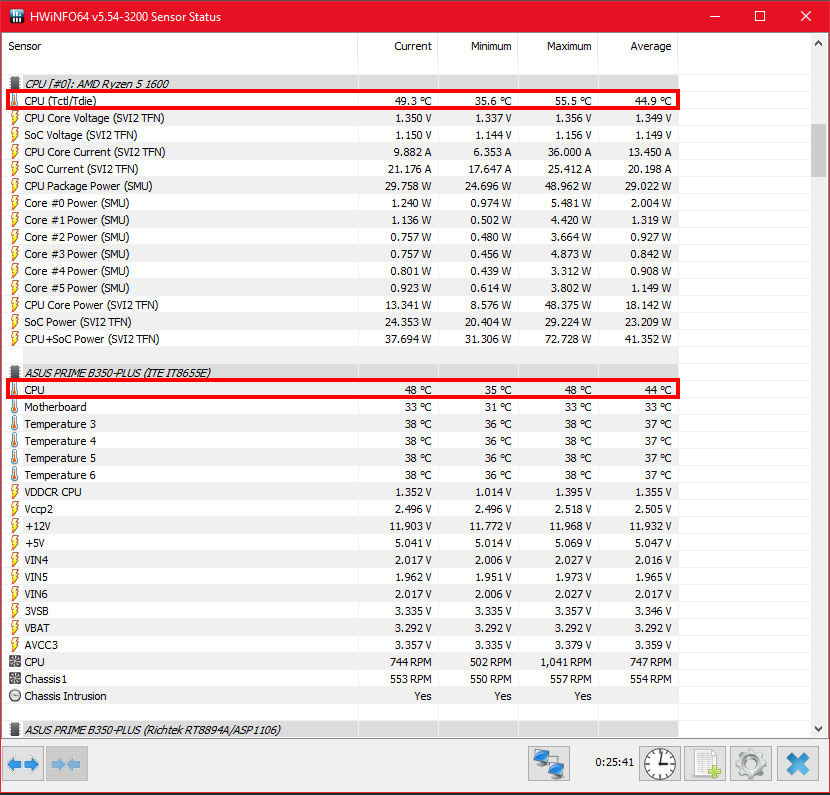
Also, an important note is that the motherboard PWM signal relays the temperature from the chip socket, not the chip diode! The socket diode will always show a lower temperature measurement then the CPU diode since the CPU diode is closer to the heat source. For a proper temperature measurement use the program called HWiNFO64, or use more advanced measurement tools if you have those at your disposal. CPU (Tctl/Tdie) is the diode located inside the chip, CPU is the diode in the socket, below a screenshot to illustrate with red outlining. Furthermore, the diodes are not optimal calibrated so temperatures could be off slightly from chip to chip, nothing can be done about this. It will not harm or damage your CPU or motherboard since there are safety thresholds in place to prevent that.
For my personal preference, I want little to no noise when listening to music, typing, browsing or doing some editing on my web page. Therefore my ASUS Suite 3 RPM profile is set in such a way that within a certain temperature range the fans will spin at low speed. And will ramp up the fans when putting the system under load when gaming, rendering or performing tests with Prime95 or similar programs. As with finding the low noise limit under no to little load, the noise limit in your gaming sessions is also important to ensure your fans offer enough cooling. But with either a headset or speakers the noise of your fans will be hard to hear unless they ramp up to 100%, in this case, find the median temperatures. And set your fans RPM accordingly, this will take some time and I have been tinkering with my settings for weeks now.


