Samsung Galaxy J6(2018) guide to Root and Custom ROM.
This will be a guide on how to root and install a custom ROM on a Samsung Galaxy J6 2018. Before you start with this guide remember to back up your files such as photo's etc. Also included in this guide will be to revert the phone to stock using the factory ROM from Samsung. Also, make sure you have about 50% battery left to ensure the J6 will not shut down during this guide. And finally, it is VERY important to note rooting and installing a custom ROM will void any warranty so proceed at your own risk.
A glossary can be found here: Samsung Galaxy devices root, recovery and custom ROM FAQ.
Preparations.
Firs your Samsung J6 need to be unlocked using the following steps to enable USB debugging and OEM Unlock by following these steps.
- Go to Settings.
- Go to About.
- Tap on build number 7-10 times.
- Go back to Settings and select "Developer Options".
- Select USB Debugging first and then select OEM Unlock.
- The device will reset now but verify the above-named options are on.
Now to download the correct files.
- Samsung USB Drivers.
- Odin ROM Flashing.
- TWRP.
- Custom ROM that works with TWRP and a Samsung J6, A7 port, A8+ port, S8+ port.
- RMM State Bypass.
- no verity opt encrypt.
Installing TWRP.
Copy files to your phone or SD card, Oreo ROM, forced encryption disabler, RMM State Bypass and, no verity opt encrypt. Power down your Samsung J6. Now boot into Download Mode by holding Volume Up and Volume Down and plug in the USB cable at the same time WITHOUT hitting the power button. This will Boot your Samsung J6 into Download mode and do the following steps.
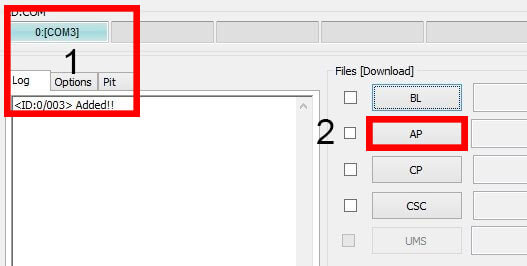
Open Odin flashing tool after extracting it into a folder of your chosen location. Your phone should be in download mode make sure you select Continue to activate the download mode so Odin can detect it. Under options in Odin make sure F.Reset Time is selected, and make sure Auto-Reboot is turned off. Now click on AP and select the TWRP *.tar file and let it load. Now click Start, it will say pass in green in the top left of Odin. Now the important step you will need to power down your device and directly boot into TWRP so read the following steps before attempting.
- Press and hold Power + Volume Down.
- Directly press Power + Volume Up as soon as the screen blanks.

Using TWRP.
Now it is time to prep the Samsung J6 with installing the previously mentioned files to safely install a custom ROM.
- Select Install
- Select RMM-State_Bypass_Mesa_v2
- Swipe to install.
- Wait for the install to complete.
- Select Install.
- Select no-verity-op-encrypt.
- Swipe to install.
- Wait for the install to complete.
Installing a custom ROM.
Just stay in TWRP and it is time for the final steps fist you need to clean the Samsung J6 in order for the custom ROM to work. First, some folders need to be wiped so head select Wipe in the TWRP home screen.
- Select Wipe.
- Select Advanced Wipe.
- Tick system.
- Tick data.
- Tick dalvik & cache.
- Tick cache.
- Swipe to wipe.
Now head back into the TWRP home screen and select install and select the custom ROM and swipe to install. Now reboot your phone by selecting Reboot in TWRP and select System. Depending on your custom ROM there will be some options most important here is that you use Magisk with the correct kernel. Also important to note booting the first time may take up to 20 minutes, select your language and reboot TWICE. The main reason to use Magisk it will still allow banking apps etc to work over SuperSU so you will retain the full functionality of your phone.
S8 Port, use the Phoenix or Stock kernel with Magisk.
A8 Port, Use the Phoenix or Stock kernel with Magisk.
Soft Brick & Hard Brick.
This may happen but in the case of a soft brick, you will be able to power down the phone and repeat the above steps Using TWRP. When your device is hard bricked it will stay in a boot loop and the Samsung logo will keep flashing other than the up to 20 minutes first boot time. In this case, you will have to drain the battery when the device powers down then charge the battery to 1% to 2% and hold Volume Up + Volume Down and insert the USB cable to enter download mode and flash TWRP again. Steps are the same as mentioned above.
Check out my other guide for Rooting the Samsung Galaxy A3, A5, and A7 here: Samsung A3/A5/A7 2017 Root & Android Oreo 8.0 OS upgrade Tutorial. And my guide for installing TWRP through Odin and root access with Magisk here: Guide to custom recovery and root on the Samsung Galaxy series.
- Paul "HisEvilness" Ripmeester
